TeamViewer ONE's Resolution Center provides a centralized view of issues that need attention within your organization. Using Cases, teams can track progress, assign ownership, and manage resolution activities from a single location. Each Case contains the information, actions, and history related to a specific issue, helping teams stay organized and work more effectively throughout the resolution process. All activities logged are automatically captured, providing a complete record of investigation and remediation efforts.
Note: The Resolution Center is currently only accessible via the web app.
This article applies to all TeamViewer ONE Standard and Advanced license holders.
What's new
Case Management
The Resolution Center provides structured visibility into all cases raised across your organization, separating open and closed cases into dedicated views. Each case includes key details such as status, severity, impact, and category, allowing your support team to gauge urgency and understand the nature of the issue at a glance. This layout helps streamline triage, track case progression, and ensure that nothing falls through the cracks.
New permissions
The Resolution Center provides four new permissions:
- View Permission: Allows users to access the Resolution Center and view Cases/related information.
- Create Permission: Allows users to create new Cases.
- Edit Permission: Allows users to modify existing Cases and their properties.
- Delete Permission: Allows users to delete Cases permanently.
Cases
Cases are the foundation of the Resolution Center. They provide a structured way to organize, track, and manage work related to a specific issue from initial investigation through resolution. By centralizing relevant information, activities, ownership, and impacted devices in a single location, Cases help teams collaborate effectively, maintain visibility, and keep a complete record of the actions taken throughout the resolution process.
Note: One device can be associated with multiple Cases. Similarly, multiple Cases can be associated with one device.
Manual Case creation
Manual Case creation provides a structured way to track and manage work throughout its lifecycle. Each Case serves as a central location for the information, ownership, and activities related to a specific issue. Teams can use Cases to define severity, assign responsibility, track progress, and document investigation and remediation efforts.
When creating a Case, users can define:
- Title
- Description
- Assignee
- Status
- Severity
- Impact
The Impact field helps identify the devices affected by the issue. Impacted devices can be added or removed at any time after the Case is created, allowing the Case to evolve as business needs change.
How to create a Case
- Navigate to Resolve in the left sidebar of TeamViewer ONE or the web app.
- Select the Resolution Center.
- Click +Add Case in the upper right corner.
The tabs below break down Cases into their individual sections. Click each tab for more information.
- Case Overview
- Activity Log
- Notes
Case Overview
Case Overview provides a centralized view of the information needed to understand and manage a Case. Designed to surface the most relevant details at a glance, it helps users quickly assess the issue, understand its impact, and track progress throughout the investigation and remediation process.
Case Overview includes:
- The issue being addressed
- Impacted devices
- Ownership
- Priority
- Status
- Activities performed during investigation and remediation
By bringing this information together in a single view, the Case Overview helps teams maintain visibility, coordinate efforts, and stay aligned on the current state of the Case. It also provides a complete record of activities throughout the Case's lifecycle, making it easier to review investigation and remediation efforts when needed.
Case fields
Each Case in the Resolution Center provides the following information in its own field:
Activity Log
The Activity Log provides a complete history of actions performed within a Case. It serves as a centralized record of the investigation and remediation process, helping teams maintain visibility into completed work and the Case's current state. The Activity Log helps users understand:
- What happened within the Case
- What action was performed
- When the action occurred
By capturing all relevant activities in a single timeline, the Activity Log creates a clear record of the actions taken throughout the lifecycle of a Case. This makes it easier to review progress, track changes, and understand the sequence of events that contributed to the investigation and resolution of an issue.
Tracked activities
The Activity Log captures key actions and updates throughout the lifecycle of a Case, providing a centralized record of changes, investigations, and remediation activities. Maintaining a complete history of events helps teams understand how a Case has progressed over time and provides valuable context when reviewing past work. The Activity Log records:
- Case creation
- Status updates
- Assignment changes
- Device additions and removals
- Notes
- Remote Control sessions
- Script deployments
As the primary source of historical context for a Case, the Activity Log supports collaboration across teams, simplifies troubleshooting, and helps ensure a smooth handover when ownership changes or additional contributors join.
Notes
Notes provide a way for collaborators and subject matter experts to capture important information throughout the lifecycle of a Case. They can be used to document findings, record decisions, share progress updates, and preserve additional context relevant to the investigation or resolution process.
By maintaining notes within the Case, teams can keep information centralized and accessible to everyone involved. This helps improve collaboration, reduces the need to track information across multiple systems, and ensures that valuable context remains available as ownership changes or additional contributors become involved. Users can add a note at any time while working on a case.
How to add a Note
To add a note to a Case, click the +Add Note button in the upper-right corner. Enter the desired notes in the text field, and then click Save. Once added, notes are visible for all users.
How to review Notes
All notes remain attached to the Case, ensuring important information is preserved and accessible to all collaborators. To review a note, open the case and navigate to the Notes tab.
Quick Actions
Quick Actions allow users to leverage TeamViewer capabilities directly from within a Case. By providing access to key tools without leaving the Resolution Center workflow, Quick Actions help streamline investigation and remediation efforts while keeping all related activity connected to the Case.
Actions initiated through Quick Actions are automatically recorded in the Activity Log, creating a complete history of the work performed and helping teams maintain visibility throughout the resolution process.
By making commonly used capabilities available within the Case, Quick Actions help reduce context switching, improve efficiency, and ensure that investigation and remediation activities remain closely tied to the issue being addressed.
Currently supported Quick Actions include:
- Remote Control
- Script Deployment
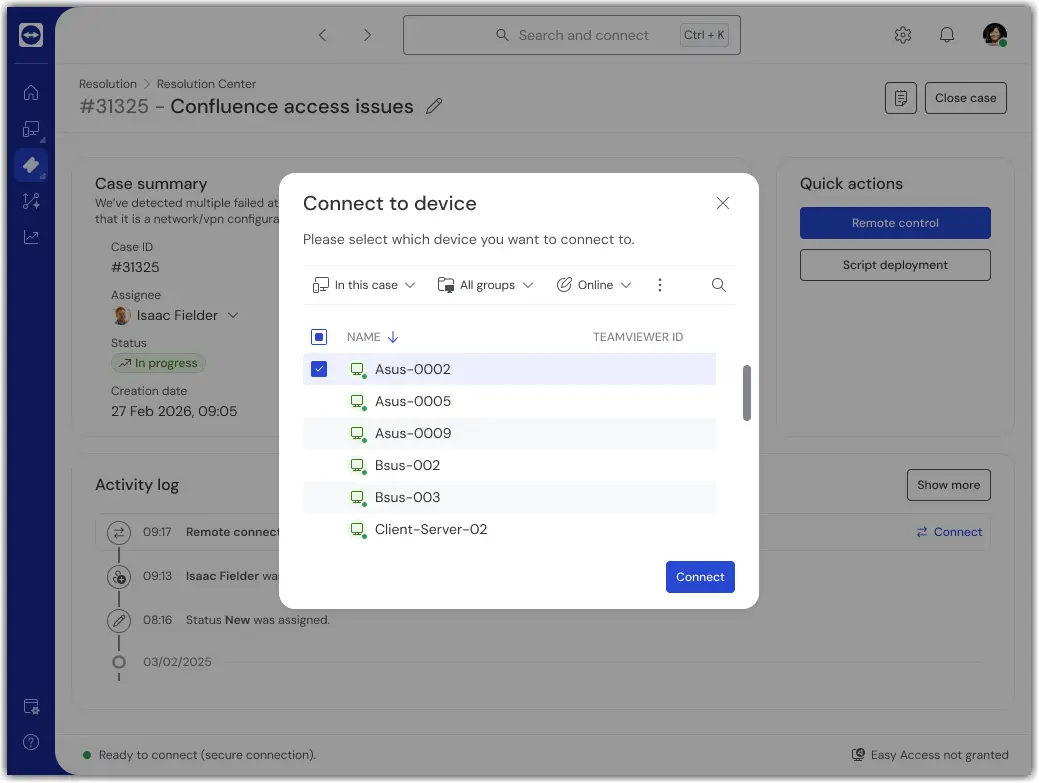
- Remote Control
- Script Deployment
Remote Control
TeamViewer ONE's Resolution Center lets you initiate a TeamViewer session directly, with the same level of access and support as all TeamViewer connections. This ensures no time is wasted resolving Cases.
How to initiate a remote control session from a Case
- Open the Case.
- Select Remote Control.
- Choose one of the impacted devices.
- Start the Remote Control session.
If Session Insights are available, links to the generated session information can also be accessed through the Case context.
Script Deployment
Along with Remote Control, TeamViewer ONE offers remote Script Deployment directly from the Resolution Center, allowing resolutions that do not require connecting to the device to be performed just as easily.
How to deploy scripts from a Case
- Open the Case.
- Select Script Deployment.
- Choose one or multiple devices from the impacted device list.
- Select the script to deploy.
- Start the deployment.
All Script Deployments are automatically recorded in the Activity Log. Deployment information includes:
- Script name
- Deployment status
- Deployment result
This allows users to understand exactly what remediation actions were executed as part of the Case.