Spatial Workplace is an application that allows users to visualize pins and their information over real-life objects. Its installation is available on a Microsoft HoloLens 2, iOS devices (iPhones and iPads), Android devices, and desktop devices.
- Spatial Workplace for iOS
- Spatial Workplace for Android
- Spatial Workplace for Desktop
Basic actions
Pairing the app with the server (first-time use)
When opening Spatial Workplace mobile app for the first time, you need to pair it with the right server instance. This ensures the correct syncing of the necessary data.
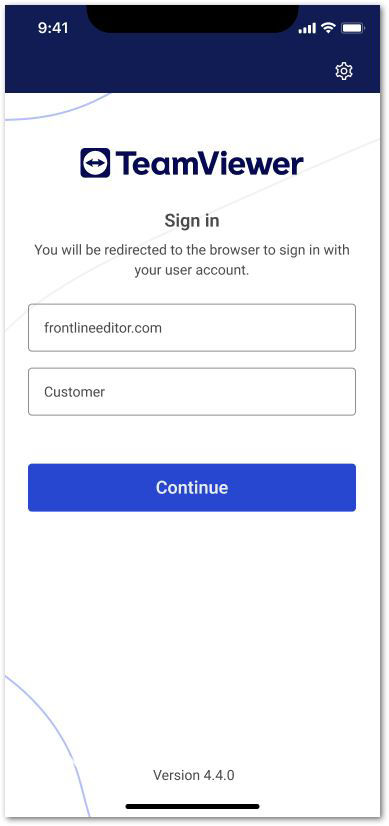
- Enter the company link provided by your administrator.
- Enter the domain name provided by your administrator.
- Tap on Continue.
Signing in to the app
After pairing, you will be directed to the Single-Sign-on page in a web browser.
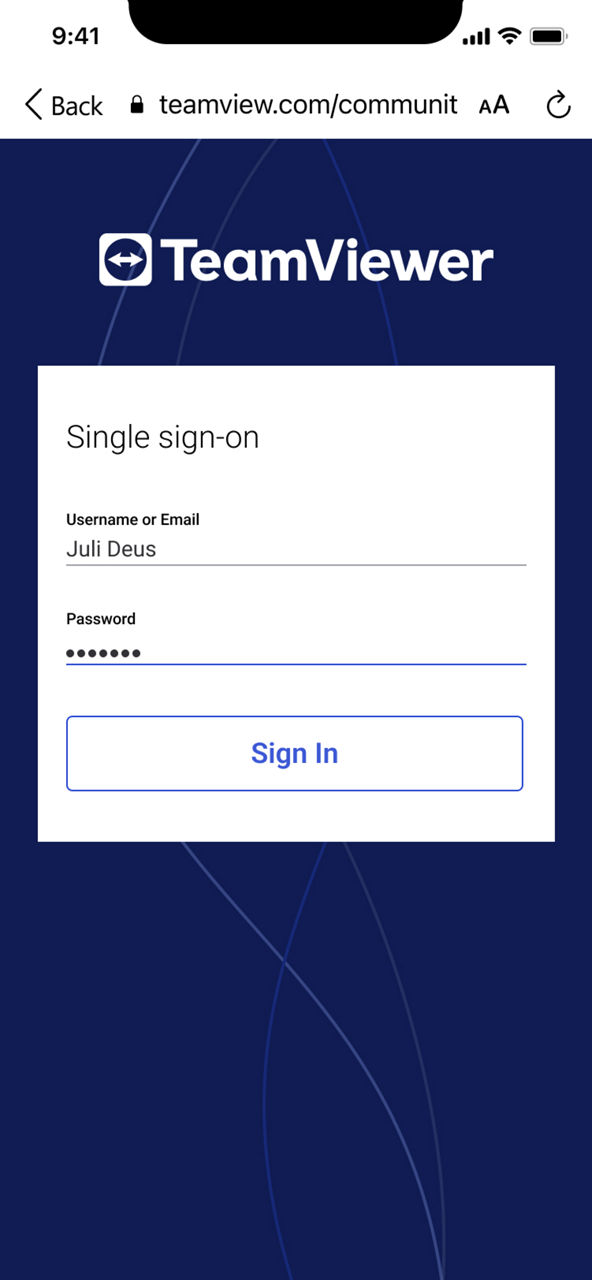
To sign in:
- Enter the username and password provided by your administrator.
- Tap on Sign In.
Signing out of the app
- In the top-right corner, tap on the Settings button.
- Tap on Logout.
- Tap on Ok!.
Changing the paired server
Re-pairing the app after logging out is possible by entering your credentials manually for alternative licenses and permissions.
To change the server you have paired previously:
- Sign out of the app.
- Tap on Edit Configuration.
- Enter the new company link and domain name provided by your administrator.
- Tap on Confirm.
User interface
Status bar
The status bar is located at the very top of the Spatial Workplace mobile app. It informs you about the overall status of your device. You can see the connection status, search for tasks and templates, and access the app settings.
Navigation section
The navigation section is located at the very bottom of the Spatial Workplace mobile app. It gives you access to the Task List and Templates.
Task List screen
The Task List shows all the tasks assigned to the user. Here you can download and execute tasks.
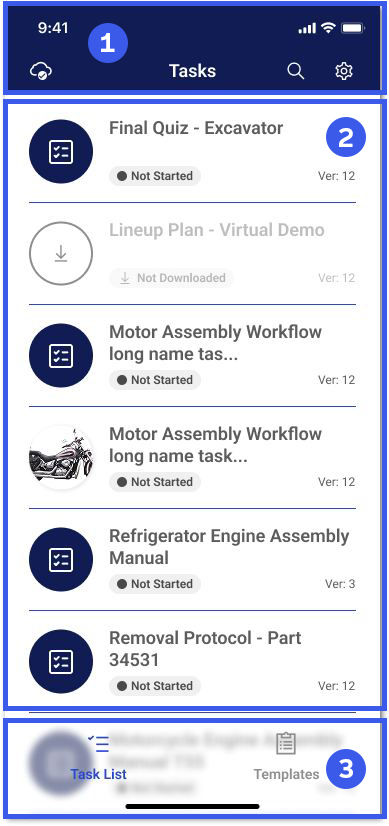
- Status bar
- Task List screen
- Navigation section
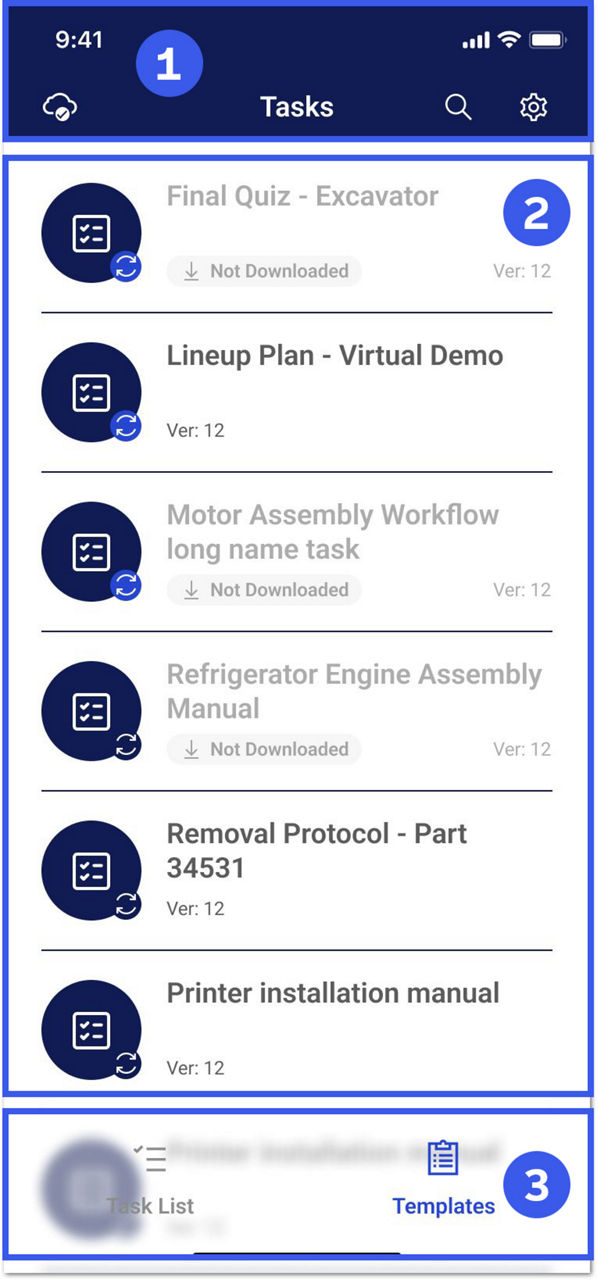
It is possible to manage this list by removing the downloaded tasks. To delete a downloaded task from Task List:
- Long press on the screen, this will make the selector options appear.
- Select the task/tasks to delete.
- Tap on Remove on the top-right bottom.
- Confirm the removal.
Note: Only the downloaded tasks can be deleted.
After removing a task from the list, it will be shown as Not-Downloaded. It is possible to re-download that task later, as these tasks are still assigned to the same user.
Templates screen
The Templates lists all the assigned templates to the user. Here you can download and execute templates.
- Status bar
- Task List screen
- Navigation section
It is possible to manage this list by removing the downloaded items. To delete a downloaded template from the Templates List:
- Long press on the screen, this will make the selector options appear.
- Select the template/templates to delete.
- Tap on Remove on the top-right button.
- Confirm the removal.
Note: Only the downloaded templates can be deleted.
After removing a template from the list, it will be shown as Not-Downloaded. It is possible to re-download that template later, as these templates are still assigned to the same user.
Tasks
Tasks are used to assign workflows to the users. When you tap on a task, you can view the details such as planned date, by whom it is created by, and tags etc. From there, you can start a task simply by tapping on the Start Task button.

Alternatively, open a specific workflow using your device's camera:
- Open Frontline Command Center.
- Go to Tasks and find the workflow to open on the device.
- Click on Print QR Code.
- Point the camera of your device to the QR code.
⇒ By opening the link, the application opens automatically and runs the selected workflow.
Note: If the user is not assigned to the selected workflow, the application will open the main menu.
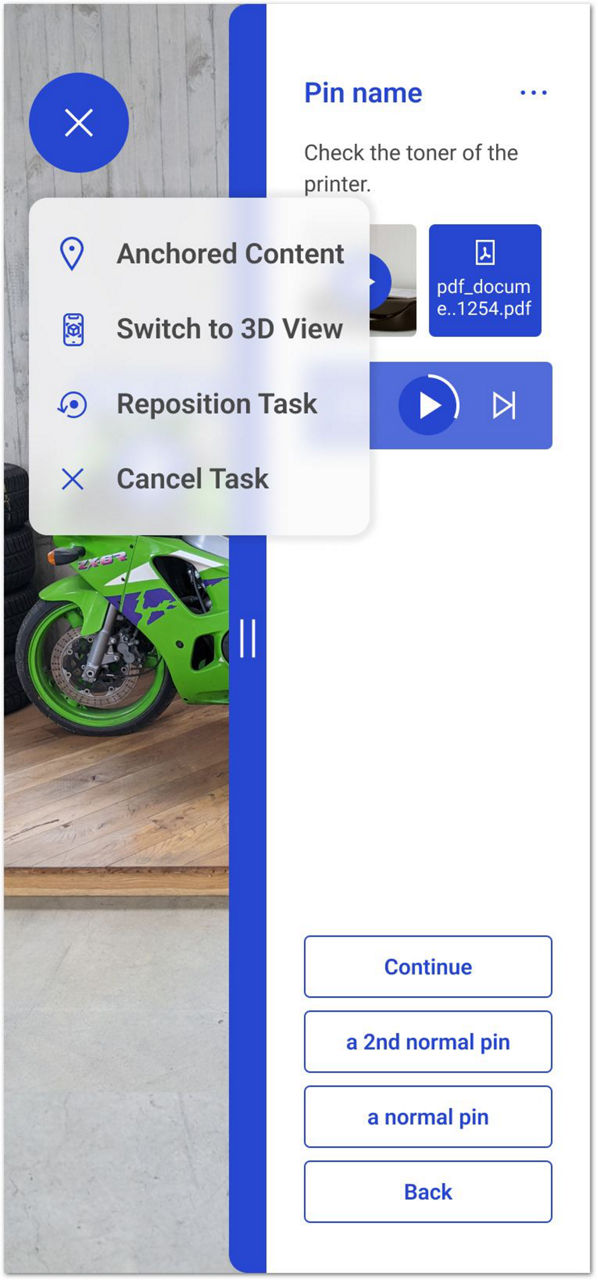
Cancelling a Task
It is possible to cancel a task with a given reason. Within your workflow:
1. Tap on the Workflow Menu.
2. Select Cancel Task.
3. Choose a reason from the list; for example, Made a mistake.
4. Tap on Yes.

Workflow Navigation
On mobile devices, there is the option to see the pins and content of a workflow through different views. The flat and anchored content modes are two possible ways of visualizing the content of pins in AR. The user can switch between the views and content displays using the workflow menu on the top left.
Workflows are shown in the flat content mode by default. This means you can tap on the screen to select icons and buttons.
If the workflow is displayed in anchored content mode, a selection cursor appears in the middle of the device. The cursor can be moved by moving the device around. Users can trigger buttons by pointing their device's viewpoint at the buttons so that the cursor lies over it. Once over the button, a red loading circle appears around the button. Wait until the bar completes the turn to select it. The user can speed up the process by touching the button while it is loading.
AR overlay view
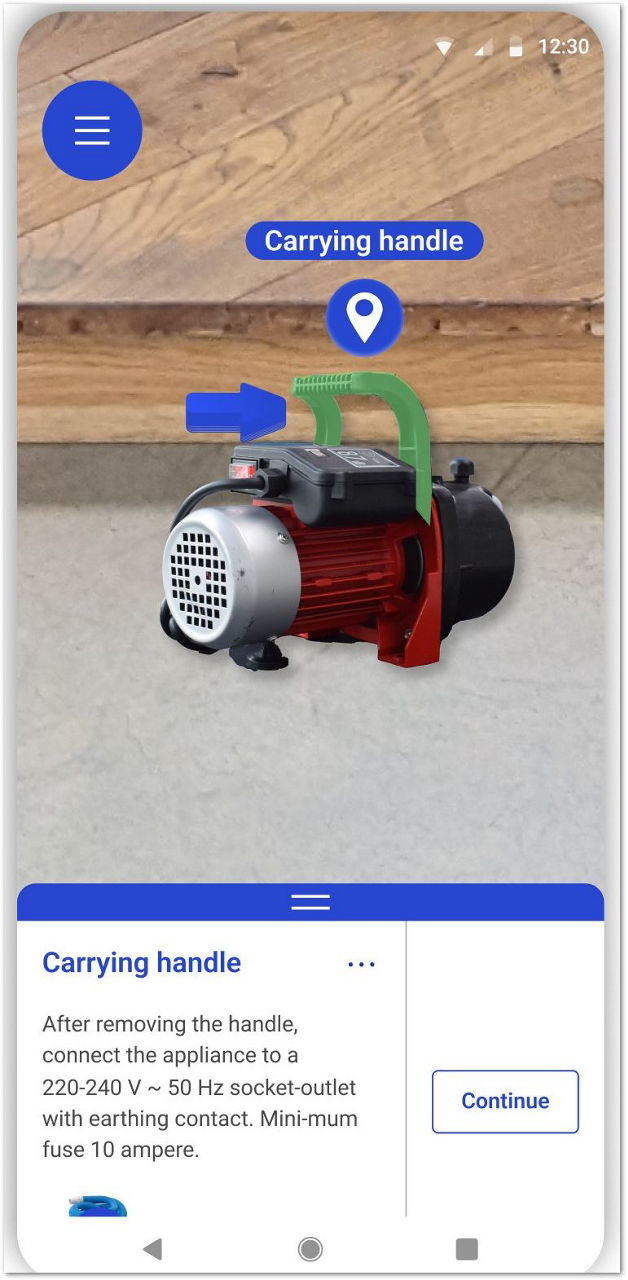
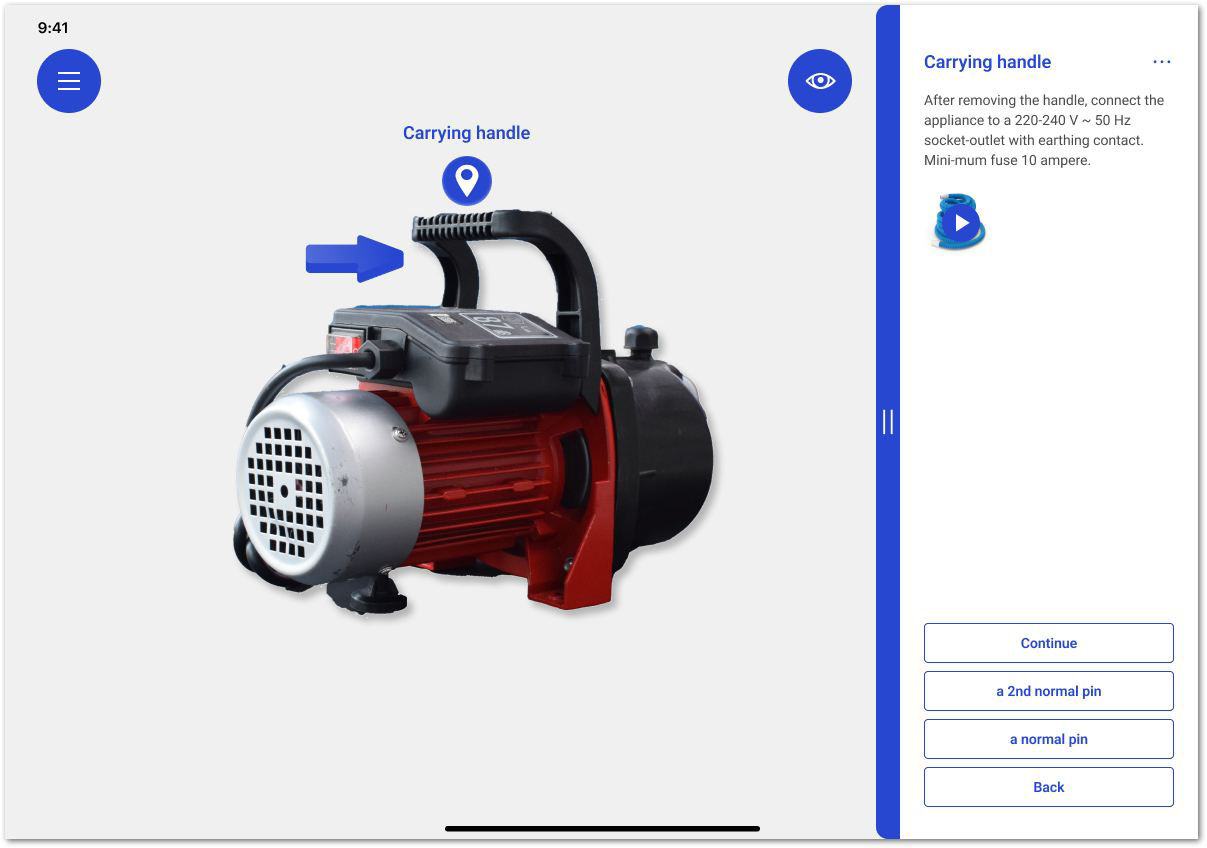
The AR overlay view is the default way of presenting pins in augmented reality over the real component. The pin shape will always be presented in the exact position in relation to the spatial reference. The content can be displayed as flat or anchored. Flat content displays the information of the pins in a menu on the right side of the screen in a static way. Anchored content displays the information in a banner next to the actual position of the pin and moves vertically, following the user's movement.
Flat content:
Anchored content:
3D Model view
The 3D model view, on the other hand, gives the user the possibility to see and handle the workflow in a virtual environment that is independent of the physical world. There is no necessity for a Scene State node or a hologram to be visible at a certain step for the user to be able to go to the 3D view.
To open the 3D model view, select Show in 3D from the Workflow menu.
This option is available for all pins that contain at least one hologram or have scene states visible.
To return to the AR view or flat content, select Show in AR while in the 3D view.
Within the 3D view, users can access a menu offering several display-related options.

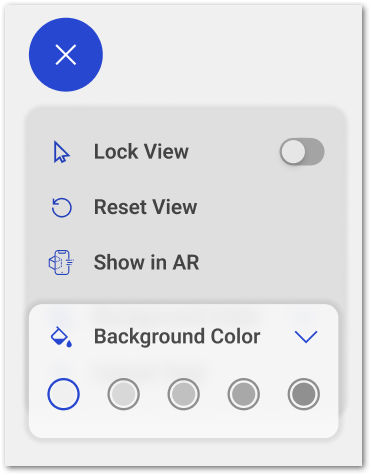
Changing the 3D View Background Color
This feature is useful when the default background closely matches the color of the model or its components, making it difficult to distinguish elements clearly. To improve visibility and avoid confusion, users can select from five predefined background colors. These options are designed to enhance contrast and support better visual clarity during 3D workflows.
Controlling the model inside the 3D model view
Steps that contain Holograms can also be visualized inside the 3D model view, which allows for handling the holograms in more detail and separately from the real-life environment. Open the top menu during a step with holograms and select See in 3D.
- Turning the model around its axis: Touch the screen with one finger and move it around.
- Zooming in and out: Pinch-zoom with two fingers, bringing them closer or further from each other.
- Dragging the model: Touch the screen with three fingers and move them around.
- 3D model view information: The 3D model view allows users to visualize holograms of pins independently from their position in the real world.
After a part of the hologram has been hidden, the eye toggle appears on the top right of the screen. Tap on it to unhide the part.
Note: The 3D model view can be used to explore the details of the hologram's model without the need to point the device to its real-life position. In this view, the remaining content of the pin (text, videos, pictures, audio, PDF) is always presented on a flat display.
Navigating with Menus inside the workflow
You can easily navigate inside the workflow with the Menu options.
By tapping on the sections, you can step into the desired part of the workflow.
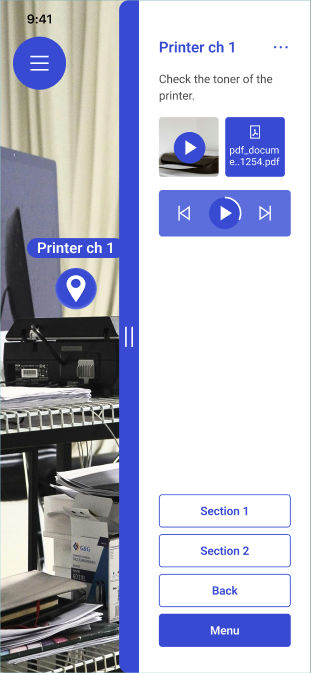
The highlighted Menu button shown here has an index functionality. It will only appear when the user has passed through previous menus, and will include all past menus.
You will return to the previous state when you close the menu options.
Positioning workflow content
To place the content of the workflow in real life, the user needs to scan their surrondings by following the instructions given.
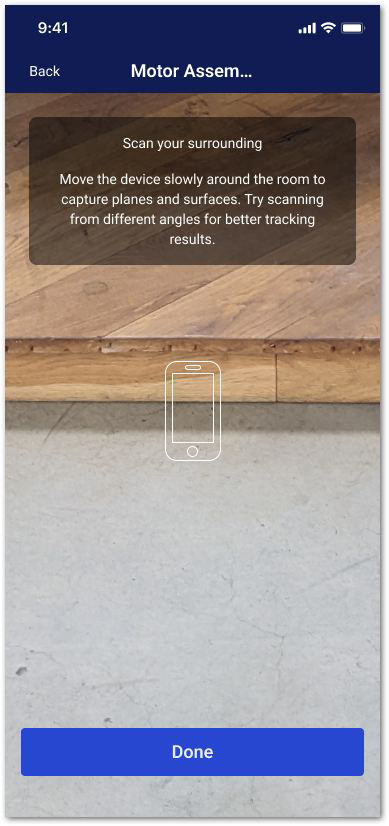
Later on, you need to perform specific actions depending on the spatial reference (markers, or object tracker) used in the workflow.
Workflows with markers
After finishing the surronding scanning, the marker scanner appears. On the top, the marker IDs are activated to start the workflow. The device's camera will open in the background and the user can focus on the chosen marker to display the first pin.

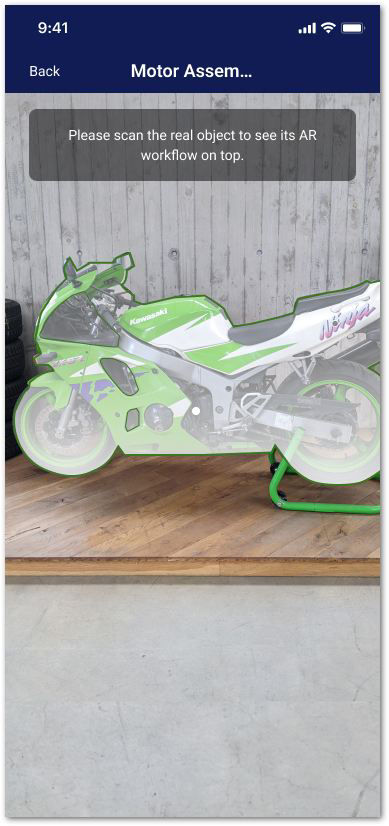
Workflows with object tracker
After finishing the surronding scanning, the hologram of the initial pose of the object appears. The device camera opens in the background and the user can position the object inside the outline until loading is completed.
Changing the initial pose: To change the initial pose of the object, change the position of the object tracker in relation to the model inside your Spatial Editor project.
Workflow with model placement
After opening the workflow, the camera of the device opens in the background and users can move their device around to find a flat surface (e.g., a floor or a table). Recognized surfaces will be marked with white dots.
To adjust the position and rotation of the model:
- Tap on the screen to position the model on this surface.
- Pinch your fingers on the model to zoom in and out.
- Tap over the model and move your finger around to rotate it.
- Tap outside the model, on a free surface, to reposition it.
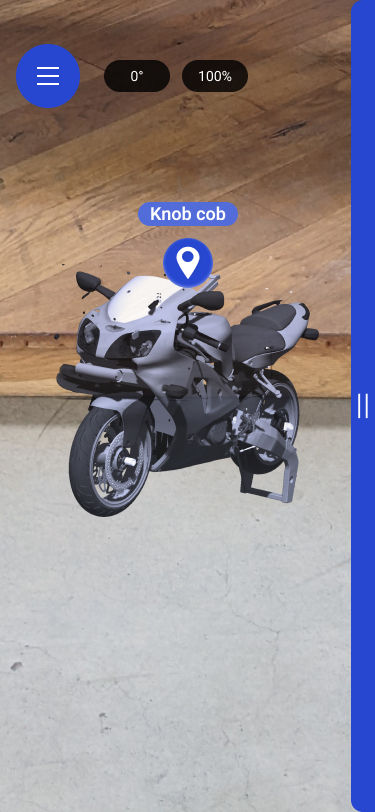
It is also possible to reposition and rotate the model during the execution of the workflow. Users can rotate the model, rescale it with pinching in/out, and move it up and down with a three-finger hold. The degree values and percentage of scale are visible while making adjustments.
Note: Readjustments are possible only if the model has been made visible with a scene state node in the workflow with proper adjustments. Please see this page about how to make models visible using scene states.
Adding comments to a Pin
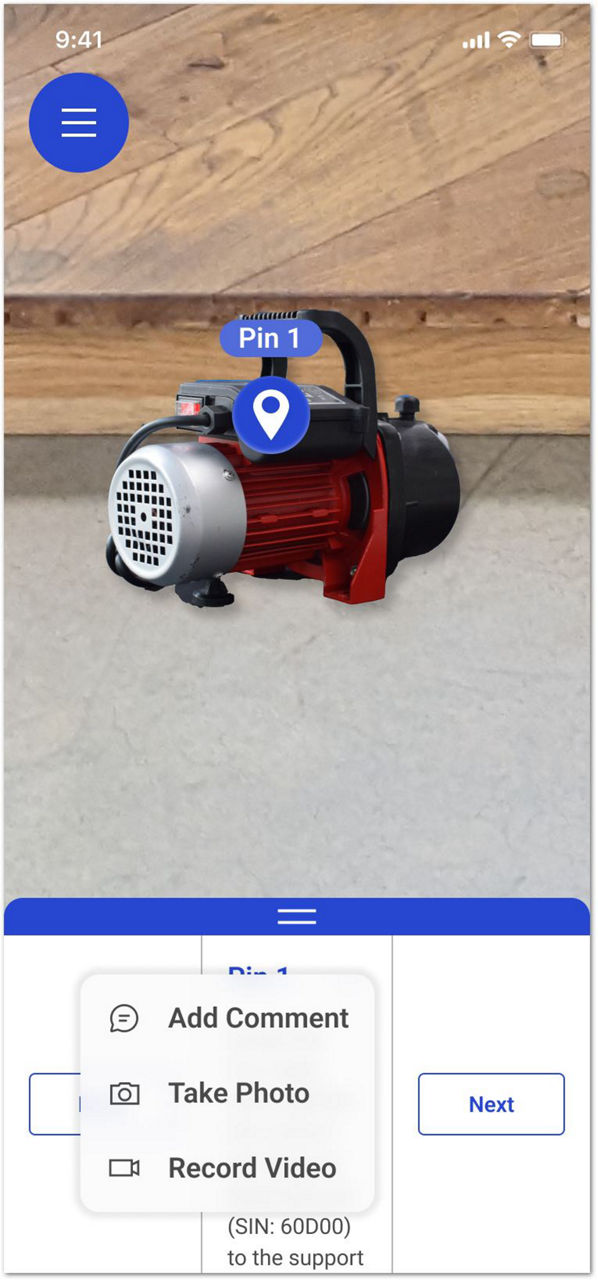
It is possible to add comments to a Pin.
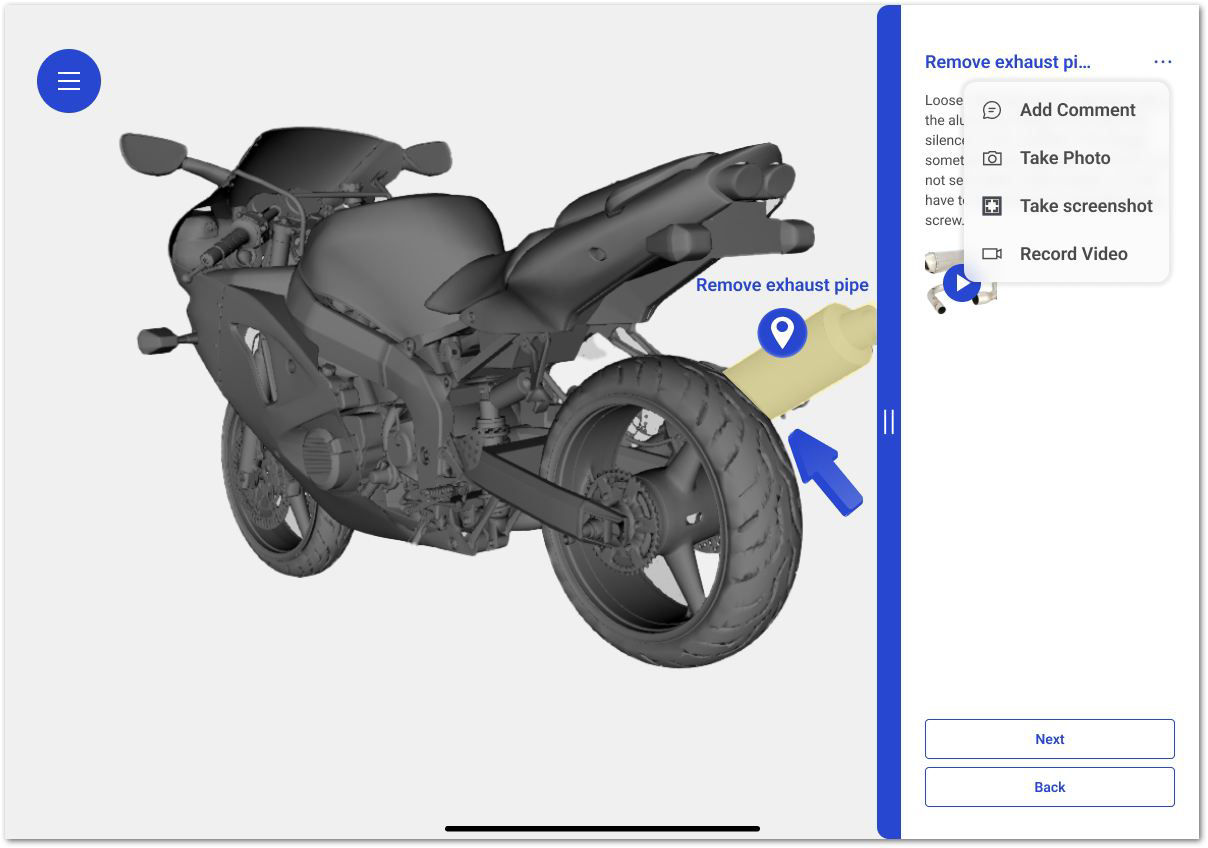
Tap on the More button (3 dots) in the top-right corner. You can choose from the menu to type your comment or upload media.
When the user switches to 3D view, they can take a screenshot and add it as a comment to the Pin.
This option is available only when the workflow is initialized in AR from the Editor side.
Then continue with Next.
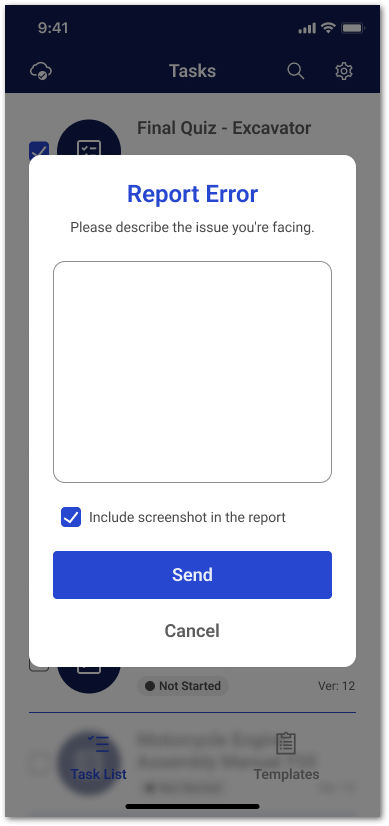
Reporting an error
When an issue arises, Spatial Workplace users can submit a report automatically or manually. This supports faster and more accurate troubleshooting by administrators.
While reporting errors manually, you can add a description, a screenshot and mention the workflow name in your report.
For reporting errors automatically, tap on the Send Report button from the pop up:
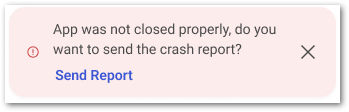
When the app restarts following a crash, an error report is automatically created.
Admins can review these reports in the Frontline Command Center, where logfiles, notes and device IDs. Here, you can view the Error Reporting section under Administration.
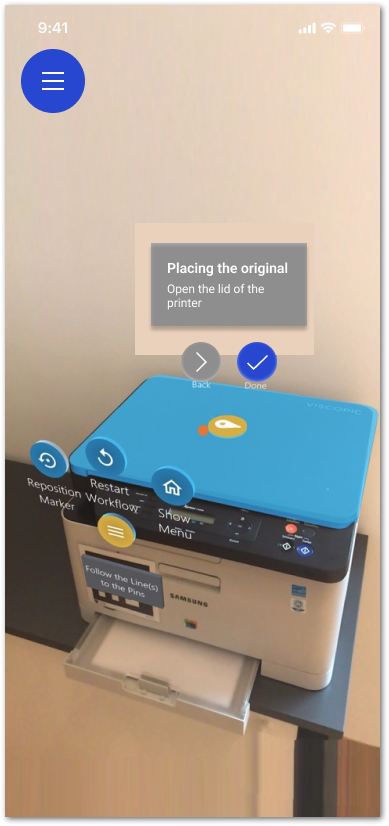
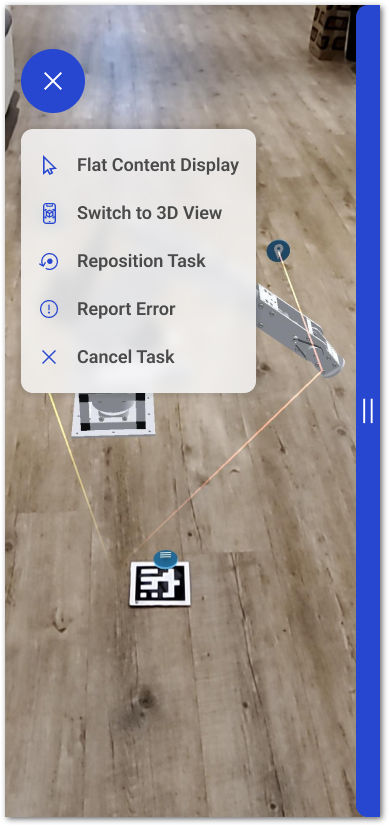
Restart tracking
If the content drifts from its correct placement during the workflow, the user can reposition the workflow and reset its spatial reference. On the workflow menu, select the Reposition Workflow option. The user is prompted to reset the spatial reference of the workflow (e.g., rescan the marker) and then the workflow continues with the previous step.
Templates
Templates are used to assign workflows to the users. From there, you can start a task simply by tapping on the template.
Alternatively, open a specific workflow using your device's camera:
- Open Frontline Command Center.
- Go to Templates and find the workflow to open on the device.
- Click on Print QR Code.
- Point the camera of your device to the QR code.
⇒ By opening the link, the application opens automatically and runs the selected workflow..
Note: The application will open on the main menu if the user is not assigned to the selected workflow.
The process for workflow navigation, AR overlay view, 3D model view, controlling the model inside the 3D model view, positioning workflow content, workflows with markers, workflows with object tracker, workflows with model placement, and restart tracking are the same as Tasks. For these details, please refer to the Tasks section above.
Custom theme applied
Custom Themes allow the user to customize the theme and appearance of Frontline Spatial Workplace application. Custom themes are configured in Frontline Command Center, for more information, please visit our Custom Themes page.
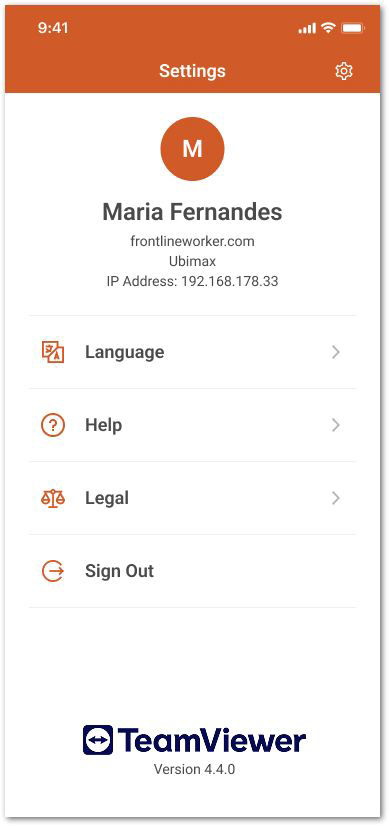
Settings and information
Changing settings
In the top-right corner of the main menu, tap on the Settings icon and change any of the following settings:
Language
Defines the language of the application. Currently supported languages are English, German, Portuguese, French, Spanish, Chinese (simplified), and Japanese.
Help
- Knowledge Base: Redirects you to the Knowledge Base web page.
- Contact: Redirects you to your default mail application to write a mail to [email protected] address.
About
- Privacy Policy: Redirects you to the Teamviewer website that contains the various privacy notices.
- Third Party Copyright: Opens the copyright information within the app.
- EULA: Redirects you to the section of the TeamViewer website that contains the EULA and the DPA.
Advanced Settings
- UI Layout: Allows you to choose where (Right side/Bottom side) text instructions are displayed in the workflow.
- Show Pin Shapes: Toggle option where you can enable Point of Interests and shapes on the 3D model.
Logout
You can logout from your account simply tapping on this option.
Basic actions
Pairing the app with the server (first-time use)
When opening Spatial Workplace mobile app for the first time, you need to pair it with the right server instance. This ensures the correct syncing of the necessary data.
- Enter the company link provided by your administrator.
- Enter the domain name provided by your administrator.
- Tap on Continue.
Signing in to the app
After pairing, you will be directed to the Single-Sign-on page in a web browser.
To sign in:
- Enter the username and password provided by your administrator.
- Tap on Sign In.
Signing out of the app
- In the top-right corner, tap on the Settings button.
- Tap on Logout.
- Tap on Ok!.
Changing the paired server
Re-pairing the app after logging out is possible by entering your credentials manually for alternative licenses and permissions.
To change the server you have paired previously:
- Sign out of the app.
- Tap on Edit Configuration.
- Enter the new company link and domain name provided by your administrator.
- Tap on Confirm.
User interface
Status bar
The status bar is located at the very top of the Spatial Workplace mobile app. It informs you about the overall status of your device. You can see the connection status, search for tasks and templates, and access the app settings.
Navigation section
The navigation section is located at the very bottom of the Spatial Workplace mobile app. It gives you access to the Task List and Templates.
Task List screen
The Task List shows all the tasks assigned to the user. Here you can download and execute tasks.
- Status bar
- Task List screen
- Navigation section
It is possible to manage this list by removing the downloaded tasks. To delete a downloaded task from Task List:
- Long press on the screen, this will make the selector options appear.
- Select the task/tasks to delete.
- Tap on Remove on the top-right bottom.
- Confirm the removal.
Note: Only the downloaded tasks can be deleted.
After removing a task from the list, it will be shown as Not-Downloaded. It is possible to re-download that task later, as these tasks are still assigned to the same user.
Templates screen
The Templates lists all the assigned templates to the user. Here you can download and execute templates.
- Status bar
- Task List screen
- Navigation section
It is possible to manage this list by removing the downloaded items. To delete a downloaded template from the Templates List:
- Long press on the screen, this will make the selector options appear.
- Select the template/templates to delete.
- Tap on Remove on the top-right bottom.
- Confirm the removal.
Note: Only the downloaded templates can be deleted.
After removing a template from the list, it will be shown as Not-Downloaded. It is possible to re-download that template later, as these templates are still assigned to the same user.
Tasks
Tasks are used to assign workflows to the users. When you tap on a task, you can view the details such as planned date, by whom it is created by, and tags etc. From there, you can start a task simply by tapping on the Start Task button.
Alternatively, open a specific workflow using your device's camera:
- Open Frontline Command Center.
- Go to Tasks and find the workflow to open on the device.
- Click on Print QR Code.
- Point the camera of your device to the QR code.
⇒ By opening the link, the application opens automatically and runs the selected workflow.
Note: If the user is not assigned to the selected workflow, the application will open on the main menu.
Cancelling a Task
It is possible to cancel a task with a given reason. Within your workflow:
1. Tap on the Workflow Menu.
2. Select Cancel Task.
3. Choose a reason from the list; for example, Made a mistake.
4. Tap on Yes.
Workflow Navigation
On mobile devices, there is the option to see the pins and content of a workflow through different views. The flat and anchored content modes are two possible ways of visualizing the content of pins in AR. The user can switch between the views and content displays using the workflow menu on the top left.
Workflows are shown in the flat content mode by default. This means you can tap on the screen to select icons and buttons.
If the workflow is displayed in anchored content mode, a selection cursor appears in the middle of the device. The cursor can be moved by moving the device around. Users can trigger buttons by pointing the viewpoint of their device at the buttons so that the cursor lies over it. Once over the button, a red loading circle appears around the button. Wait until the bar completes the turn to select it. The user can speed up the process by touching the button while it is loading.
AR overlay view
The AR overlay view is the default way of presenting pins in augmented reality over the real component. The pin shape will always be presented in the exact position in relation to the spatial reference. The content can be displayed as flat or anchored. Flat content displays the information of the pins in a menu on the right side of the screen in a static way. Anchored content displays the information in a banner next to the actual position of the pin and moves vertically, following the user's movement.
Flat content:
Anchored content:
3D Model view
The 3D model view, on the other hand, gives the user the possibility to see and handle the workflow in a virtual environment that is independent of the physical world. There is no necessity for a Scene State node or a hologram to be visible at a certain step for the user to be able to go to the 3D view.
To open the 3D model view, select Show in 3D from the Workflow menu.
This option is available for all pins that contain at least one hologram or have scene states visible.
To return to the AR view or flat content, select Show in AR while in the 3D view.
Within the 3D view, users can access a menu offering several display-related options.
Changing the 3D View Background Color
This feature is useful when the default background closely matches the color of the model or its components, making it difficult to distinguish elements clearly. To improve visibility and avoid confusion, users can select from five predefined background colors. These options are designed to enhance contrast and support better visual clarity during 3D workflows.
Controlling the model inside the 3D model view
Steps that contain Holograms can also be visualized inside the 3D model view, which allows for handling the holograms in more detail and separately from the real-life environment. Open the top menu during a step with holograms and select See in 3D.
- Turning the model around its axis: Touch the screen with one finger and move it around.
- Zooming in and out: Pinch-zoom with two fingers, bringing them closer or further from each other.
- Dragging the model: Touch the screen with three fingers and move them around.
- 3D model view information: The 3D model view allows users to visualize holograms of pins independently from their position in the real world.
After a part of the hologram has been hidden, the eye toggle appears on the top right of the screen. Tap on it to unhide the part.
Note: The 3D model view can be used to explore the details of the hologram's model without the need to point the device to its real-life position. In this view, the remaining content of the pin (text, videos, pictures, audio, pdf) is always presented on a flat display.
Navigating with Menus inside the workflow
You can easily navigate inside the workflow with the Menu options.
By tapping on the sections, you can step into the desired part of the workflow.
The highlighted Menu button shown here has an index functionality. It will only appear when the user has passed through previous menus, and will include all past menus.
You will return to the previous state when you close the menu options.
Positioning workflow content
To place the content of the workflow in real life, the user needs to scan their surrondings by following the instructions given.
Later on, you need to perform specific actions depending on the spatial reference (markers, or object tracker) used in the workflow.
Workflows with markers
After finishing the surronding scanning, the marker scanner appears. On the top, the marker IDs are activated to start the workflow. The device's camera will open in the background and the user can focus on the chosen marker to display the first pin.
Workflows with object tracker
After finishing the surronding scanning, the hologram of the initial pose of the object appears. The device camera opens in the background and the user can position the object inside the outline until loading is completed.
Changing the initial pose: To change the initial pose of the object, change the position of the object tracker in relation to the model inside your Spatial Editor project.
Workflow with model placement
After opening the workflow, the camera of the device opens in the background and users can move their device around to find a flat surface (e.g., a floor or a table). Recognized surfaces will be marked with white dots.
To adjust the position and rotation of the model:
- Tap on the screen to position the model on this surface.
- Pinch your fingers on the model to zoom in and out.
- Tap over the model and move your finger around to rotate it.
- Tap outside the model, on a free surface, to reposition it.
It is also possible to reposition and rotate the model during the execution of the workflow. Users can rotate the model, rescale it with pinching in/out, and move it up and down with a three-finger hold. The degree values and percentage of scale are visible while making adjustments.
Note: Readjustments are possible only if the model has been made visible with a scene state node in the workflow with proper adjustments. Please see this page about how to make models visible using scene states.
Adding comments to a Pin
It is possible to add comments to a Pin.
After tapping the More button (3 vertical dots), you can choose from the menu to type your comment or upload media.
When the user switches to 3D view, they can take a screenshot and add it as a comment to the Pin.
This option is available only when the workflow is initialized in AR from the Editor side.
Then continue with Next.
Reporting an error
When an issue arises, Spatial Workplace users can submit a report automatically or manually. This supports faster and more accurate troubleshooting by administrators.
While reporting errors manually, you can add a description, a screenshot and mention the workflow name in your report.
For reporting errors automatically, tap on the Send Report button from the pop up:
When the app restarts following a crash, an error report is automatically created.
Admins can review these reports in the Frontline Command Center, where logfiles, notes and device IDs. Here, you can view the Error Reporting section under Administration.
Restart tracking
If the content drifts from its correct placement during the workflow, the user can reposition the workflow and reset its spatial reference. On the workflow menu, select the Reposition Workflow option. The user is prompted to reset the spatial reference of the workflow (e.g., rescan the marker) and then the workflow continues with the previous step.
Templates
Templates are used to assign workflows to the users. From there, you can start a task simply by tapping on the template.
Alternatively, open a specific workflow using your device's camera:
- Open Frontline Command Center.
- Go to Templates and find the workflow to open on the device.
- Click on Print QR Code.
- Point the camera of your device to the QR code.
⇒ By opening the link, the application opens automatically and runs the selected workflow.
Note: The application will open on the main menu if the user is not assigned to the selected workflow.
The process for workflow navigation, AR overlay view, 3D model view, controlling the model inside the 3D model view, positioning workflow content, workflows with markers, workflows with object tracker, workflows with model placement, and restart tracking are the same as Tasks. For these details, please refer to the Tasks section above.
Custom theme applied
Custom Themes allow the user to customize the theme and appearance of Frontline Spatial Workplace application. Custom themes are configured in Frontline Command Center by Frontline Experts. For more information, please visit our Custom Themes page.
Settings and information
Changing settings
In the top-right corner of the main menu, tap on the Settings icon and change any of the following settings:
Language
Defines the language of the application. Currently supported languages are English, German, Portuguese, French, Spanish, Chinese (simplified), and Japanese.
Help
- Knowledge Base: Redirects you to the Knowledge Base web page.
- Contact: Redirects you to your default mail application to write a mail to [email protected] address.
About
- Privacy Policy: Redirects you to the Teamviewer website that contains the various privacy notices.
- Third Party Copyright: Opens the copyright information within the app.
- EULA: Redirects you to the section of the TeamViewer website that contains the EULA and the DPA.
Advanced Settings
- UI Layout: Allows you to choose where (Right side/Bottom side) text instructions are displayed in the workflow.
- Show Pin Shapes: Toggle option where you can enable Point of Interests and shapes on the 3D model.
Logout
You can logout from your account simply tapping on this option.
Basic actions
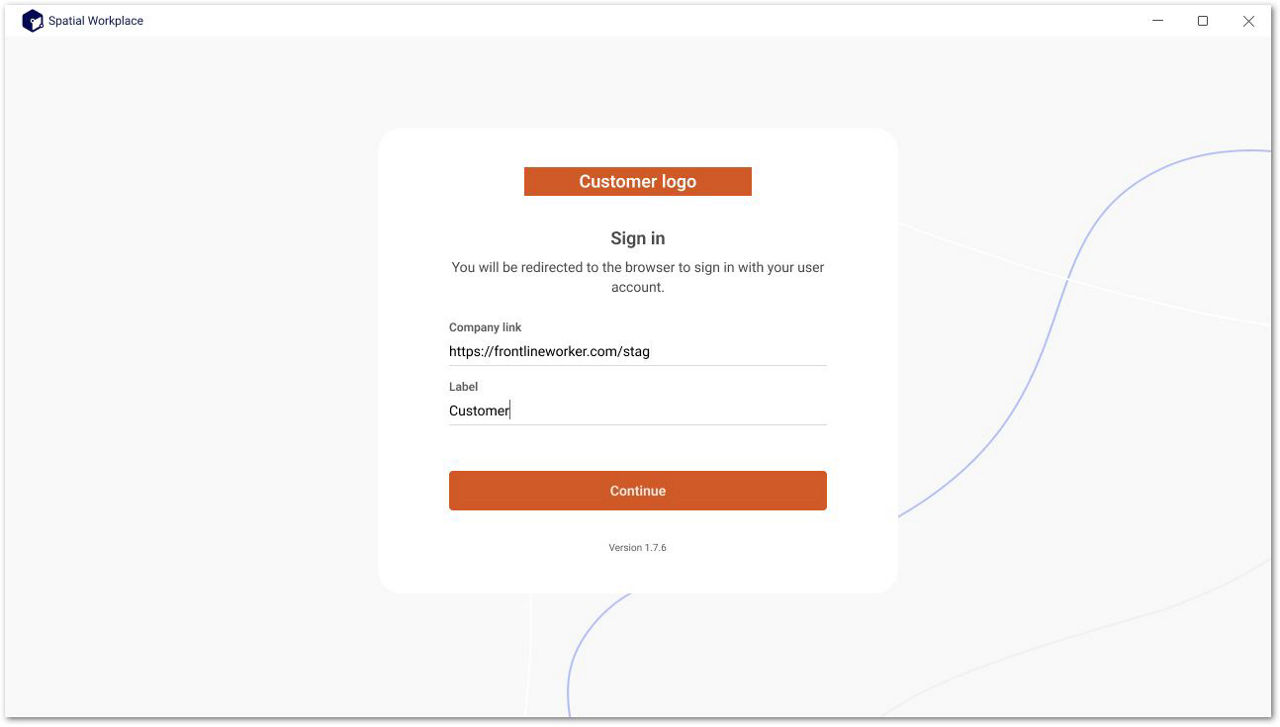
Pairing the app with the server (first-time use)
When opening Spatial Workplace for the first time, provide the company URL and domain to pair it with the right server instance. This ensures the correct syncing of the necessary data.
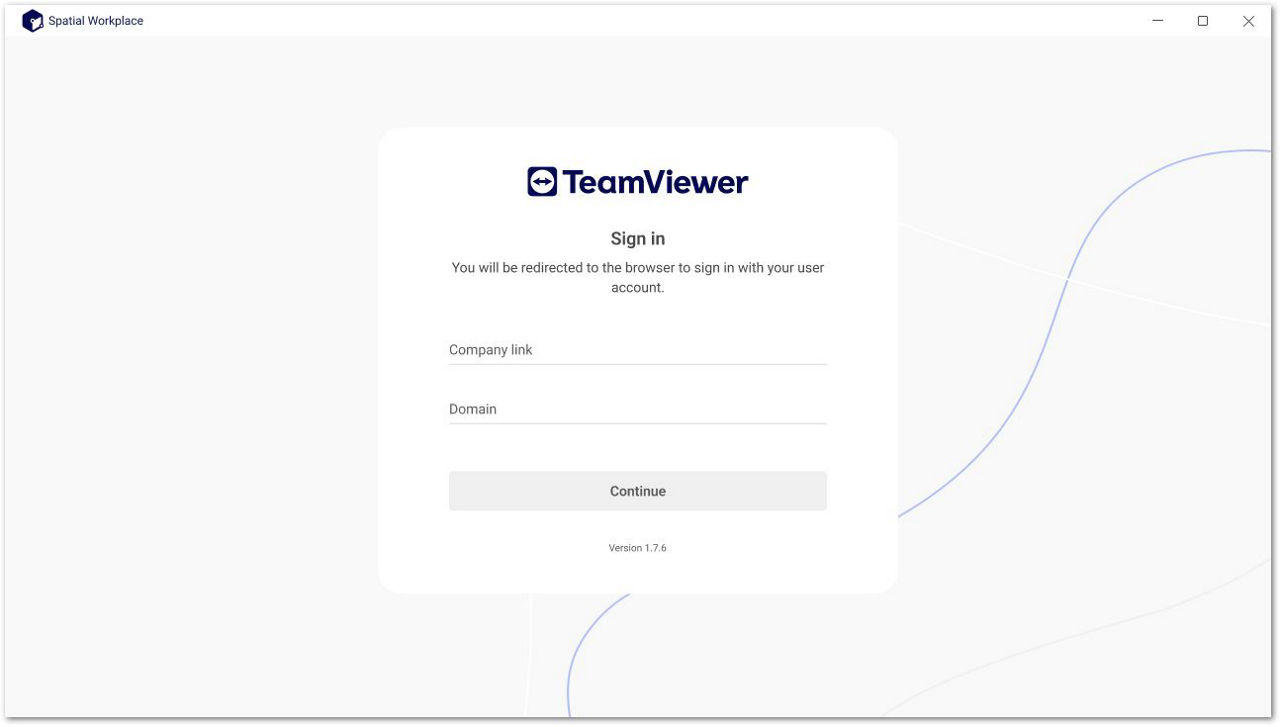
- Enter the company link provided by your administrator.
- Enter the domain name provided by your administrator.
- Click on Confirm.
Signing in to the app
After pairing, you will be directed to the Single-Sign-on page in a web browser.
To sign in:
- Enter the username and password provided by your administrator.
- Tap on Sign In.
- After signing in, click on YES to grant access to Spatial Workplace.
Signing out of the app
- In the top-right corner, tap on the Profile button.
- Tap on Logout.
- Tap on Ok!.
Changing the paired server
Re-pairing the app after logging out is possible by entering your credentials manually for alternative licenses and permissions.
To change the server you have paired previously:
- Sign out of the app.
- Enter the new company link and domain name provided by your administrator.
- Tap on Confirm.
User interface
Status bar
The status bar is located at the very top of the Spatial Workplace desktop app. It informs you about the overall status of your device. You can see the connection status, search for tasks and templates, and access the app settings.
Navigation section
The navigation section is located right under the status bar. It gives you access to the Task List and Templates.
Task List screen
The Task List shows all the tasks assigned to the user. Here you can download and execute tasks.
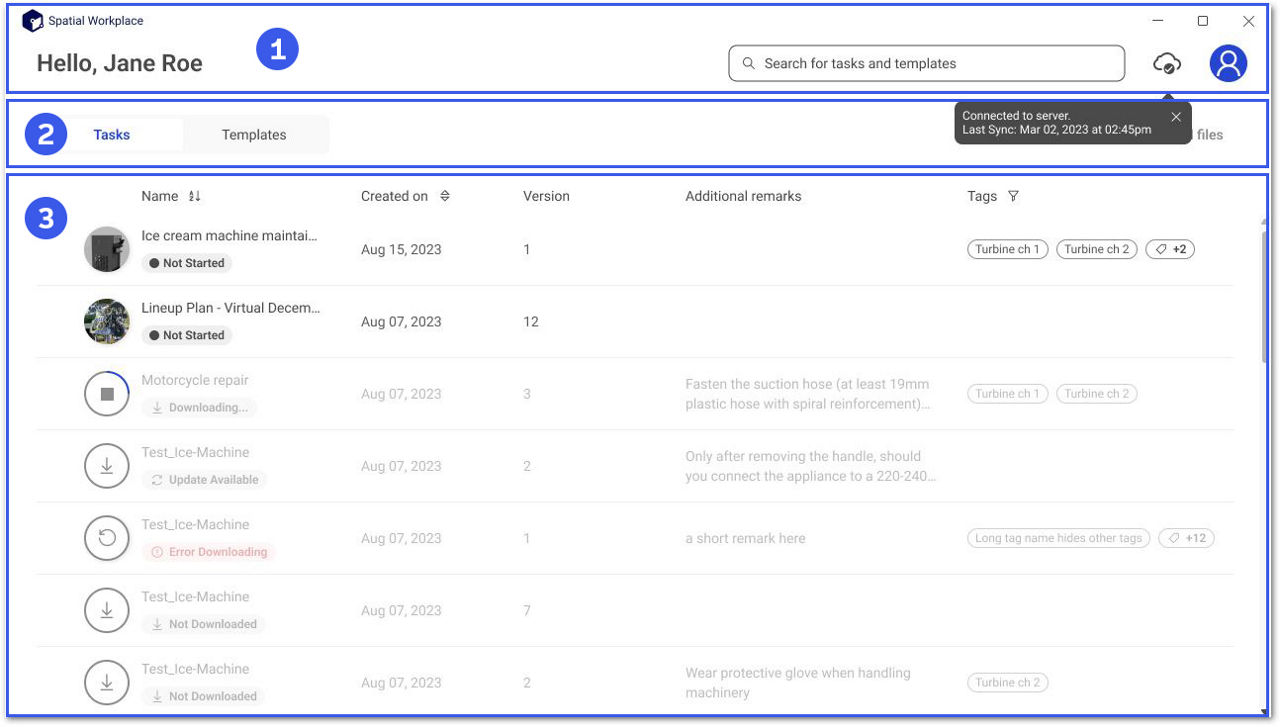
- Status bar
- Task List screen
- Navigation section
It is possible to manage this list by removing downloaded tasks. To delete a downloaded task from the Task List:
- Directly click on the task line you wish to delete (when hovered over, the selector options will appear on the left).
- Click on the Remove download files button on the top-right.
- Confirm the removal.
Only the downloaded tasks can be deleted.
After removing a task from the list, it will be shown as Not-Downloaded. It is possible to re-download that task later, as these tasks will be still assigned to the same user.
Templates screen
The Templates lists all the assigned templates to the user. Here you can download and execute templates.
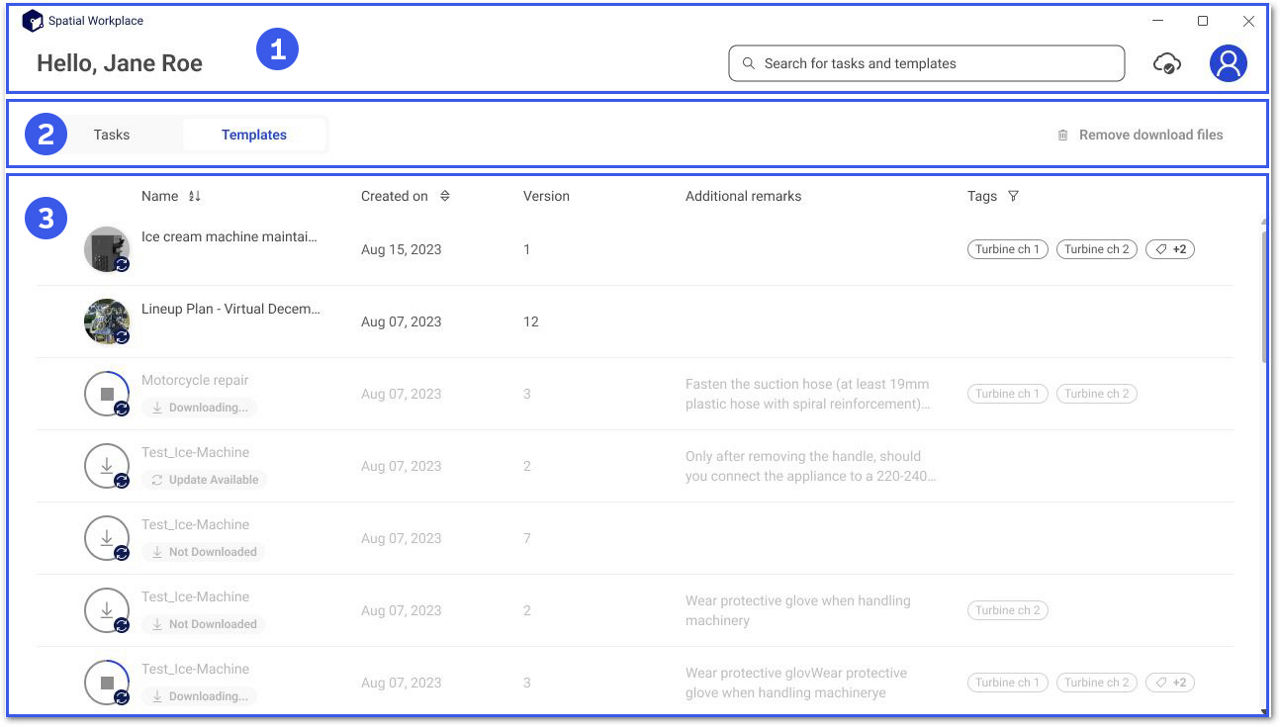
- Status bar
- Task List screen
- Navigation section
It is possible to manage this list by removing the downloaded templates. To delete a downloaded template from the list:
- Directly click on the template line you wish to delete (when hovered over, the selector options will appear on the left).
- Click on the Remove download files button on the top-right.
- Confirm the removal.
Only the downloaded templates can be deleted.
After removing an item from the list, it will be shown as Not-Downloaded. It is possible to re-download that template later, as these templates are still assigned to the same user.
Tasks
Tasks are used to assign workflows to the users. You can start a task simply by clicking on it.
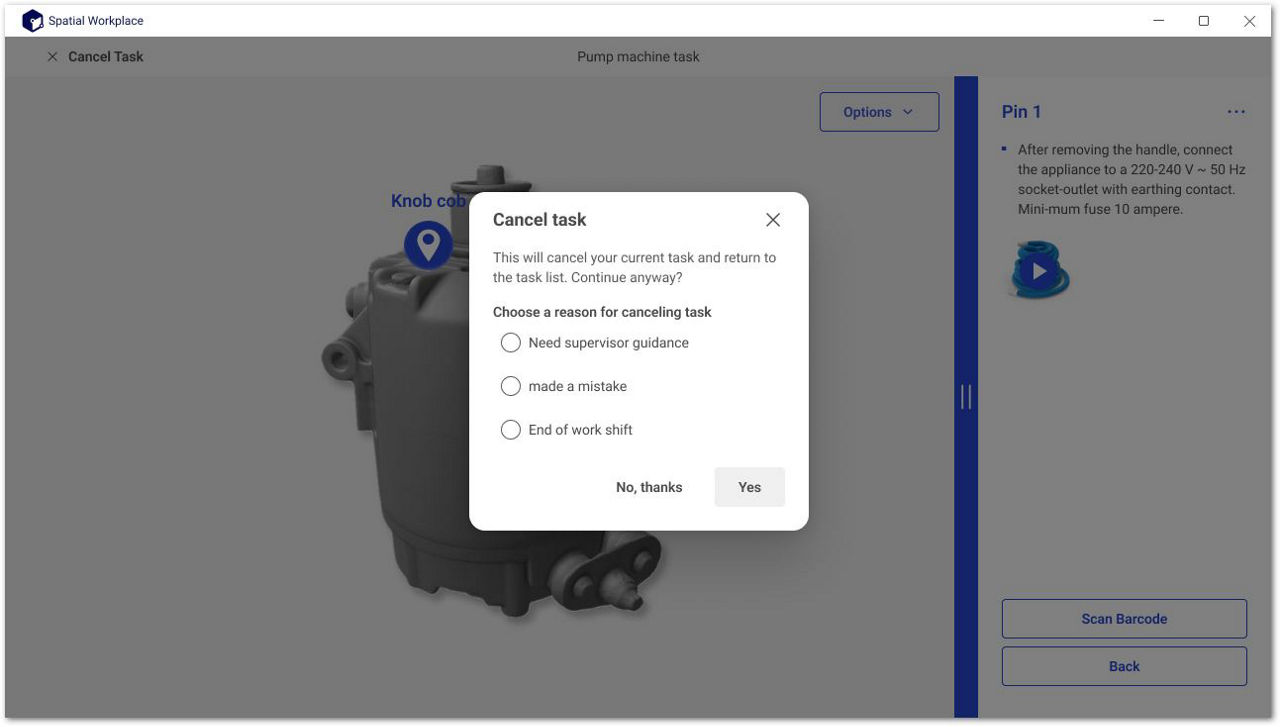
Cancelling a Task
It is possible to cancel a task with a reason. Within your workflow:
1. On the top-left corner, choose (X) Cancel Task.
2. Choose a reason from the list; for example, Made a mistake.
3. Click on Yes.
Adding comments to a Pin
It is possible to add comments to a Pin.
Tap on the More button (3 dots) in the top-right corner. You can choose from the menu to type your comment or upload media.

Reporting an error
When an issue arises, Spatial Workplace users can submit a report automatically or manually. This supports faster and more accurate troubleshooting by administrators.
The functionality is located in the Help section:
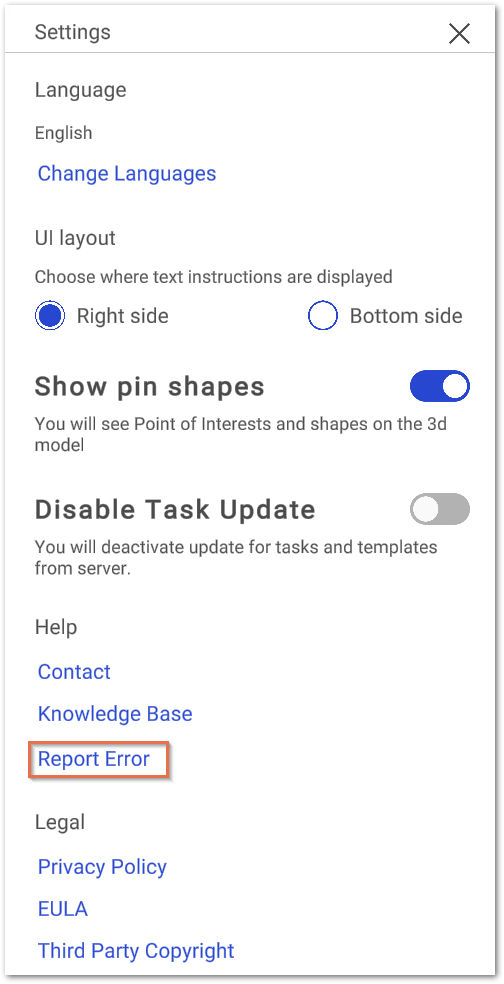
While reporting errors manually, you can add a description, a screenshot and mention the workflow name in your report.
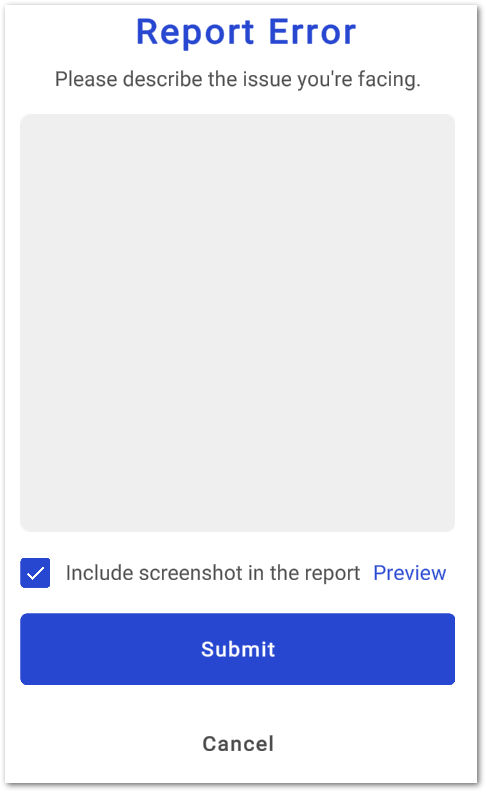
For reporting errors automatically, click on the Send Report button from the pop up:
When the app restarts following a crash, an error report is automatically created.
Admins can review these reports in the Frontline Command Center, where logfiles, notes and device IDs. Here, you can view the Error Reporting section under Administration.
Workflow Navigation
In the workflows, models can only be viewed in 3D model view since AR and VR options are not available for desktop devices.
3D Model View
The 3D model view allows users to observe and manipulate the workflow within a virtual environment separate from the physical world. The 3D model view can be used to explore the details of the hologram's model. In this view, the remaining content of the pin (text, videos, pictures, audio, pdf) is always presented on a flat display.
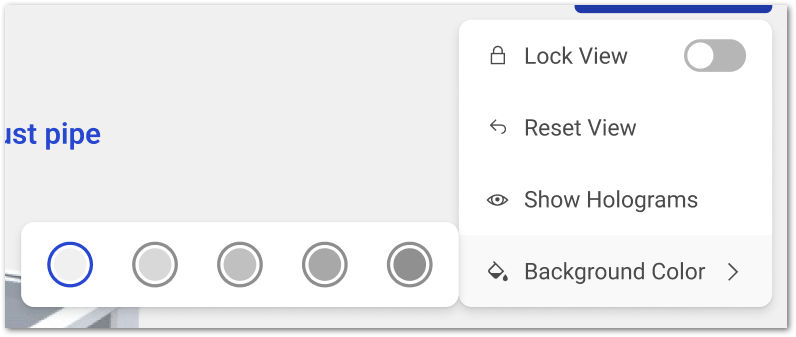
Changing the 3D View Background Color
This feature is useful when the default background closely matches the color of the model or its components, making it difficult to distinguish elements clearly. To improve visibility and avoid confusion, users can select from five predefined background colors. These options are designed to enhance contrast and support better visual clarity during 3D workflows.
Navigating with Menus inside the workflow
You can easily navigate inside the workflow with the Menu options.
By tapping on the sections, you can step into the desired part of the workflow.
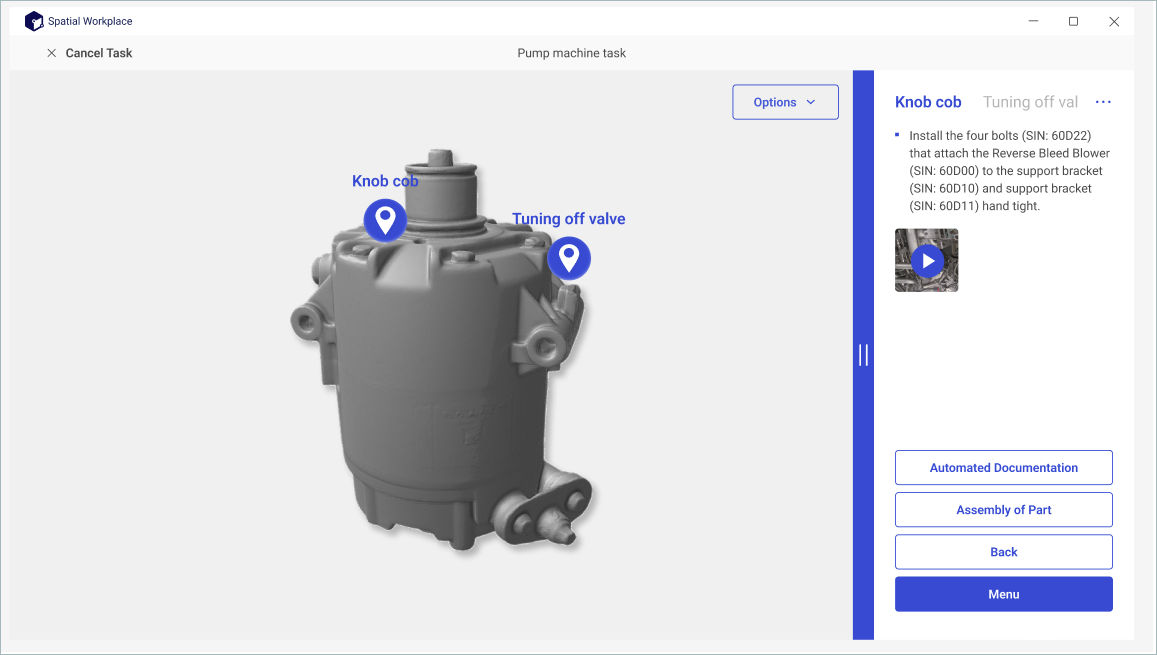
The highlighted Menu button shown here has an index functionality. It will only appear when the user has passed through previous menus, and will include all past menus.
You will return to the previous state when you close the menu options.
Controlling the model inside the 3D model view
Steps that contain Holograms can also be visualized inside the 3D model view, which allows for handling the holograms in more detail and separately from the real-life environment. Interacting with the 3D model using a mouse, touchpad, and touch interactions is possible.
-
Mouse interactions:
-
Rotating the model: click and hold left mouse button, move the mouse.
-
Zoom in and out: scrolling wheel of the mouse
-
Dragging the model: click and hold the right mouse button OR the scrolling wheel, move the mouse
-
-
Trackpad interactions:
-
Rotating the model: click and hold the left trackpad button, and move your finger through the trackpad.
-
Zoom in and out: pinching two fingers on the trackpad (apart and towards each other) OR Place two fingers on the touchpad and slide horizontally or vertically.
-
Dragging the model: click and hold the right trackpad button, and move your finger through the trackpad.
-
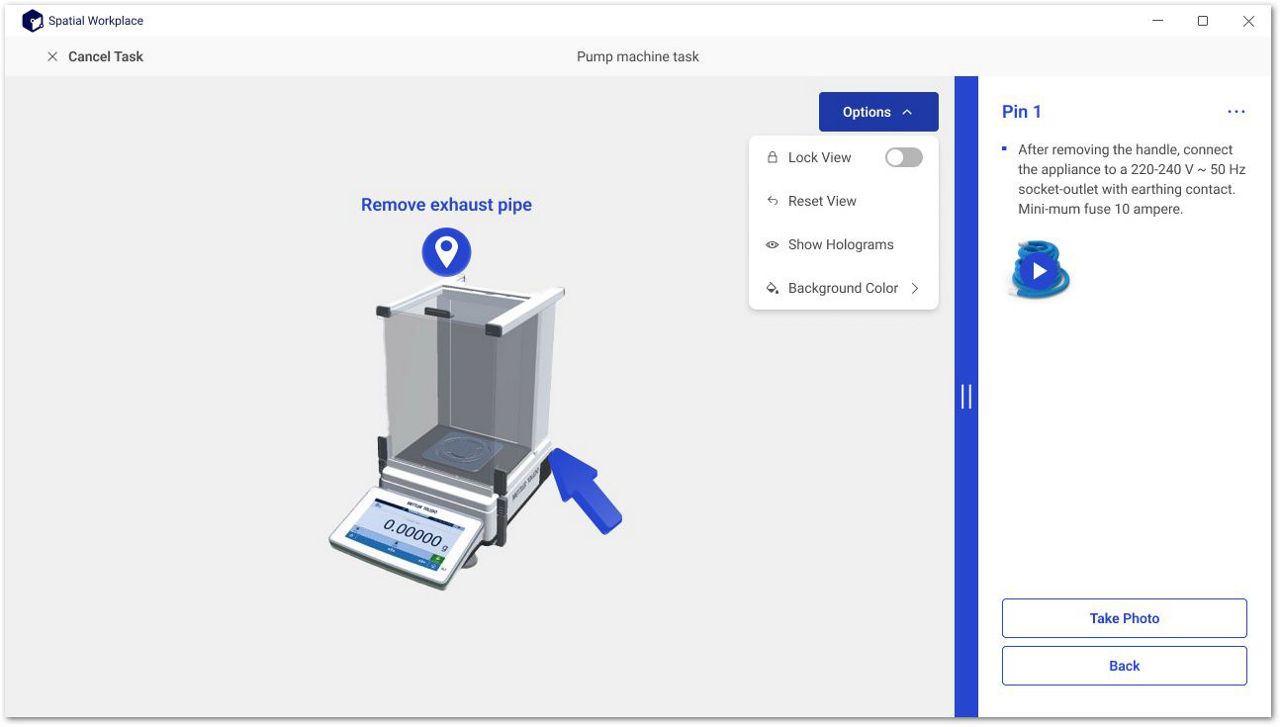
There are options for Reset view and Lock view while viewing the models.
- Reset View: resets the model position to the default
- Lock View: When enabled, fixes the camera on the currently viewed pin. When disabled, the camera automatically pans to show all visible pins, models, and holograms
Templates
Templates are used to assign workflows to the users. From there, you can start a task simply by clicking on the template.
The process for workflow navigation, 3D model view, and controlling the model inside the 3D model view are the same as Tasks. For these details, please refer to the Tasks section above.
Custom theme applied
Custom Themes allow the user to customize the theme and appearance of Frontline Spatial Workplace application. Custom themes are configured in Frontline Command Center, for more information, please visit our Custom Themes page.
Settings and Information
Click the profile icon in the right corner of the status bar to access the Settings, About, and Logout sections.
Changing settings
In the drop-down of the profile menu, click on the Settings icon and change any of the following settings:
Language
Defines the language of the application. Currently supported languages are English, German, Portuguese, French, Spanish, Chinese (simplified), and Japanese.
UI Layout
Allows you to choose where (Right side/Bottom side) text instructions are displayed in the workflow.
Show Pin Shapes
Toggle option where you can enable Point of Interests and shapes on the 3D model.
Help
- Knowledge Base: Redirects you to the Knowledge Base web page.
- Contact: Redirects you to your default mail application to write a mail to [email protected] address.
Legal
- Privacy Policy: Redirects you to the Teamviewer website that contains the various privacy notices.
- Third Party Copyright: Opens the copyright information within the app.
- EULA: Redirects you to the section of the TeamViewer website that contains the EULA and the DPA.
About
In the drop-down of the profile menu, click on the About button to view the current version you have and your IP address.
Logout
You can logout from your account simply clicking on this option in the drop-down of the profile menu..