Note: To download the Frontline Spatial Capture application, please contact us.
Basic actions
Pairing the app with the server
To use the Frontline Spatial Capture app, pair it with the correct server instance. This ensures the correct syncing of the necessary data. The following pairing screen is displayed if you are using the app for the first time, if your last sign-in took place longer than 30 days ago, or if you previously signed out of the app.
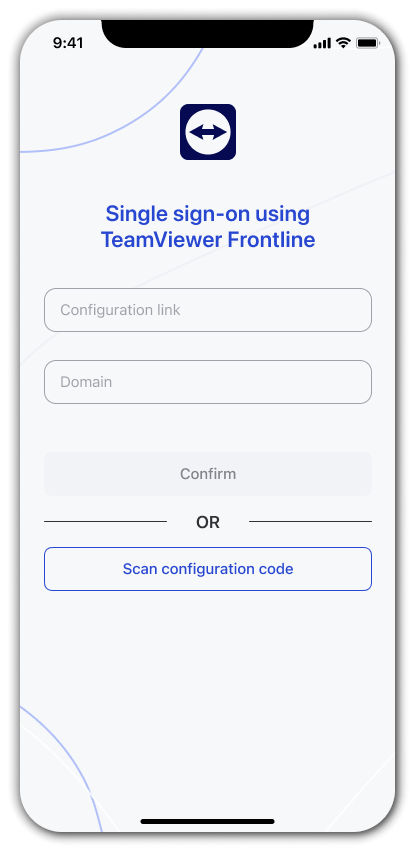
There are 2 different ways to pair the Frontline Spatial Capture app installed on your iPhone with a server instance:
- Scanning the configuration code generated via the Frontline Command Center.
- Manually entering the server details provided by your administrator.
Note: If the app has been previously paired with a server but requires re-pairing, the input fields for the configuration link and the domain are already prefilled. If your administrator has not notified you about any changes, you can simply tap on Confirm without having to change or re-enter the respective details as described below.
To pair the app via configuration code:
- Tap on Scan configuration code.
- Use your device to scan the configuration code provided by your administrator.
- Tap on Save.
To pair the app manually enter the server details:
- Enter the configuration link provided by your administrator.
- Enter the domain name provided by your administrator.
- Tap on Confirm.
Signing in to the app
To sign in manually entering your credentials:
- Enter your username or email address.
- Enter your password.
- Tap on SIGN IN.
Signing out of the app
- In the top-left corner, tap on the Menu button.
- Tap on Sign Out.
- When asked if you want to proceed, tap on Sign Out.
Reporting an issue
In case of a technical problem, you can report an issue to someone who is able to investigate more and provide you with a possible solution. In this case, this person will receive the app’s log files that contain important information regarding any applicable settings and technical events for a proper in-depth analysis.
To report an issue:
- In the top-left corner, tap on the Menu button.
- Tap on Report issue under Feedback.
- Describe the issue in as much detail as you can.
- Optional: You can send log files by toggling the Send logs button.
- Tap on Send on the top-right corner.
⇒ Your text describing the issue and a copy of the log files are sent to the development team for analysis.
Note: You can always visit the Help page that is linked at the bottom.
Captures
Captures act as projects within the Frontline Spatial Capture app to create virtual representations of single objects or entire room setups. Once you have made a capture, you can use your device’s camera to take photos of the desired object or room, which will then be used to create corresponding 3D models (for more information, please see the “Models” section).
Types of captures:
- Object scans: These allow you to create virtual 3D models of real-world objects. This is especially useful when dealing with smaller objects (up to about 1 by 1 meter) or individual parts of larger machines. The corresponding 3D models can be used in Frontline Spatial workflows for training maintenance or repair tasks.
- Room scans (only available on devices with LiDAR running iOS 16 and later): These allow you to create virtual floor plans of real-world locations together with schematic representations of the objects in them. The corresponding floor plans clearly show walls and windows as well as box-like shapes to indicate any objects inside the rooms. Additionally, the floor plans contain real-life dimensions and measurements of the respective rooms and objects.
- Scene reconstruction (only available on devices with LiDAR running iOS 16 and later): Allows you to capture both the floor plan of a room and the objects included in it in 3D, with refined details.
To achieve the best possible results in terms of captures and virtual 3D models, apply the following principles:
- Choose the suitable object: Ideal objects are those that do not move, show lots of surface details, and have a distinct texture. Objects with highly reflective surfaces should be avoided.
- Ensure proper lighting: Consistent and bright lighting is necessary for taking good pictures. It may help to open the curtains or turn on the lights.
- Use a plain background: Backgrounds should be single-colored without complicated patterns or bright colors. In addition, backgrounds should provide a good contrast to the objects.
- Center the object: Objects should be placed in the middle of the camera’s field of view to fill the entire frame. It is essential to ensure no parts are hidden or cut off.
- Take pictures from all possible angles: Objects must be photographed from multiple angles and from all sides, providing a 360° view.
- Avoid motion blur: Taking good pictures requires a steady hand. Try to move slowly and evenly without any sudden gestures.
User interface
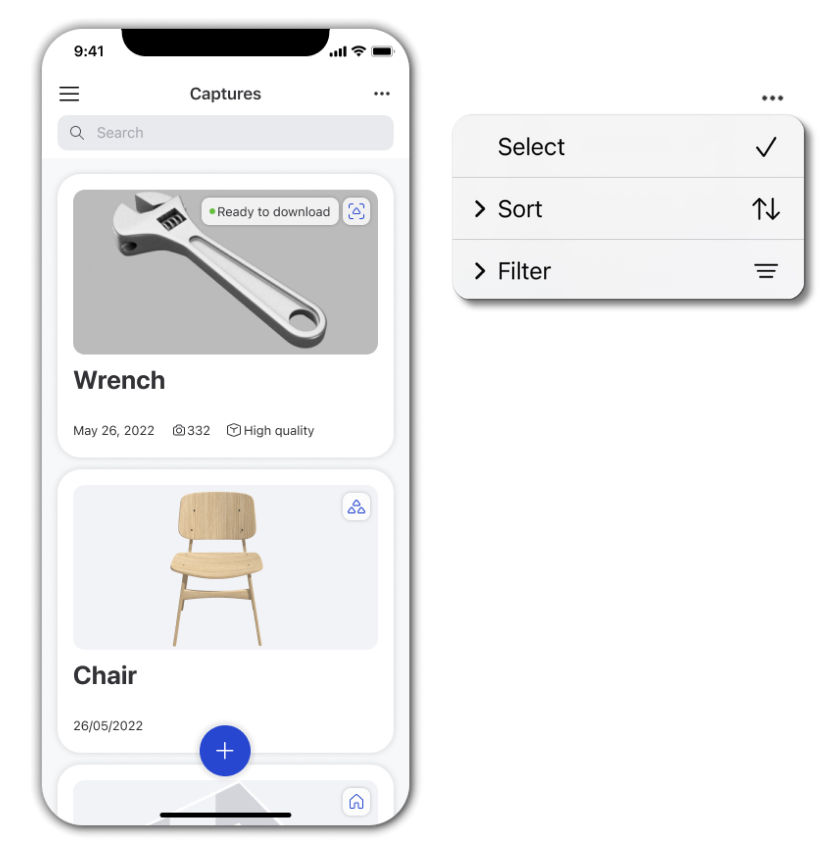
The Captures screen displays a list of all available captures. You’ll find a menu button in the top-left corner for accessing the app’s settings and important information. The top-right corner features a three-dot menu for managing your captures. Through this menu, you can:
- Select multiple captures
- Sort captures by date, name, newest/oldest first
- Filter captures by type or by their download status (downloading/ready to download/building)
Additionally, a search bar below the menu lets you find the specific captures quickly.
Creating a new object scan
There are two ways to create an object scan.
- Dome: above the object: This one allows you to scan objects that you look down at. You can position yourself anywhere around the object and take pictures from all angles.
- Plane: parallel to the object: For this one, the camera should be held parallel to the object (e.g., objects that are wall-mounted).
Dome: above the object
1. Go to the Captures screen.
2. At the bottom of the screen, tap on the Plus icon.
3. Tap on Object Scan.
4. Position your device at a higher angle by putting the object in the centre of the camera's field of view.
5. Tap on the centre of the object.
6. Adjust the size and position of the virtually displayed dome to cover the entire object and be located above the object’s centre.
- To resize the dome, use a pinch gesture.
- To reposition the dome, drag and drop it to the desired spot with your finger.
7. Once the dome is correctly placed, tap on Ready.
8. Slowly move your device around the object and take pictures from all possible angles:
- If auto mode is not enabled (i.e. if the Shutter button in the bottom centre of the screen shows an uppercase A in its middle), tap on the Shutter button each time you want to take a picture.
- If auto mode is enabled (i.e. if the Shutter button in the bottom centre of the screen shows an uppercase A in its middle), tap on the Shutter button once, and the app will start taking multiple pictures while you move your device around the object.
9. If auto mode is enabled, tap on the Shutter button (currently showing a square stop symbol in its middle) in the top centre of the screen once all the necessary pictures are taken.
10. In the top-right corner, tap on Done.
11. Enter a capture name.
12. Tap on Confirm.
13. To build a corresponding 3D model based on the capture, tap on Build.
14. Select the desired quality:
- High quality: Takes a relatively long time for processing but offers the highest level of detail. This quality setting is ideal for 3D models to be used in high-definition Frontline Spatial workflows.
- Medium quality: Takes a moderate time for processing but offers a higher level of detail. This quality setting is ideal for 3D models to be used in regular Frontline Spatial workflows.
- Preview quality: Takes a short time for processing but offers a relatively low level of detail. This quality setting is ideal for fast loading and real-time rendering.
⇒ The data is uploaded to the asset library. Once the upload is completed, the building process for the corresponding 3D model is started. After successful completion, the capture and its corresponding 3D model are ready to use.
Plane: parallel to the object
1. Go to the Captures screen.
2. At the bottom of the screen, tap on the Plus icon.
3. Tap on Object Scan.
4. Position your device parallel to the wall.
5. Tap on the centre of the object.
6. Adjust the size of the blue plane to fit the area you want to capture.
- To resize the plane, use a pinch gesture.
- To reposition the plane, move it with your finger to the desired spot.
7. Once the plane is correctly placed, tap on Ready.
8. Hold the device parallel to the wall and cover all the squares shown on the plane. (You can slowly pan around the area.)
- If auto mode is not enabled (i.e., if the Shutter button in the bottom centre of the screen shows an uppercase A in its middle), tap on the Shutter button each time you want to take a picture.
- If auto mode is enabled (i.e. if the Shutter button in the bottom centre of the screen shows an uppercase A in its middle), tap on the Shutter button once, and the app will start taking multiple pictures.
Note: It is beneficial to follow the instructions that are shown on the screen while capturing, such as “Camera too close” or “Move away from the object”.
To enable or disable auto mode, tap on Options in the top centre of the screen and use the corresponding settings. To hide or unhide the blue plane, tap on the AR guidance button (a schematic cube with broken lines) in the bottom-right corner of the screen.
If necessary, you can take a pause and resume work on the incomplete capture later.
9. If auto mode is enabled, tap on the Shutter button (currently showing a square stop symbol in its middle) in the bottom centre of the screen once all the necessary pictures are taken.
10. In the top-right corner, tap on Done.
11. Enter a capture name.
12. Tap on Confirm.
13. To build a corresponding 3D model based on the capture, tap on Build.
14. Select the desired quality:
- Preview quality: Takes a short time for processing but offers a relatively low level of detail. This quality setting is ideal for fast loading and real-time rendering.
- Medium quality: Takes moderate time for processing but offers a higher level of detail. This quality setting is ideal for 3D models to be used in regular Frontline Spatial workflows.
- High quality: Takes a relatively long time for processing but offers the highest level of detail. This quality setting is ideal for 3D models to be used in high-definition Frontline Spatial workflows.
⇒ The data is uploaded to the asset library. Once the upload is completed, the building process for the corresponding 3D model is started. After successful completion, the capture and its corresponding 3D model are ready to use.
Creating a new room scan
Note: When creating your first capture, the app will provide a short tutorial and guide you through the individual steps.
1. Go to the Captures screen.
2. At the bottom of the screen, tap on the Plus button.
3. Tap on Room Scan.
4. Slowly move your device around the room so that the app can take pictures until the entire room is properly captured.
Note: You can check your progress by looking at the small model of the room that is displayed in the bottom centre of the screen.
5. Once all the necessary pictures are taken, tap on Finish in the top-right corner.
6. Enter a capture name.
7. Tap on Confirm.
⇒ The data is uploaded to the asset library. Once the upload is completed, the building process for the corresponding 3D model is started. After successful completion, the capture and its corresponding 3D model are ready to use.
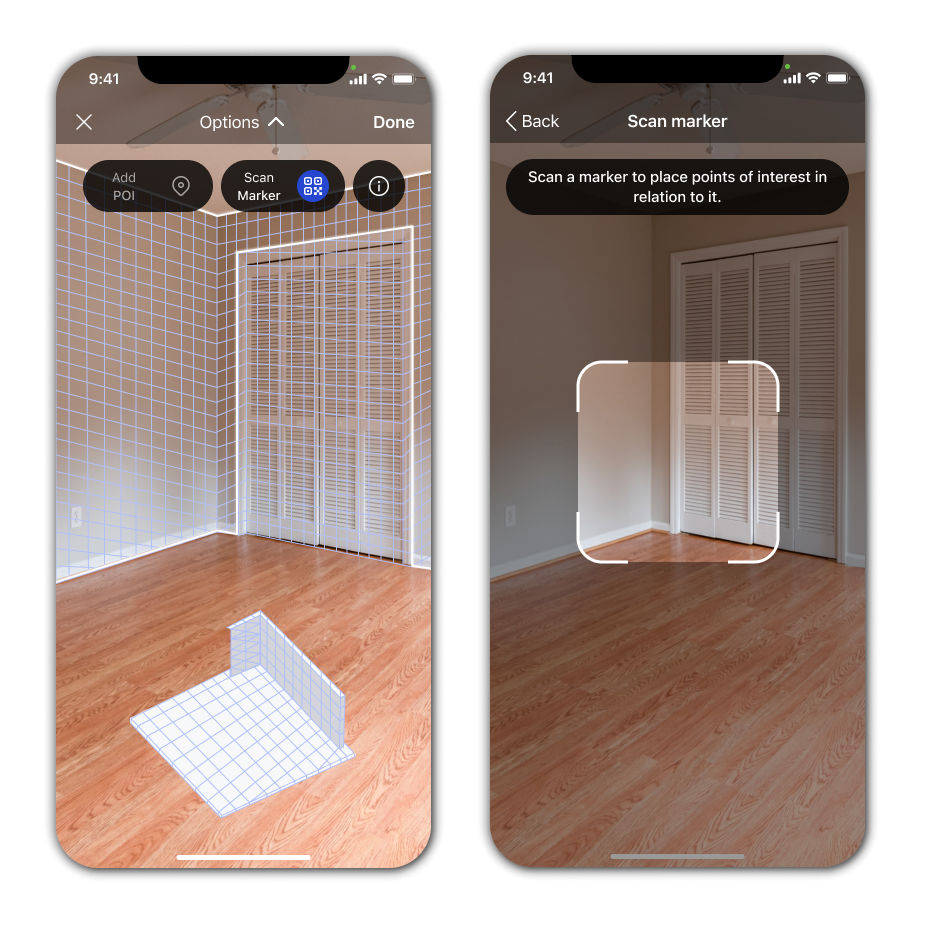
Reconstructing a scene and creating a mobile workflow
- Go to the Captures screen.
- At the bottom of the screen, tap on the Plus icon.
- Tap on Scene Reconstruction.
Note: Highly reflective Areas or absorbent may not give the best results for modelling.
4. Slowly move your device around the surface so the app can take pictures until the entire area is properly captured.
Note: You can follow the progress by checking the blue mesh and the in-progress model on the screen.
5. When capturing is complete, tap on Options at the top of the screen.
6. Tap on Scan Marker.
7. Scan the QR code marker.
⇒ Add POI button will be available after adding a QR code marker.
8. Tap on Add POI.
9. Tap on the areas where you want to add pins.
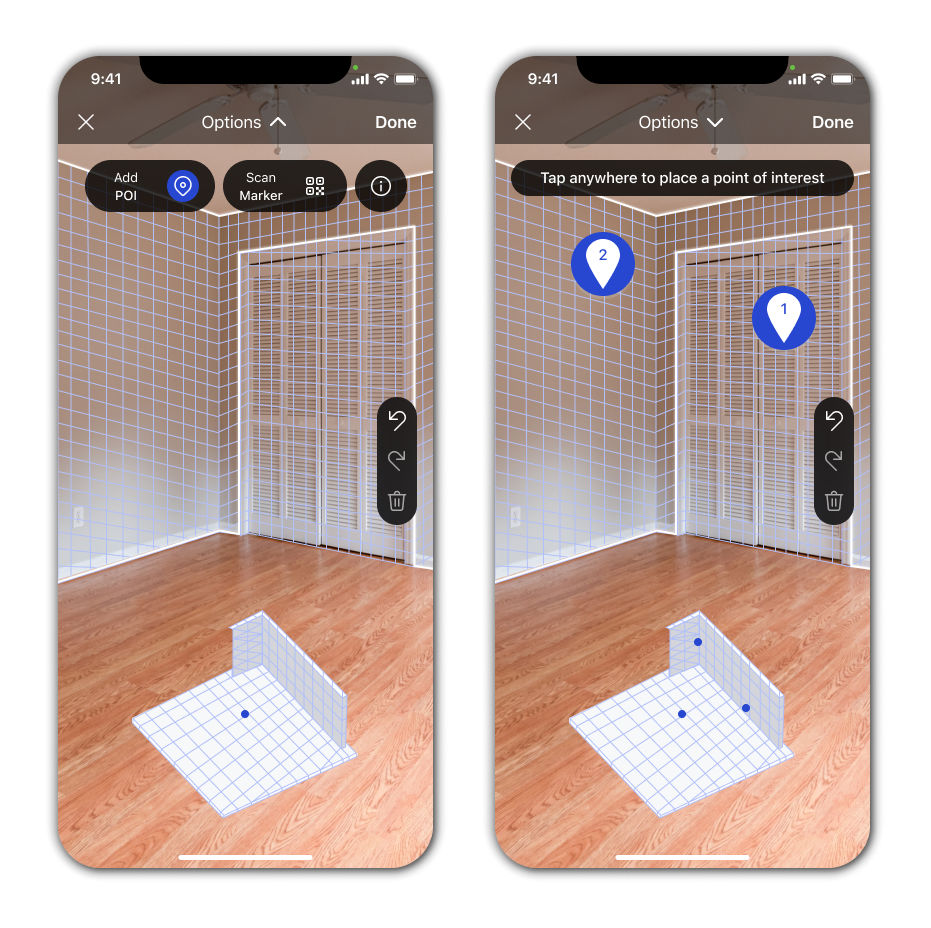
10. Tap on Finish in the top-right corner when scanning and adding the pin is done.
11. Enter a capture name.
12. Tap on Confirm.
⇒ Once the model has the 'Model Ready' status, it can be viewed under the Captures screen. By tapping on the model, you can share, rename or delete the scene after tapping on the More options button (3 vertical dots).
Afterwards, the capture is uploaded to the File Manager in Frontline Command Center. From there it can be used to create and refine instructions in Spatial Editor. To do that:
1. Open Spatial Editor on your desktop device. The user must have the "File Manager" role to access all the saved files.
2. Click on New Project.
⇒ New workspace will open.
3. On the Menu Bar, click on Import Model.
4. Choose Import from FCC.
5. Choose the mobile workflow capture you created earlier in the folder named after the user.
6. Click on Import.
7. Edit the workflow as you wish and create connections between pins and markers in Connector.
8. After you are finished, save the model using the Save button.
9. Click on Export Workflow > Export Workflow to FCC from the Menu Bar.
10. Name the workflow.
11. Choose a Make or Inspect solution.
12. Click on Export.
Capture Actions
Resuming work on an incomplete capture for Object Scans
1. Go to the Captures screen.
2. Look for the desired capture. Optionally, you can use the search button in the top-right corner to do so.
3. Tap on the capture.
4. Tap on Add Photos.
5. Slowly move your device around the object and take pictures from all possible angles:
- If auto mode is not enabled (i.e., if the Shutter button in the bottom centre of the screen does not show an uppercase A in its middle), tap on the Shutter button each time you want to take a picture.
- If auto mode is enabled (i.e. if the Shutter button in the bottom centre of the screen shows an uppercase A in its middle), tap on the Shutter button once, and the app will start taking multiple pictures while you move your device around the object.
Note: You can check your progress by looking at the dome as well as the circle graphic in the bottom-right corner. Blue portions on the dome’s grid indicate that the corresponding sections have already been covered. The same goes for green portions of the circle graphic.
To enable or disable auto mode, tap on Options in the top centre of the screen and use the corresponding settings. To hide or unhide the dome, tap on the AR guidance button (a schematic cube with broken lines) in the bottom-right corner of the screen.
If necessary, you can take a pause by tapping on the Shutter button (currently showing a square stop symbol in its middle) in the bottom centre of the screen and resume work on the incomplete capture later.
6. Once all the necessary pictures are taken, tap on Done in the top-right corner.
7. Enter a capture name.
8. Tap on Confirm.
9. To build a corresponding 3D model based on the capture, tap on Build.
10. Select the desired quality:
- Preview quality: Takes a short time for processing but offers a relatively low level of detail. This quality setting is ideal for fast loading and real-time rendering.
- Medium quality: Takes moderate time for processing but offers a higher level of detail. This quality setting is ideal for 3D models to be used in regular Frontline Spatial workflows.
- High quality: Takes a relatively long time for processing but offers the highest possible level of detail. This quality setting is ideal for 3D models to be used in high-definition Frontline Spatial workflows.
⇒ The data is uploaded to the asset library. Once the upload is completed, the building process for the corresponding 3D model is started. After successful completion, the capture and its corresponding 3D model are ready to use.
Renaming a capture
- Go to the Captures screen.
- Look for the desired capture. Optionally, you can use the search button in the top-right corner to do so.
- Long-press on the capture.
- Tap on Rename capture.
- Enter a new name.
- Tap on Confirm.
⇒ The capture is renamed locally on your device as well as in the asset library.
Note: Alternatively, captures can also be renamed via the More options button (3 vertical dots) on the corresponding details screen if they’re already open.
Deleting a capture
- Go to the Captures screen.
- Look for the desired capture. Optionally, you can use the search button in the top-right corner to do so.
- Long-press on the capture.
- Tap on Delete capture.
- When asked if you want to proceed, tap on Delete.
⇒ The capture is deleted locally on your device as well as in the asset library. This cannot be undone.
3D Models
A 3D Model is a digital representation of an object created from a series of images. When you initiate a project by selecting “object scan,” you capture multiple images of the object. These images are then processed to construct the 3D Model. The 3D Model is stored within a project we refer to as a Capture. You have the flexibility to delete the 3D Model from the Capture while retaining the original images. This allows you to rebuild the 3D Model with different quality settings without losing your initial work.
Opening an existing 3D model
- Go to the Captures screen.
- Look for the desired capture. Optionally, you can use the search button in the top-right corner to do so.
- Tap on the capture.
⇒ If the 3D model data for this capture has already been downloaded to your device, the model is displayed right away. If the data has not been downloaded, an overview screen is displayed that allows you to review the capture’s details and to download its model data.
Editing an existing 3D model
- Go to the Captures screen.
- Look for the desired model. Optionally, you can use the search bar at the top.
Note: If a model is ready to download after being built, it cannot be edited. The status of the model should be Model ready, to be edited.
3. Tap on the capture you wish to edit.
4. Tap on the More options button (3 vertical dots) in the top right corner.
5. Select Edit.
⇒ Edit mode screen opens.
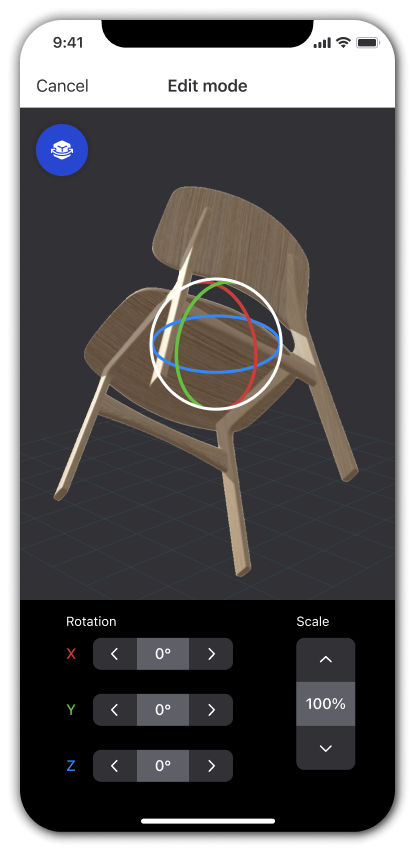
6. Here the model appears within the three-dimensional structure. It is possible to rotate and scale the model.
- Rotate: You can rotate the model by pinching and setting it with your fingers within the axis. Also, below, you can set the axis for width (X), height (Y) and depth (Z) by entering the desired angles, or by using the left-right arrows to rotate.
- Scale: You can scale the model by pinching and setting it with your fingers within the axis. Also, below, you can set the scale percentage by entering the number, or by using the up-down scale arrows.
7. After the edit is finished, tap on Done in the top-right corner.
8. The model will take some time to rebuild.
Building a 3D model with a different quality
- Go to the Captures screen.
- Look for the desired capture. Optionally, you can use the search button in the top-right corner to do so.
- Tap on the capture.
- In the top-right corner, tap on the More options button (3 vertical dots).
- Tap on Build Other Quality.
- Select the desired quality:
- Preview quality: Takes a short time for processing but offers a relatively low level of detail. This quality setting is ideal for fast loading and real-time rendering.
- Medium quality: Takes moderate time for processing but offers a higher level of detail. This quality setting is ideal for 3D models to be used in regular Frontline Spatial workflows.
- High quality: Takes a relatively long time for processing but offers the highest possible level of detail. This quality setting is ideal for 3D models to be used in high-definition Frontline Spatial workflows.
- Wait until the building process has been completed.
- Tap on Download to open the new build on your device.
Note: Although this step is not mandatory and can be skipped to save storage space on your device, we strongly recommend downloading the build to check the 3D model at an early stage.
⇒ The newly created build (i.e., the corresponding 3D model) is uploaded to the asset library and is ready to use. Only the latest 3D model is stored in the asset library, any new builds replace the previous ones. However, since the underlying images are also stored in the asset library, you can create new builds with different quality settings at any time. If you locally delete a 3D model on your device, you can re-download it as needed.
Renaming a 3D model
- Go to the Captures screen.
- Look for the desired capture. Optionally, you can use the search bar at the top.
- Tap on the capture.
- In the top-right corner, tap on the More options button (3 vertical dots).
- Tap on Rename capture.
- Enter a label for your capture.
- Tap on Confirm.
Sharing a 3D model
- Go to the Captures screen.
- Look for the desired capture. Optionally, you can use the search button in the top-right corner to do so.
- Tap on the capture.
- In the top-right corner, tap on the More options button (3 vertical dots).
- Tap on Share.
- Select the desired sharing option and proceed as necessary.
⇒ A copy of the capture’s 3D model is sent to another user who can use it for their own purposes. Any changes made afterwards by you or the other user are not synced.
Deleting a 3D model
- Go to the Captures screen.
- Look for the desired capture. Optionally, you can use the search button in the top-right corner to do so.
- Tap on the capture.
- In the top-right corner, tap on the More options button (3 vertical dots).
- Tap on Delete 3D Model or Delete 3D Room Scan.
- When asked if you want to proceed, tap on Delete.
⇒ The corresponding data is removed from your device. If the build data has been uploaded to the asset library, the model can be downloaded again at a later point. If necessary, you can also build a new 3D model with a different quality.
Settings and information
Viewing your user account details and current app version
- In the top-left corner, tap on the Menu button.
- You can see the following details:
- User account details: These are shown at the top of the screen and include your profile picture as well as the configuration link and domain currently used to connect to the server.
- App version: This information is shown at the bottom of the screen.
Changing settings
- In the top-left corner, tap on the Menu button.
- Tap on the desired settings category and change any of the following settings:
- Network Options
- Upload photos (only when Wi-Fi is on): When enabled, images taken when creating a new capture are only uploaded to the asset library when the device is connected to a local network.
- Download 3D models (only when Wi-Fi is on): When enabled, already existing 3D models are only downloaded from the asset library when the device is connected to a local network.
- Scan Options
- Object Scan
- Start camera in Auto Mode: When enabled, the app starts taking multiple pictures by default after you tap on the Shutter button once and start moving the device around the object. When disabled, the default setting is that you need to tap on the Shutter button each time you want to take a picture. Regardless of the chosen default setting, the auto mode can still be turned on or off as needed while creating an object scan.
- AR Guidance type: With the Dome or Plane options here, it is possible to set the default guidance type for capturing. You can always switch to the other option via the Guidance Options toggle located at the bottom of the screen while capturing.
- Enable masking: Masking feature enables you to capture the object without the background or anything else near it. It is possible to enable or disable it after capturing, therefore you can have both versions ready to be built. Here are the available options for masking elements explained:
- AR Guidance: When chosen, highly focuses on the object and aims to cut out the surroundings. Some parts of the base can still be visible.
- Capture Object: When chosen, the focused area would be the lifted subject and the captures will be reconstructed with only the lifted parts of the object (available for iOS17 or later).
- System Default: When chosen, only the object of interest will be focused in the scene and the background will be removed.
- Room Scan (Capture structural elements only): When enabled, only the walls and windows of a room are captured when creating a new room scan. Any objects inside the room that would normally be represented by box-like shapes will be ignored and not included in the final model.
- Object Scan
- Network Options
Viewing legal information
To view the TeamViewer Privacy Notices:
- In the top-left corner, tap on the Menu button.
- Tap on Product policy under Legal.
⇒ You are redirected to the section of the TeamViewer website that contains the various privacy notices.
To view the TeamViewer End-User License Agreement (EULA) and the TeamViewer Data Processing Agreement (DPA):
- In the top-left corner, tap on the Menu button.
- Tap on Agreements under Legal.
⇒ You are redirected to the section of the TeamViewer website that contains the EULA and the DPA.
To view the license information of third-party components used by the Frontline Spatial Capture app:
- In the top-left corner, tap on the Menu button.
- Tap on Third-party copyright under Legal.
⇒ An info screen opens, where you can see the respective license information.
Frontline Expert can view and manage the captures in File Manager.
Feedback
- Report Issue: Briefly explain the problem you’re facing and send it. You can also choose to send logs or not with the toggle option.
Account
- Sign Out: Allows you to sign out from your account.