TeamViewer Single Sign-On (SSO) aims to reduce large companies' user management efforts by connecting TeamViewer with identity providers and user directories.
This article applies to TeamViewer customers with a Tensor license.
Requirements
To use TeamViewer Single Sign-On (SSO), you need:
-
A TeamViewer version 13.2.1080 or newer
-
A SAML 2.0 compatible identity provider (IdP)*
- A TeamViewer account to access the Management Console and add domains
- Access to the DNS management of your domain to verify the domain ownership
- A TeamViewer Tensor license
SSO configuration guide
Follow the steps below to set up your SSO configuration for Okta.
Add a new domain
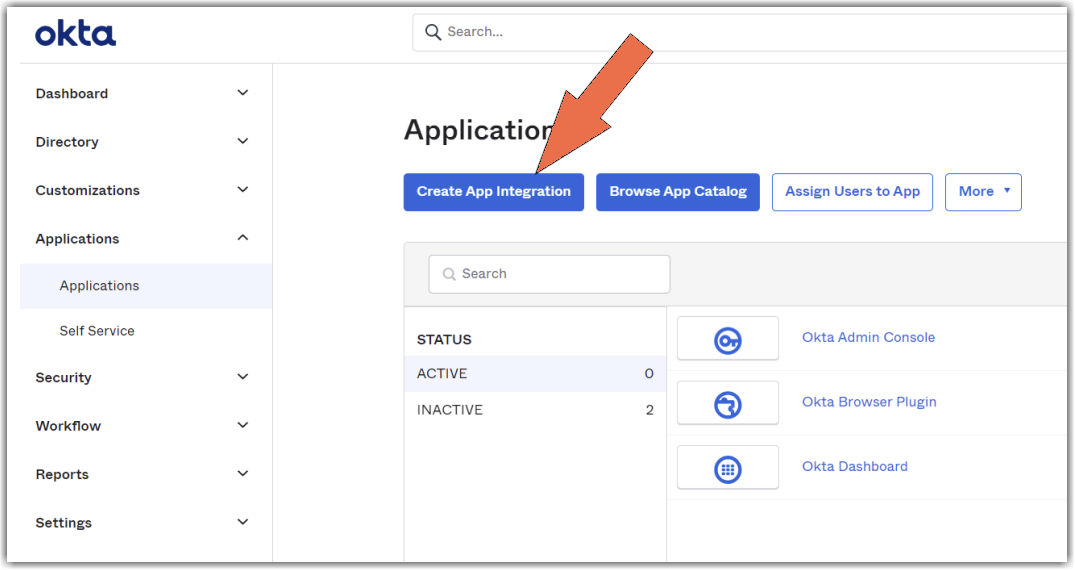
1. Open the Okta app.
2. Go to Applications and select Applications.
3. Click the button Create App Integration.
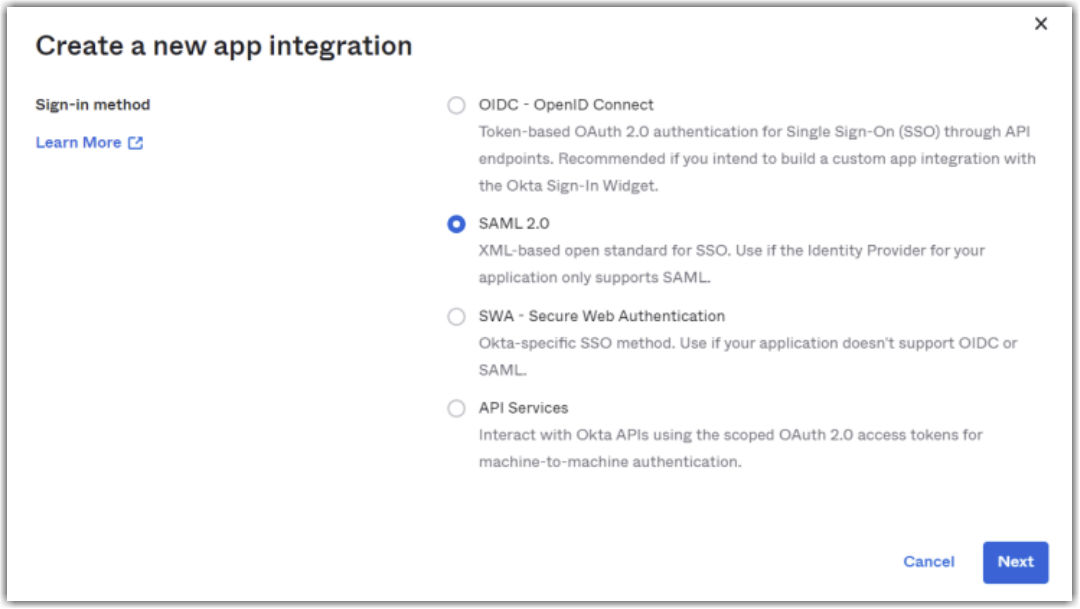
4. Select SAML 2.0 and give your app a name, then click Next.
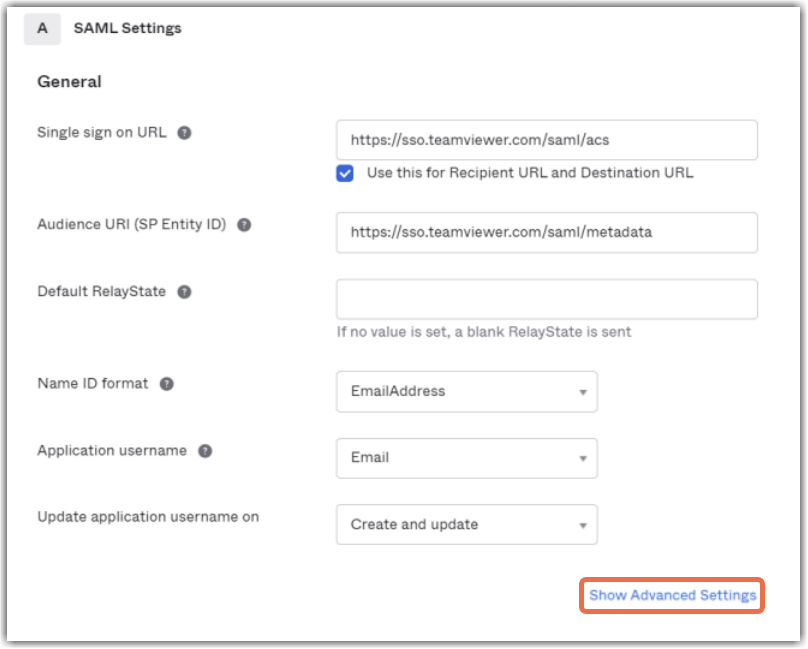
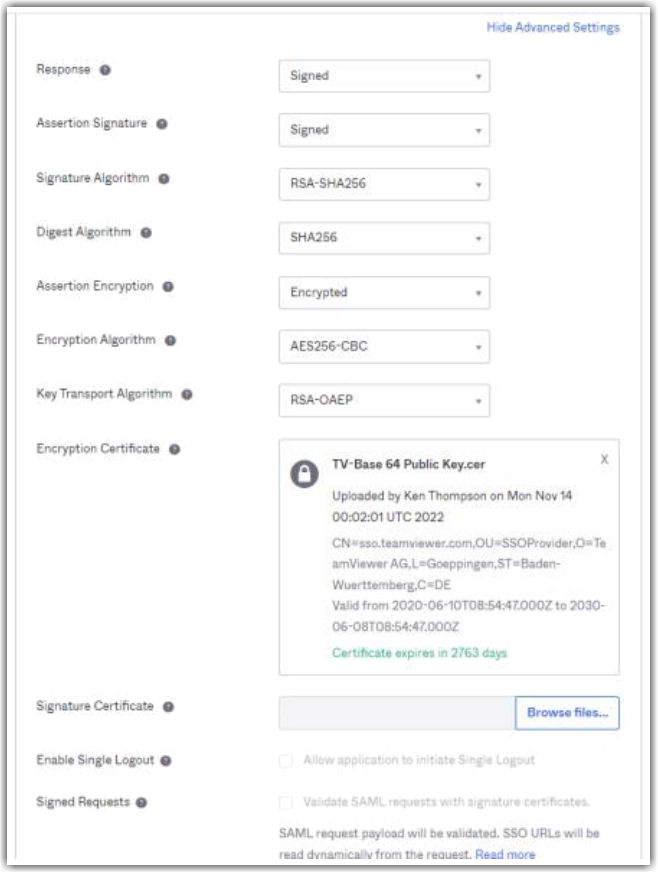
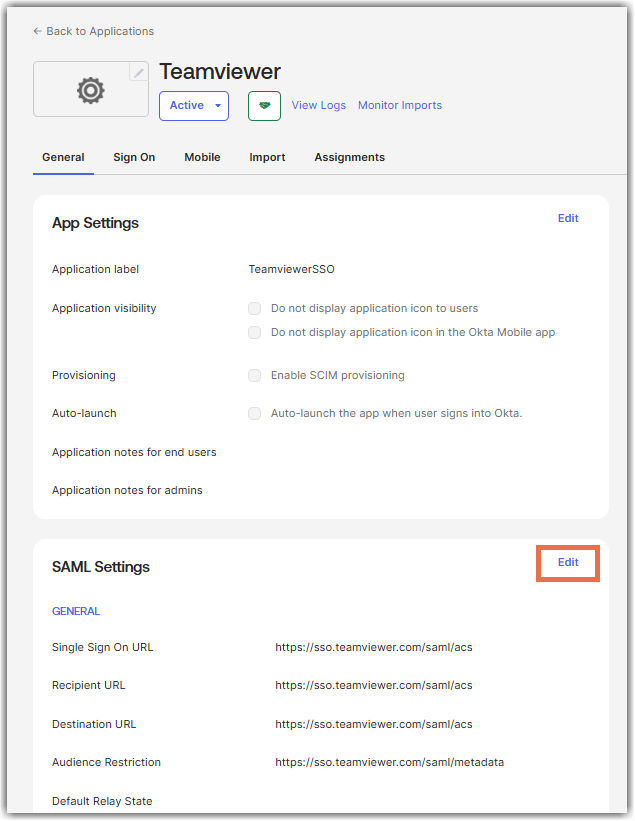
5. On the SAML Settings, populate the fields using the information below:
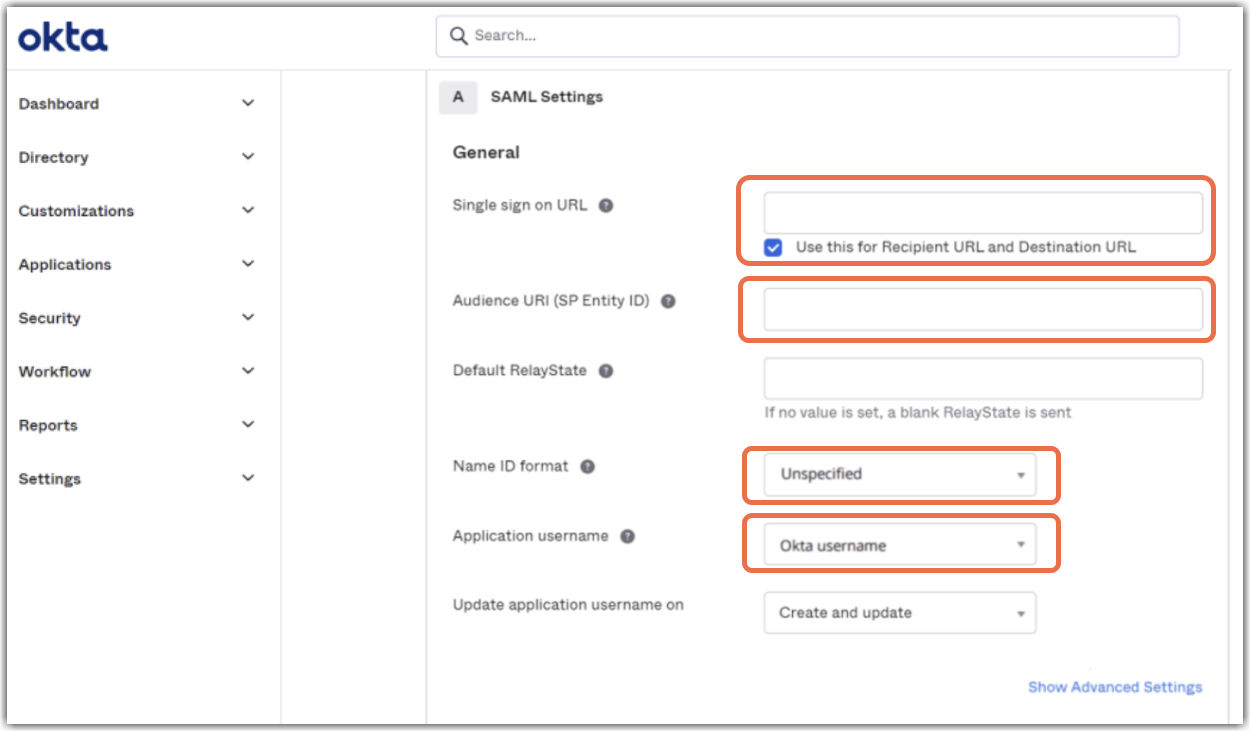
6. Now click Show Advanced Settings.
7. Change the Assertion Encryption to Encrypted.
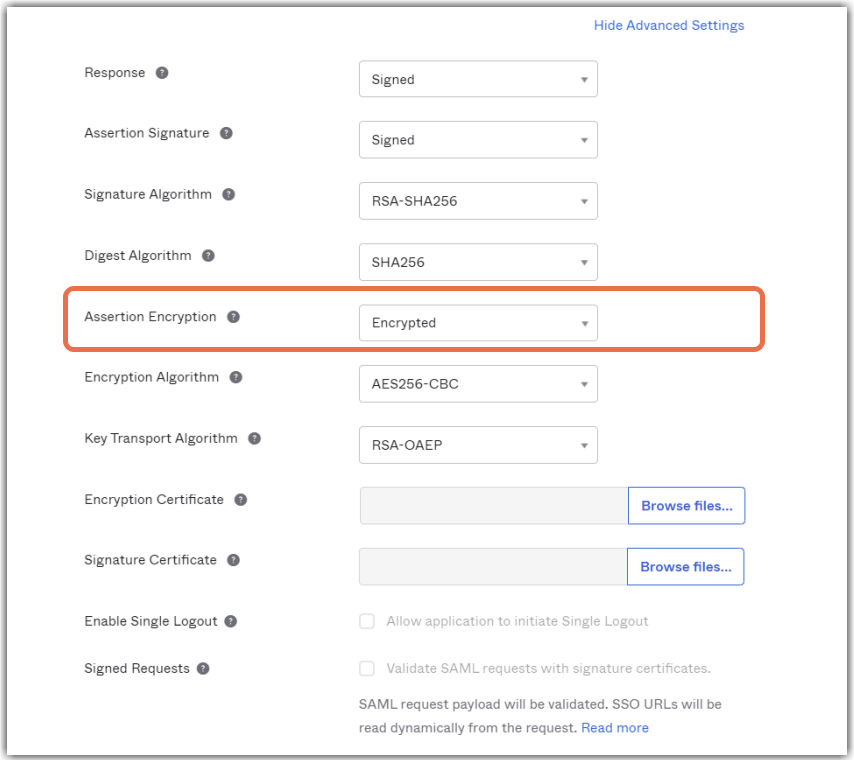
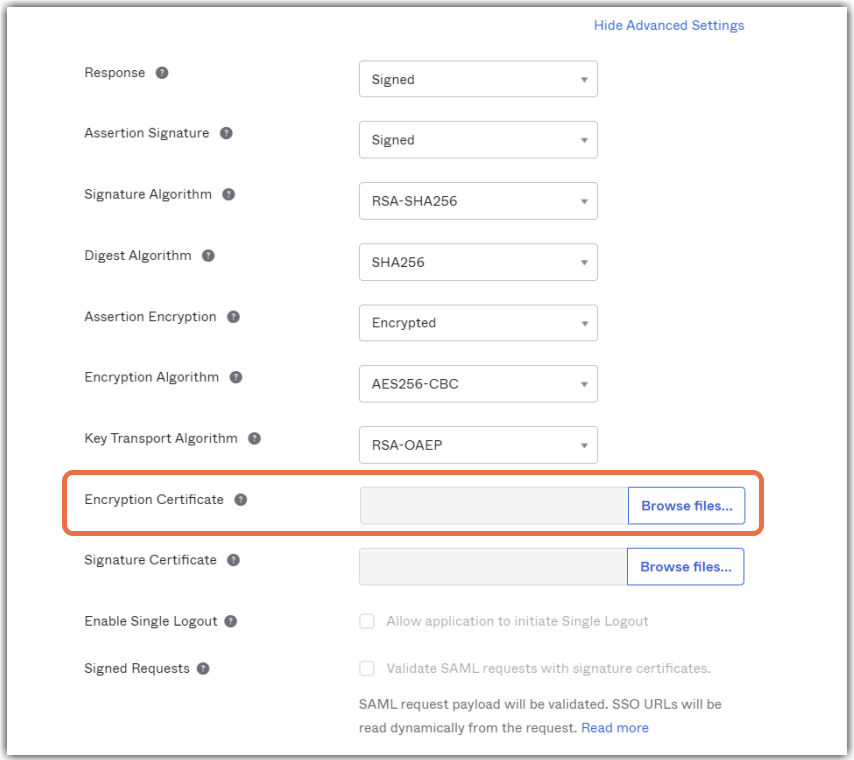
8. Next, you must retrieve the TeamViewer Public key to upload it into the Encryption Certificate field.
Note: This file needs to be in Base64 format.
Get TeamViewer Public Key:
The public key of the certificate that is used to sign SAML requests and for the encryption of SAML responses can be obtained by executing the following PowerShell command:
"-----BEGIN PUBLIC KEY-----`n"+ `
((Select-Xml `
-Content ((Invoke-WebRequest `
https://sso.teamviewer.com/saml/metadata.xml).Content) `
-xpath "//*[local-name()='X509Certificate']").Node[0].'#text') + `
"`n-----ENDPUBLIC KEY-----" `
| Out-File -FilePath "sso.teamviewer.com -saml.cer" -Encoding ascii
The command downloads the metadata, extracts the public key, and writes it to sso.teamviewer.com - saml.cer file in ascii format.
After Completion, you must convert this file to a Base64 .cer file type.
Convert the sso.teamviewer.com - saml.cer file
To convert the sso.teamviewer.com - saml.cer file into Base64, follow the steps below:
1. Right-click and select Open.
2. Click on Details Tab 3 and select Copy to File.

3. Click Next.

4. Select Base-64 encoded X.509.

5. Click Next.
6. Type in File Name.
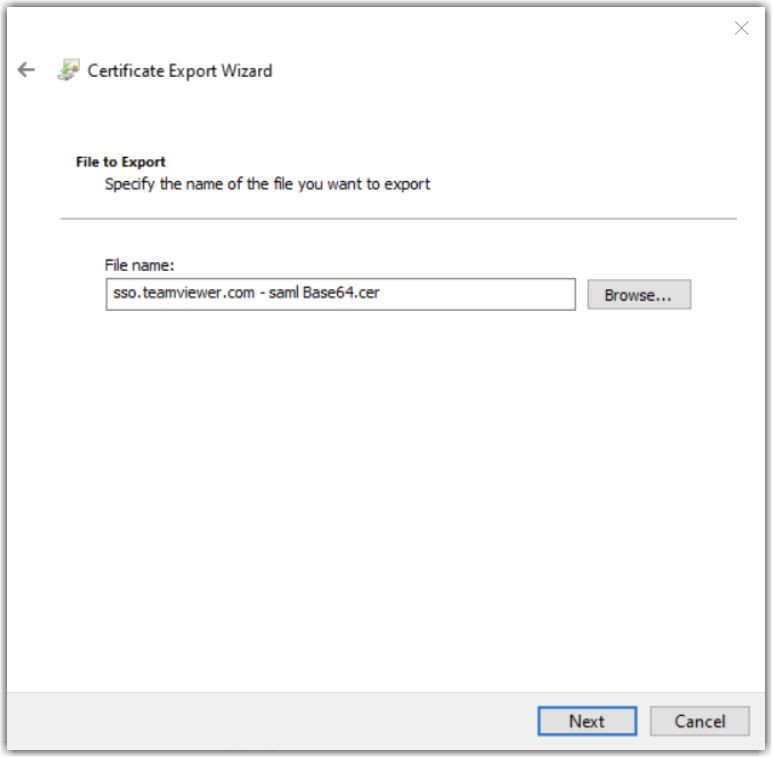
7. Click Next.
8. Click Finish.
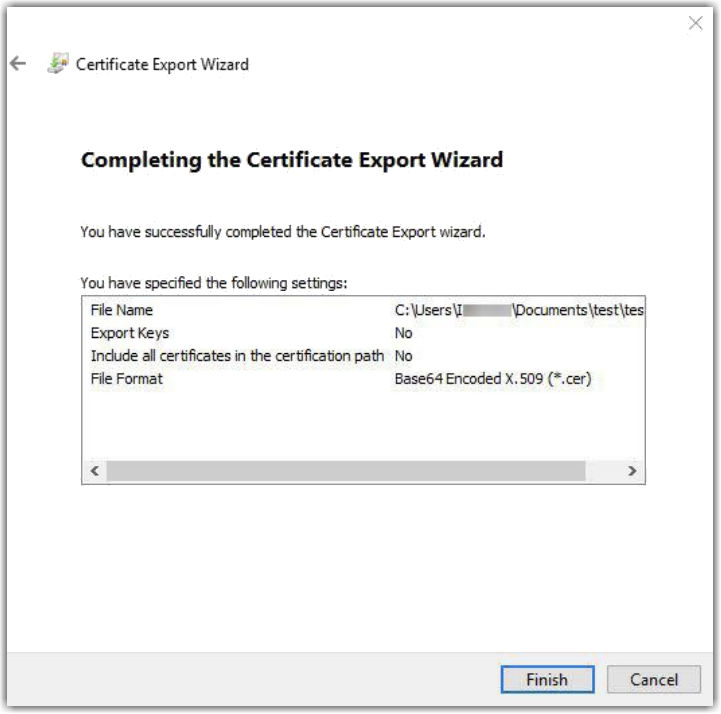
The result should look like this:
Before you can add the two required Attribute Statements, you will need to click Next to get the public key for Okta and other information required to populate the information in the SSO settings in the TeamViewer Management Console. You will come back here afterwards again to complete.
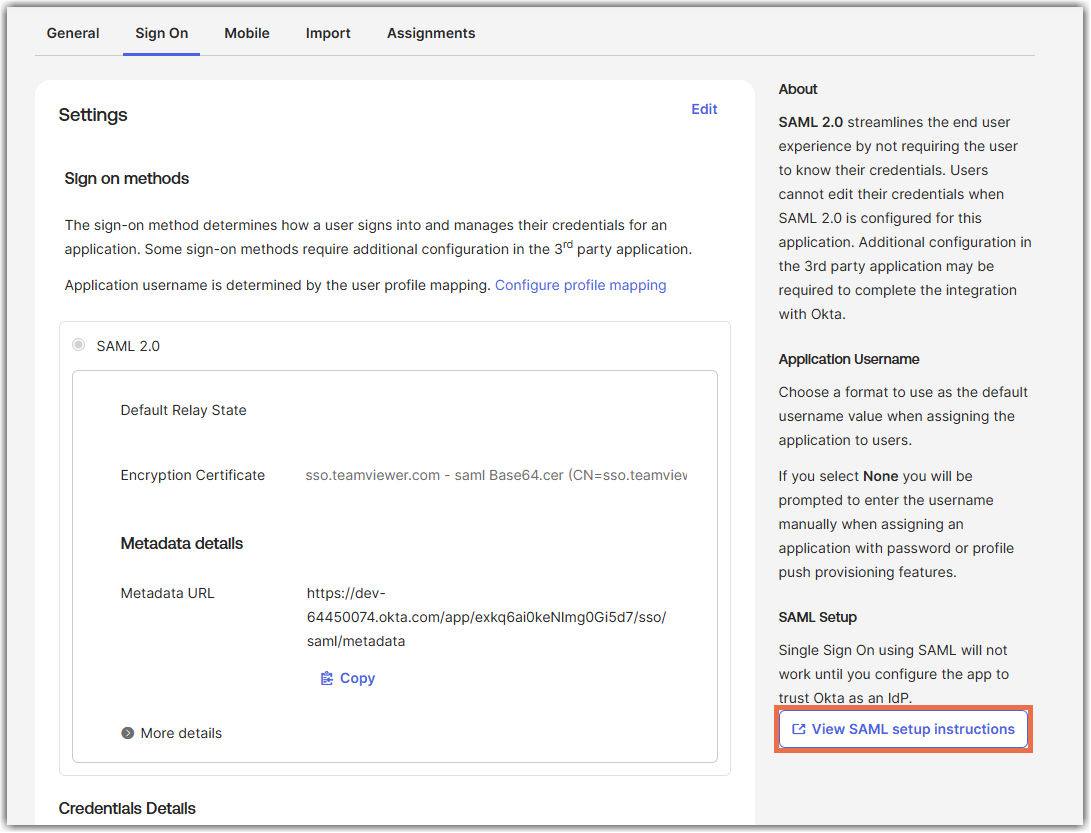
1. Select I’m an Okta customer, adding an internal app.
2. Select This is an internal and click Finish.
3. Click on View SAML setup instructions.
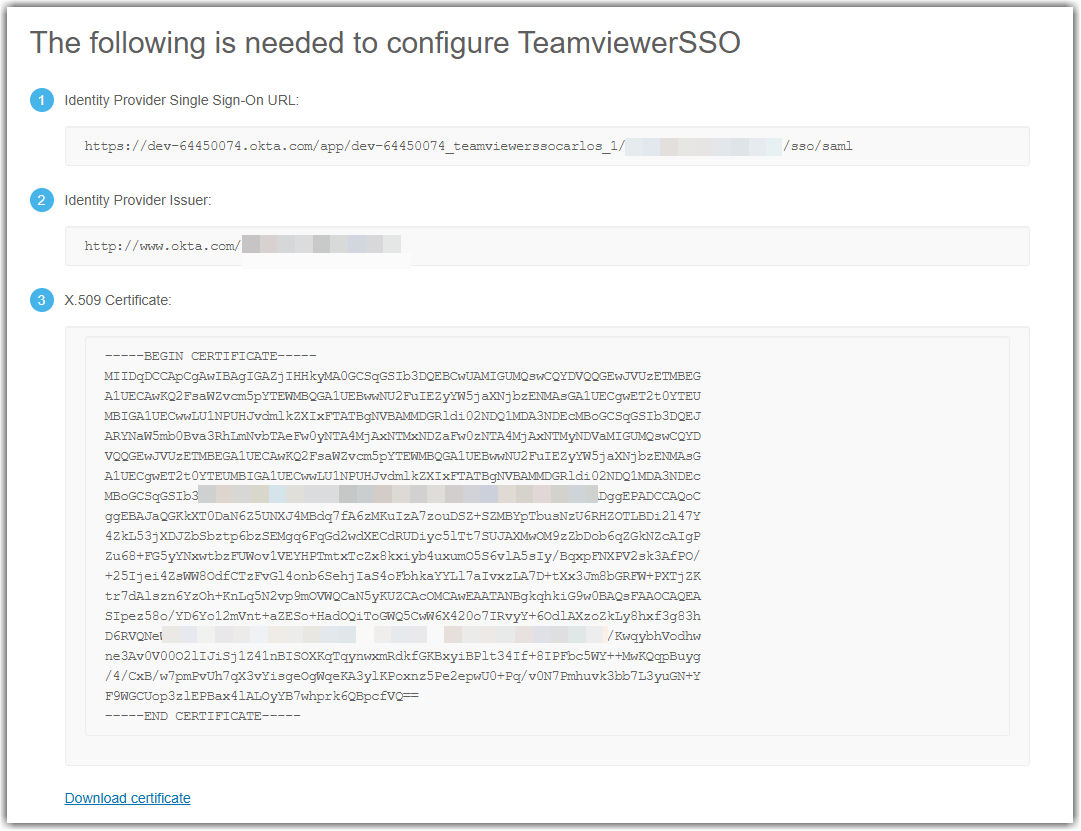
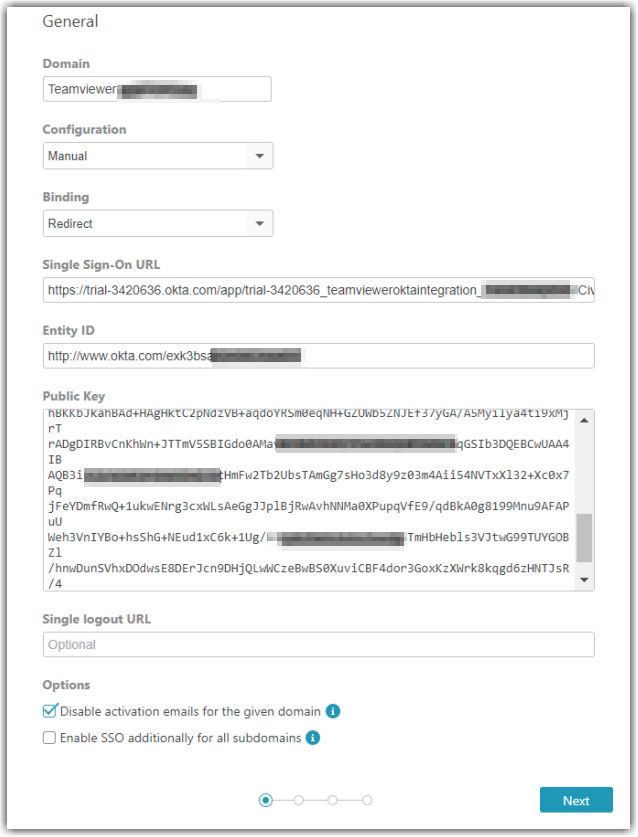
4. Log in to the TeamViewer Management Console and:
a) Select Company Administration
b) Select Single Sign-On
c) Click the + sign or Add First Domain
d) Enter your domain you want to activate SSO for
e) Change Configuration to Manual
f) Copy the information from (1) and paste it into the Single Sign-On URL field
g) Copy the information from (2) and paste it into the Entity ID field
h) Copy the information from (3) and paste it into the Public Key field, excluding the first and last line
I) Tick Disable activation emails for the given domain box
j) Click Next
k) Enter any email SSO exclusions you want to exclude from SSO
l) Click Next again
The results should look something like this:
Next, you need to generate your Customer identifier.
After the domain has been added, the customer identifier can be generated. This customer identifier is not stored by TeamViewer but is used for the initial configuration of SSO. It must not be changed at any point in time, since this will break Single Sign-On, and a new setup will be necessary. Any random string can be used as a customer identifier. This string is required later for the configuration of the IdP.
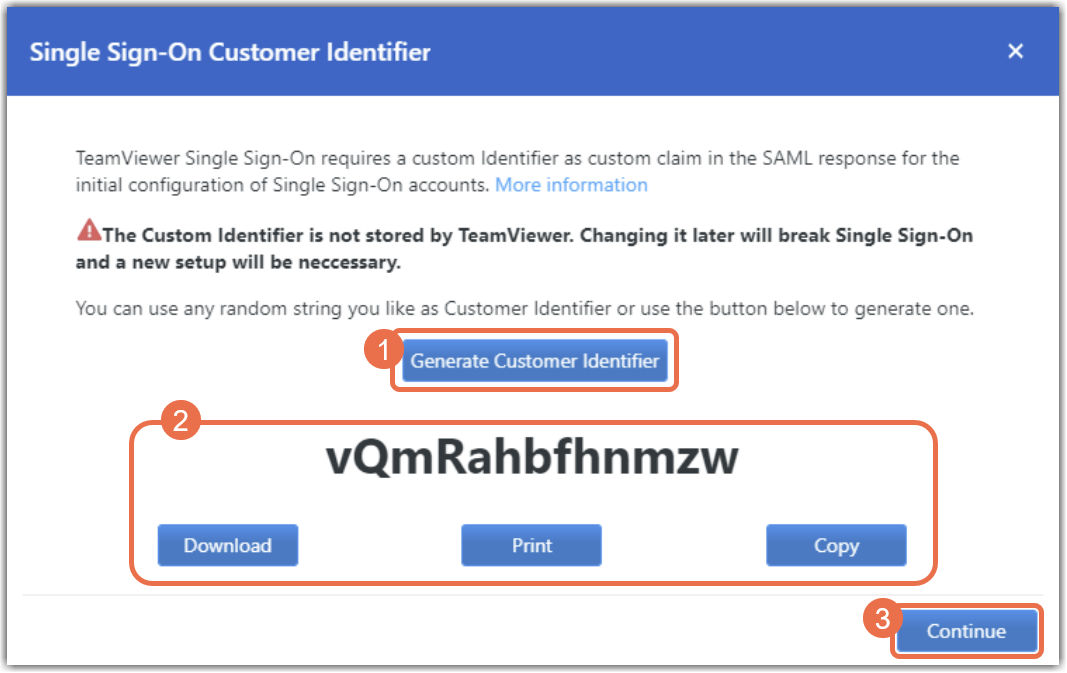
Make sure to save this, as you will need it again later.
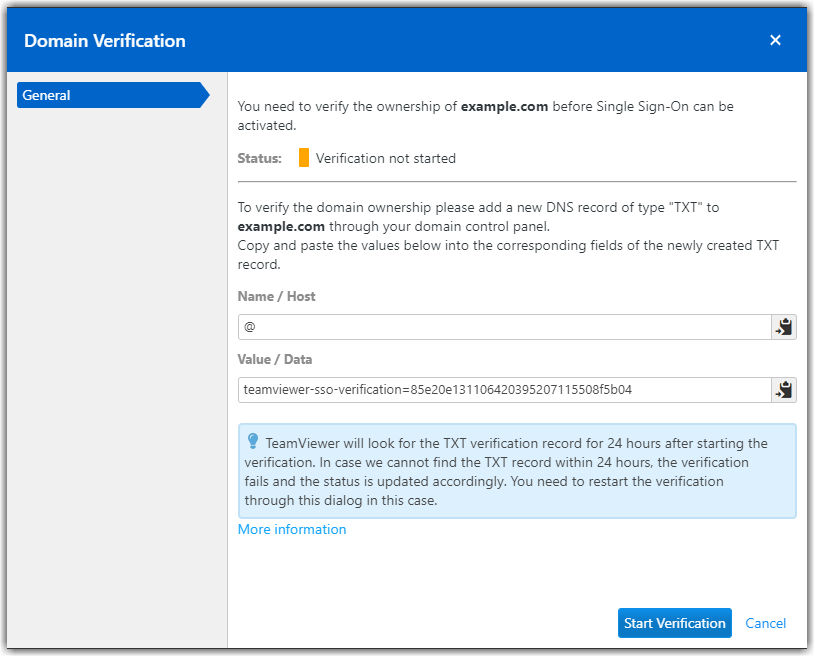
Verify domain ownership
After a domain has been added successfully, you need to verify the domain ownership.
Single Sign-On will not be activated before the domain verification is completed.
To verify the domain, please create a new TXT record for your domain with the values shown on the verification page.
Note: The verification process can take several hours because of the DNS system.
The dialog to add a TXT record might look similar to:
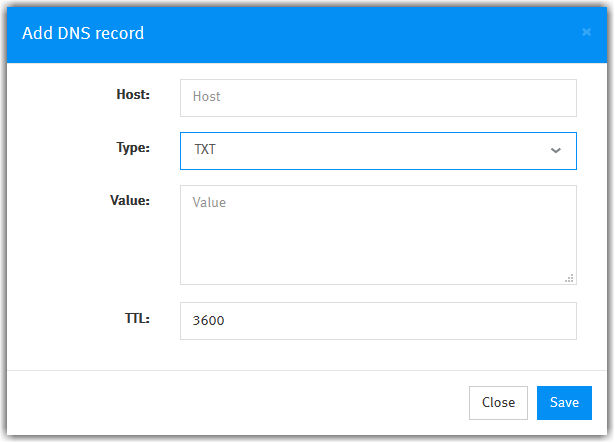
Notes:
- Depending on your domain management system, the description of the input fields may vary.
- After creating the new TXT record, start the verification process by clicking on the Start Verification button and then on Finish.
- The verification process can take several hours because of the DNS system, but it will usually take a minute or so.
Hint: TeamViewer will look for the TXT verification record for 24 hours after starting the verification. In case we cannot find the TXT record within 24 hours, the verification fails and the status is updated accordingly. You need to restart the verification through this dialog in this case.
1. Select the General tab and Edit your SAML settings.
2. Click Next.
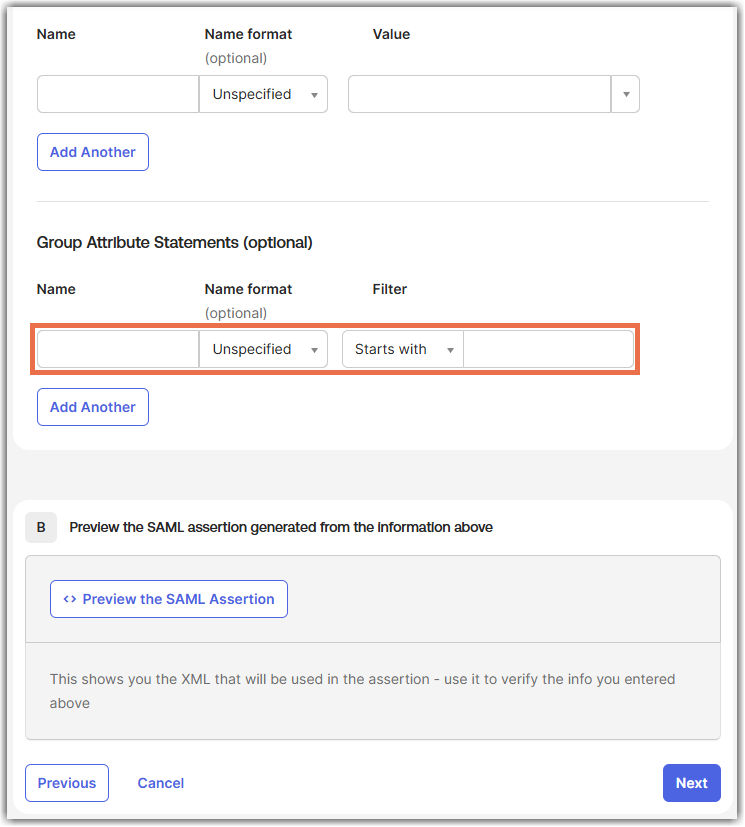
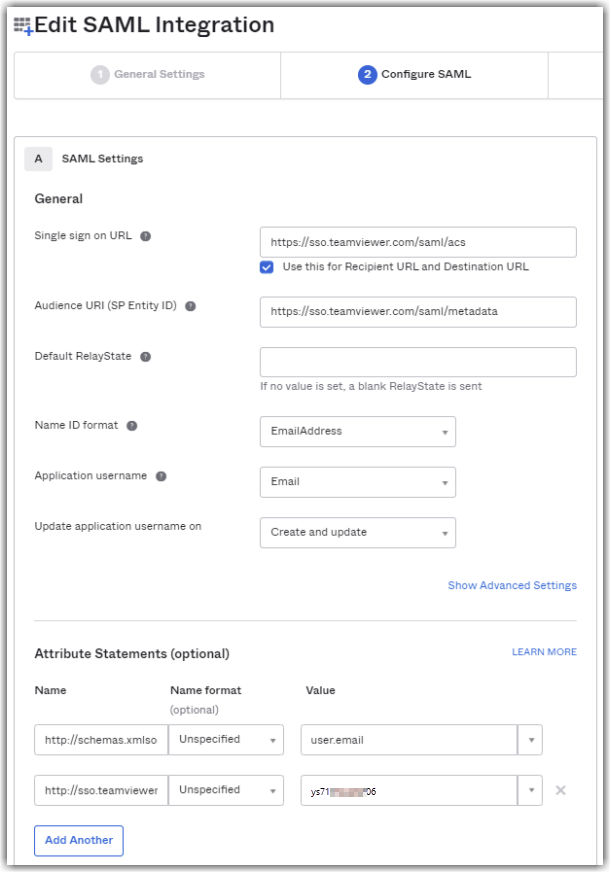
3. Go to the Attribute Statements section and enter the following two attributes:
- Name Format
http://schemas.xmlsoap.org/ws/2005/05/identity/claims/emailaddress
Value: user.email
- Unspecified
http://sso.teamviewer.com/saml/claims/customeridentifier
This attribute has to be specified by each customer when initially setting up TeamViewer SSO.
Important: The Customer Identifier that has been set initially must not change; otherwise, SSO will break. TeamViewer is not storing this value.
Your results should look like this:
4. Click Next, then Finish.
TeamViewer Client Configuration
TeamViewer is compatible with Single Sign-On starting from version 13.2.1080.
Previous versions do not support Single Sign-On and can not redirect users to your identity provider during the login. The client configuration is optional but allows changing the used browser for the SSO login of the IdP.
The TeamViewer client will use an embedded browser for the identity provider authentication by default. If you prefer to use the default browser of the operating system, you can change this behavior:
Windows:
HKEY_CURRENT_USER\Software\TeamViewer\SsoUseEmbeddedBrowser = 0 (DWORD)
macOS:
defaults write com.teamviewer.teamviewer.preferences SsoUseEmbeddedBrowser -int 0
Note: You need to restart the TeamViewer client after creating or changing the registry.
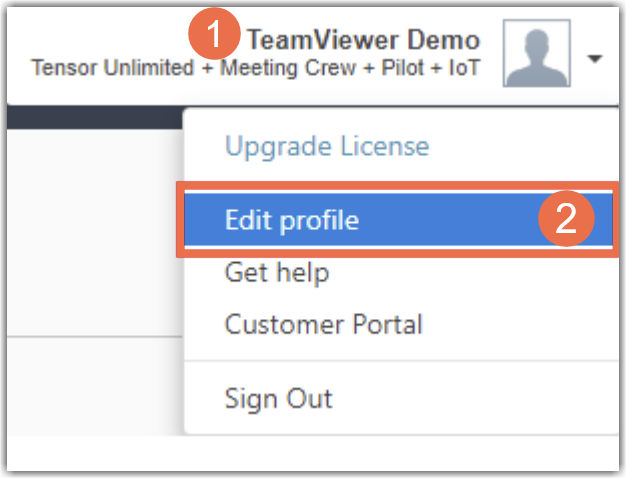
1. Open the TeamViewer Management Console, and sign in with your licensed TeamViewer Account.
3. Click on your profile name and select Edit profile.
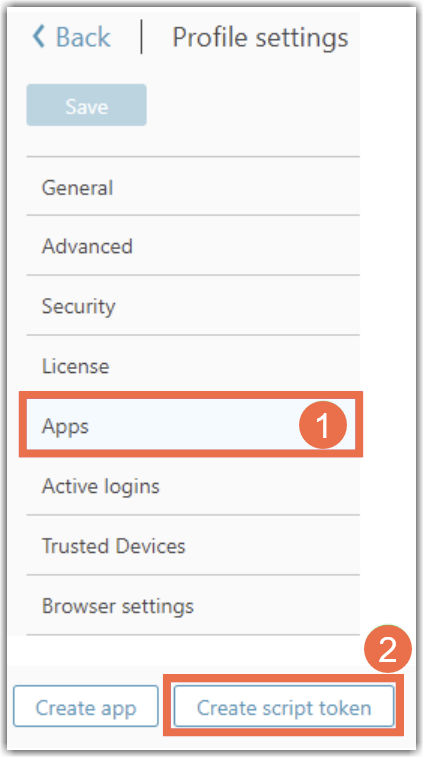
4. Click on Apps and then Create Script Token.
5. Enter a Name for your API Token and select the following options for the Token.
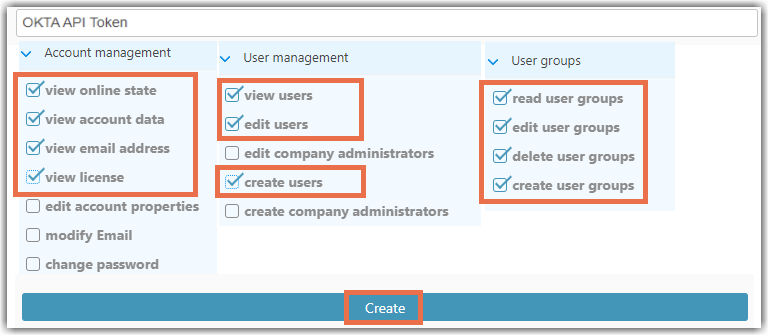
6. Click Create to receive your API Token.
7. After the token gets created, you will see the token in the overview. Expand to view the API Token. Copy the token and paste it into the Okta app next to Authorization.
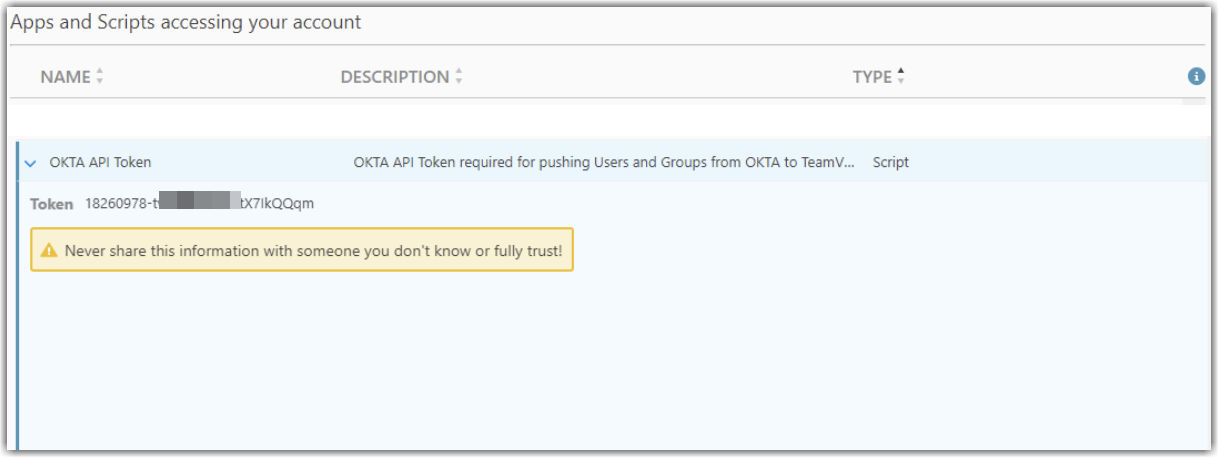
8. Copy this Token and go back to your Okta app.