With the TeamViewer Black Screen feature, you can hide the remote screen in connections to a Windows, Mac or Linux computer into a full-screen security image. To enable this feature, please follow our How-to guide below.
This article applies to all TeamViewer customers with a Remote Access, Business, Premium, Corporate or Tensor plan.
TeamViewer Black Screen
TeamViewer Black screen allows you to ensure your privacy is protected at work, by hiding the content of the remote screen.
Once this feature is activated,
- the remote computer's screen gets immediately hidden by the TeamViewer security image (see below)
- the input on the remote computer gets also disabled
Download
TeamViewer offers you different custom black screens to download and to use for free: Download Custom Black Screen
Compatibility
You can turn the remote screen black in connections from any desktop platform OS (Windows, macOS and Linux) to any Windows device running Windows 7, 8 and 10, any Linux and macOS device (only for TeamViewer version 15.8 and higher).
Prerequisites for macOS
Black screen on macOS is only available if a TeamViewer version 15.8 or higher is running on the remote Mac.
Due to technical restrictions, it is only possible to activate the black screen, if “Start TeamViewer with System” is selected.
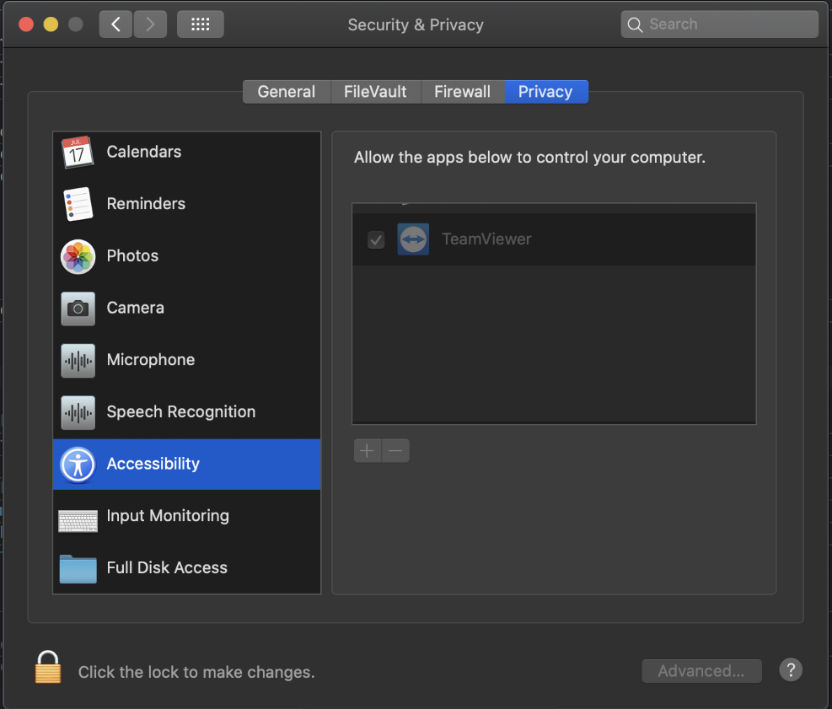
In addition to that, Accessibility permissions need to be granted for the TeamViewer application. This applies also to users on macOS 10.13 who did not need this permission earlier for a successful TeamViewer remote support.
Please keep in mind: Since 10.14 (Mojave) this setting is a pre-requisite to be able to control the remote Mac.
For an optimal remote access setup, we recommend the following:
- Deactivate Siri, as it’s still listening to voice input and will still react on “Hey Siri”
- Deactivate computer sound
Please be aware that the keyboard input on the remote side cannot be blocked while showing system password fields due to restrictions on macOS itself.
How to activate the standard Black Screen
During a remote control session
To activate the Black Screen on the remote device during a remote control session:

- Within the remote control toolbar, click Actions.
- Click Show Black Screen.
Via the TeamViewer settings of the remote computer
You can set up the TeamViewer Black Screen as default in every connection to a specific device (e.g your computer at work). To do so, you need to set it up in the TeamViewer settings of the remote computer you want to connect to.
- In the Remote UI
- In the (Classic) UI
- Open TeamViewer Remote.
- Go to Settings (⚙).
- Go to Advanced settings.
- Click Open advanced settings.
- Go to Advanced settings for connections to this computer.
- First, tick Disable local input for incoming connections and then tick Enable Blackscreen for incoming connections.
- Open TeamViewer (Classic) on the remote computer
- Go to Extras ➜ Options
- Access the Advanced tab, and scroll down to Advanced setting for connections to this computer
- First, tick the setting Disable local input and then tick Enable local blackscreen
Note: Every time you will connect to this specific computer, the TeamViewer black screen will be automatically enabled and remote input will be deactivated.
Via the Computers & Contacts list (only available with the (Classic) UI)
- In the Computers & Contacts list, select the device, click on the grey gear, and then click on Properties.
- In the Properties menu, click on Advanced.
- In the Remote input option of the Actions Settings, select Disable remote input and show black screen.
- Save by clicking OK.
Note: Every time you will connect to this specific computer, the TeamViewer black screen will be automatically enabled and remote input will be deactivated.
How to activate the customized Black Screen
Note: In our examples here, the image file is named test.png
TeamViewer offers you different custom black screens to download and to use for free: Download Custom Black Screen
You can customize this feature by inserting your own image when activating the Black Screen. To do so, please follow these instructions:
Windows
On the remote computer
1. Make sure the option Start with system option is enabled and close TeamViewer.
2. Open the Registry Editor and go to the following path:
- 32-bit version:
Computer\HKEY_LOCAL_MACHINE\SOFTWARE\WOW6432Node\TeamViewer
- 64-bit version:
Computer\HKEY_LOCAL_MACHINE\SOFTWARE\TeamViewer
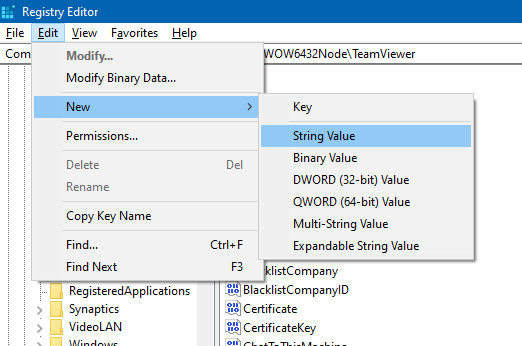
3. Now click on Edit, go to New and select String Value
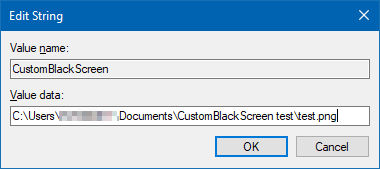
4. Rename the key entry CustomBlackScreen and add as a value the path that leads to your custom image and include the image file name in the path and click OK.
5. Now, restart the TeamViewer service.
On the local computer
- Open TeamViewer (Classic).
- Activate the TeamViewer Black Screen. Your custom image will be displayed on the remote computer.
macOS
On the remote computer
1. Make sure the option Start with system option is enabled and close TeamViewer (Classic).
2. Open the Terminal and add the following setting:
sudo defaults write /Library/Preferences/com.teamviewer.teamviewer.preferences.plist CustomBlackScreen -string "/path/to/test.png"
Please make sure that the image is located in the path you have indicated.
On the local computer
1. Open TeamViewer (Classic).
2. Activate the TeamViewer Black Screen. Your custom image will be displayed on the remote computer.
Note: The supported image formats for Windows are JPEG and PNG.
The supported image formats for macOS are BMP, GIF, JPEG, PNG.
Only relevant for Windows 7 and below
For Windows 7 and below, to be able to turn the remote screen black, the TeamViewer monitor driver needs to be installed on the remote device. If the driver is already installed, the remote screen will turn black immediately.
If it is not installed, you will be prompted to install it when using the feature for the first time. A pop-up will appear. Please click on Continue to install the driver.
You can also install the TeamViewer monitor driver via the TeamViewer settings.
- Go to Settings (⚙)
- Go to Advanced settings
- Click Open advanced settings
- Go to Advanced network settings
- Next to Install monitor driver, click Install...
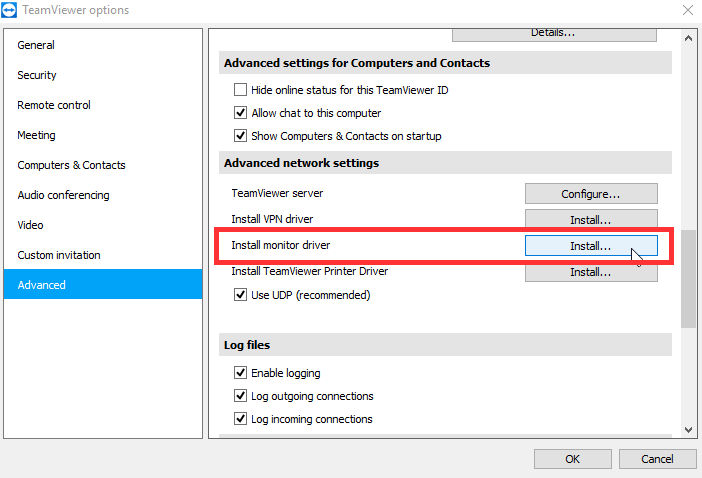
Note: Not all monitors, video cards, motherboards, or BIOS support the TeamViewer monitor driver solution, which is required to use the black screen. The TeamViewer monitor driver solution is dependent on the implementation of hardware vendors and in case of incompatibility, you may not be able to use this feature with some host computers.
Ctrl + Alt + Del / Cmd + Option + Esc
Users still have the option to press the key combination Ctrl + Alt + Del (Windows and Linux) or Cmd + Option + Esc (macOS) on the remote computer.
Ctrl + Alt + Del (for Windows and Linux)
Cmd + Option + Esc (for macOS)
This will:
- remove the black screen on the remote computer
- lock the remote user's session
- enable remote input
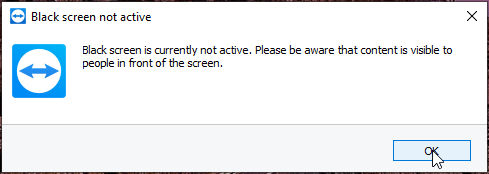
Therefore, the user working remotely can be 100% sure that no one can see what they are doing during their remote control session. As soon as the key combination is used on the remote computer, the following pop-up will appear on both sides of the connection:
Note: Locking the user's Windows session with the Ctrl + Alt + Del combination is only working on devices running Windows 8 and 10.