With TeamViewer policies, it is possible to automatically upload remote control session recordings to a self-hosted or cloud-hosted SFTP storage. Storing recordings for later reviews can be useful for quality assessments, training, and auditing. This article explains how to set up the required TeamViewer policy rule(s) to achieve this. To learn more about how to initiate a recording of a remote control session, you can read this article.
This article applies to TeamViewer Tensor license holders, with Windows supporting both incoming and outgoing session recordings and Linux supporting outgoing recordings only.
TeamViewer supports recording and uploading of incoming and outgoing remote control session recordings using separate policy rules. Recording and upload capabilities differ depending on the session direction and operating system.
|
OS
|
Session direction
|
Recording supported
|
Upload supported
|
|---|---|---|---|
|
Windows |
Incoming |
|
|
|
|
Outgoing |
|
|
|
macOS |
Incoming |
|
|
|
|
Outgoing |
|
|
|
Linux |
Incoming |
|
|
|
|
Outgoing |
|
|


TeamViewer policy setup
To configure your setup for automatic session recording upload, you must create a new policy or update an existing TeamViewer policy and add the policy rules mentioned in the following paragraphs. You can combine multiple policy rules within the policy to achieve your specific goal. Once the policy is applied to the desired devices, the configuration will take effect.
Learn how to create/update and apply policies and get more details on policy rules.
TeamViewer can record and upload both incoming and outgoing session recordings using two separate policy rules, with support depending on the operating system. The following sections explain the setup of each policy rule. Both rules can be combined, where supported, to enable uploading of both incoming and outgoing recordings.
Outgoing sessions
The primary policy rule for recording outgoing sessions is called Upload outgoing session recordings to custom storage, which offers the capability to upload recordings to your SFTP server. The setup of this policy rule will also be explained in the following section. There are two other rules that should be evaluated, as they further enhance control over when recordings are started and stopped.
The policy rule Enforce auto recording of remote control sessions will automatically start recording as soon as an outgoing connection is made from the device with the policy applied. If you want to prevent the user from stopping or pausing the recording before the remote control session ends, you can also add the Disable stopping and pausing session recordings policy rule. Both rules can be added and enabled without any further setup required.
Incoming Sessions
If you want to record incoming sessions, you need the Auto record incoming remote control sessions policy rule, which will automatically start recording as soon as a connection is made to the device with the policy applied.
To also upload these recordings to your SFTP server, the Upload incoming session recordings to custom storage policy rule has to be added. The setup of this policy rule will also be explained in the following section.
How to set up the automatic recording uploads policy rule
When you add the Upload outgoing session recordings to custom storage or the Upload incoming session recordings to custom storage rule to your policy, there are a few required and optional fields to configure, which the following paragraphs will explain in more detail.
Required fields
Currently, only SFTP servers, which can be hosted in an on-premises data center or in a cloud-based environment such as Azure or Amazon Web Services, are supported as the Service Type.
There are two authentication types available:
- Password authentication
-
Public key authentication
Choose your preferred option and verify that it is supported by your SFTP server or service. You should configure the new account and its authentication before continuing, because the password or private key are required in the next paragraphs.
Enter the Username of the account that should be used to authenticate with your server and upload the recording. Specify your Destination URL, which must be an SFTP URL targeting your server, including the path to the folder where the remote control session recordings should be uploaded. It is recommended that you minimize the permissions of the chosen account, granting only write access to the specific folder designated for uploading recordings.
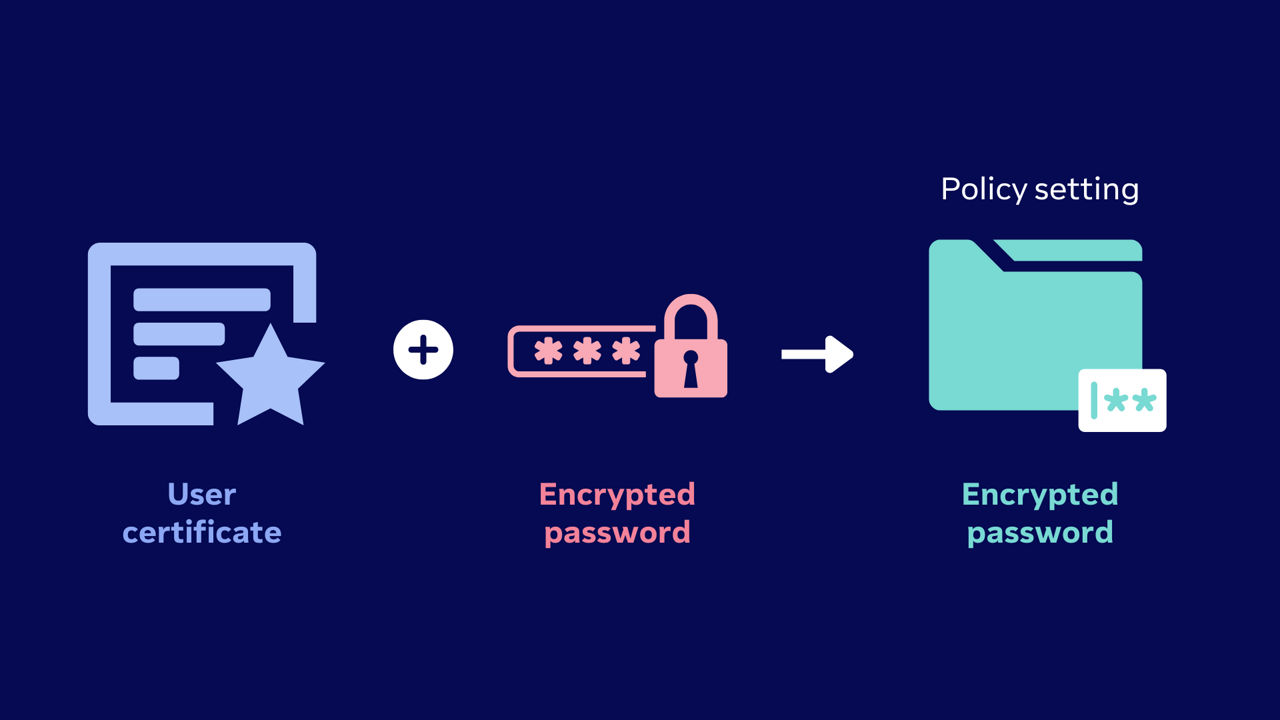
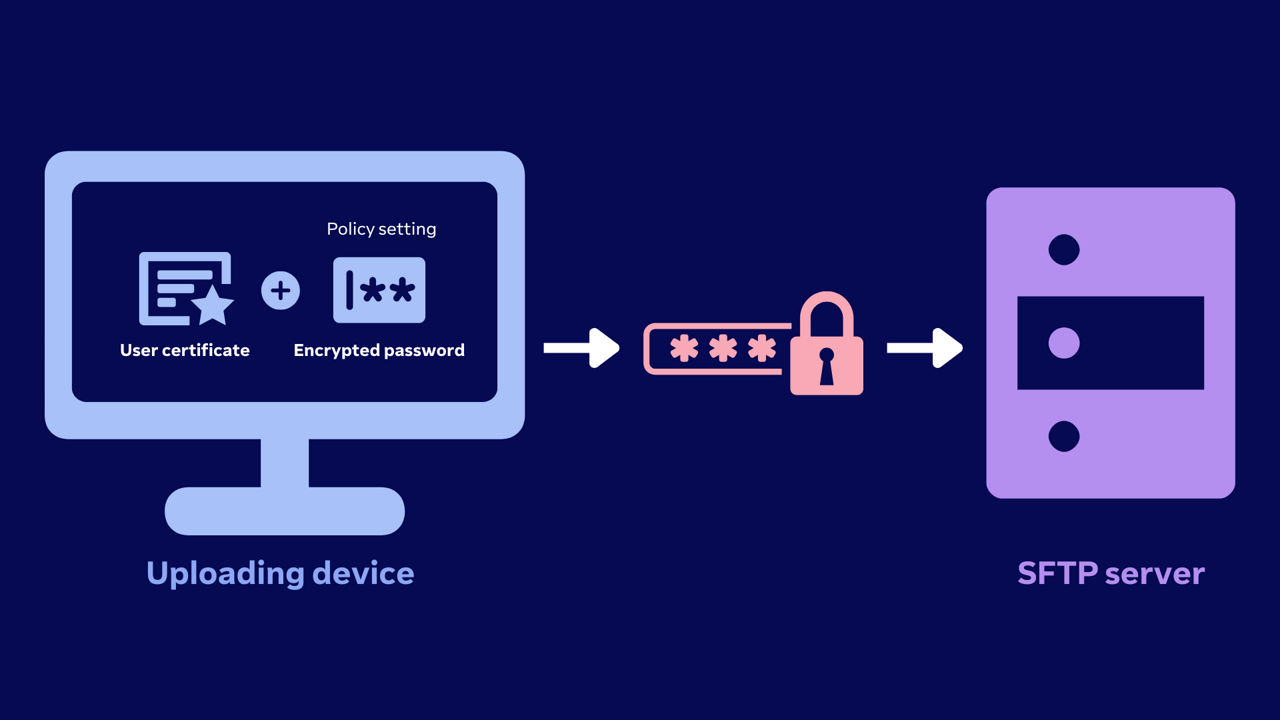
Encrypted password or encrypted private key field
To deliver the credentials of the SFTP account in a secure manner, in which only you and the uploading device can access it, the password or private key must be encrypted using a user-defined certificate. The encrypted credentials will then be added to the policy rule as an Encrypted password or an Encrypted private key. The reason you need a certificate for encryption is that it will be rolled out to multiple devices later. Your SFTP server will not handle the encrypted credentials, as the TeamViewer Application will decrypt them beforehand using the certificate. The following documentation assumes that OpenSSL is installed on your system.
There are various methods for generating certificates, depending on the operating system and the tools employed. All of them should be viable if the important parameters required for the x509 certificate are specified correctly:
-
Key Usage: KeyEncipherment, DataEncipherment, KeyAgreement
-
Type/Extended Key Usage: DocumentEncryptionCert, also known as 1.3.6.1.4.1.311.80.1
If you want to use self-signed certificates, then you can use the openssl req command (please find its documentation here), replacing <CertificateAndKeyName> with a name of your choice:
openssl req -x509 \-newkey rsa:2048 \-keyout <CertificateAndKeyName>.pem \-out <CertificateAndKeyName>.crt \-addext keyUsage='keyEncipherment, dataEncipherment, keyAgreement' \-addext extendedKeyUsage='1.3.6.1.4.1.311.80.1'
This command will generate a certificate CRT and a private key PEM file, which are capable of encrypting and decrypting data. These files must be converted to PFX format before they can be rolled out to Windows devices, as explained in a later paragraph.
Once you have your certificate file, you can verify its key parameters by running the following command, replacing <CertificateAndKeyName> with your real certificate, to check if it is compatible. This is especially important if you want to verify whether an existing certificate or one from a third party can be used:
openssl x509 -text -in <CertificateAndKeyName>.crt
If your key generation was successful, you can then see the following lines within the output of your terminal. If they are not present, then the encryption and decryption of your credentials will fail.
X509v3 Key Usage: critical
Key Encipherment, Data Encipherment, Key Agreement
X509v3 Extended Key Usage:
1.3.6.1.4.1.311.80.1
Your chosen credential must be encrypted using the Cryptographic Message Syntax (CMS), as described in RFC 5652, with your certificate. This can be done by running the openssl cms command (please find its documentation here). For the following commands, you can also specify -out <FileName> to redirect the output from the terminal into a file instead.
To generate the Encrypted password, you will need to replace <Password> with the password of your SFTP server account and <CertificateAndKeyName> with the name of your certificate file. Please use echo -n on Linux to avoid adding a new-line character at the end of your password:
echo "<Password>" | openssl cms -encrypt -outform PEM <CertificateAndKeyName>.crt
If you want to use the Encrypted private key instead, you will need to replace the <PathToPrivateKey> with the relative or absolute path to your private key of the SFTP server account.
openssl cms -encrypt -in <PathToPrivateKey> -outform PEM <CertificateAndKeyName>.crt
Once the credentials are successfully encrypted, the resulting output will look like the following example:
-----BEGIN CMS-----
MIIBwgYJKoZIhvcNAQcDoIIBszCCAa8CAQAxggFqMIIBZgIBADBOMDoxCzAJBgNVBAYTAkRFMSsw
(...)
hvcNAQcBMB0GCWCGSAFlAwQBKgQQddXx6ufF4KafytY5RKIZqYAQtpGNqX/eU+Oz+lxUnYUTJQ==
-----END CMS-----
Take the respective output of your chosen command and copy it over into the rule field, including the header and footer of the output that signify the beginning and end of the message.
The preparations for the policy rule using this certificate are done, but the generated PEM and CRT files are still required when the certificate is rolled out to the devices. There are additional optional fields in the policy rule that are explained in the following paragraphs.
Optional field
Download prefix URL is an optional field, that can be specified to offer direct downloads of recordings from your servers. This information is then available via our Web API (read more about it here) or in our integrations with Salesforce and ServiceNow. The field expects a web URL including the path, which contains your recordings. Since TeamViewer does not have access to your storage, the recordings will need to retain their original name from the upload for the paths to stay valid.
While TeamViewer caches the public host-key of your SFTP server upon the first connection to check the server’s identity and prevent man-in-the-middle attacks, you can also specify it explicitly with the optional SSH public host-key setting, which is then used to verify the server identity instead. This is especially useful when you need to replace the host key of your SFTP server at some point and tell the devices to expect a different host key than they have initially cached.
In most cases, you can specify the public host-key during the setup of your SFTP server, or you can look it up in the configuration files or the dashboards of your SFTP server. If you do not have access to these values, you can also get them from your current device.
In case you have connected to the server before using SSH, you can get it from the known_hosts file within your .ssh folder. Alternatively, you can use the following command, replacing <SftpServerDomain> with your server:
ssh-keyscan <SftpServerDomain>
When you copy the host key into the settings field, ensure that you only copy the host key fingerprint, not the server’s name, IP address, key type, or comment.
This concludes the setup of the policy setting. You can extend the policy with more settings or save it now.
Preparing and rolling out the certificate
For the TeamViewer application to upload remote control session recordings to the SFTP server, it must be able to decrypt the credentials. For this, the created certificate must be converted to the format of the device's operating system to which the policy is applied. The same outgoing session upload policy can be deployed to both Windows and Linux machines if the underlying keys are the same. The incoming session policy is only supported on Windows operating systems.
Rolling out the certificates
If you are rolling this out to Windows devices, then you will need to convert your PEM and CRT files into the PFX format using the following command, replacing <CertificateAndKeyName> and <CertificateName> with the respective file names:
openssl pkcs12 \
-inkey <CertificateAndKeyName>.pem \
-in <CertificateAndKeyName>.crt \
-export \
-out <CertificateName>.pfx
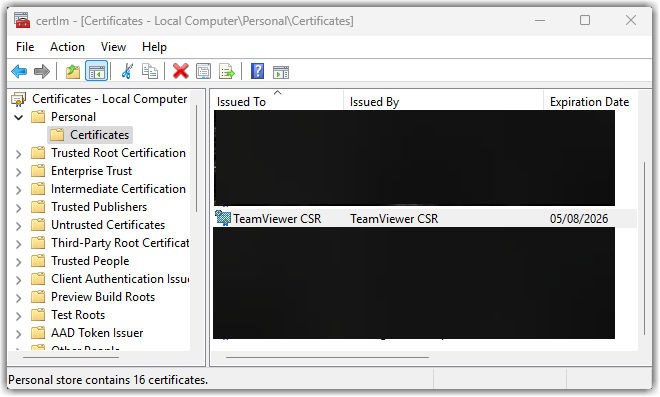
The resulting PFX certificate can be rolled out into the local machine certificate storage of the target devices using your endpoint management solution. After the rollout, the certificate should appear in the Certificates Manager for the local computer (search for manage computer certificates) within the Personal/Certificates folder.
PowerShell calls this location:
cert:\LocalMachine\My
To minimize access to the private key, restrict permissions to the SYSTEM account and only to the necessary administrator accounts. You can verify this in the Certificates Manager for the local computer by right-clicking the certificate, selecting All Tasks, then Manage Private Keys…, and confirming that only the required accounts have access.
If you are rolling this out to Linux devices, no changes are required. You should place the private key PEM file into /etc/teamviewer/ssl/private and the public certificate CRT file into /etc/teamviewer/ssl/certs. Make sure that both the public certificate and corresponding private key have the same base filename, for example, <CertificateAndKeyName>.pem and <CertificateAndKeyName>.crt. Please ensure that the root is the owner of the private key file. It is recommended to minimize access to the root itself.
Testing and applying the policy
As the setup process for this feature is complicated, this setup should be tested before it is fully rolled out to other devices. This can be tested by installing the certificate on a local device and applying the policy to the same device.
To upload the outgoing session recording, start a remote control session from the device and then begin recording. For the incoming session recording upload, start a connection to the device, and check that a recording is automatically started. Then, verify that the file is successfully uploaded to the SFTP server after the recording has stopped. This confirms that the encryption, decryption, and SFTP setup, as well as the connection to the server from the uploading device, are functioning properly.
If an upload fails, it will be retried after a short period of time, increasing with every subsequent failed attempt, up to a maximum of one hour. The timeout will reduce the number of erroneous requests to the SFTP server. Especially during testing, when the configuration is still actively adapted, the next retry may not be immediately after a recording has stopped. To attempt another upload immediately, a full TeamViewer restart can be performed (for example, by rebooting the computer).
Once the test is successful, first roll out the certificate to all devices using your endpoint management solution, then apply the policy to those devices. Once these devices record any remote control sessions, all recordings from these devices will automatically be uploaded to your server.