The target of the TeamViewer-BOSS Solutions integration is to enable IT Administrators to remotely support end users, troubleshoot issues faster, increase first call resolution and reduce ticket volume. Help Desk Operators can perform remote tasks such as file transfer, view system information and monitor hardware performance including CPU utilization, RAM usage, and device storage information.
This article applies to customers with a Premium or Corporate subscription license.
Audience
This document intends to address IT Administrators and Help Desk Operators. The rest of this document refers to these users as ‘Support Users’.
Prerequisites
It is assumed that the user is knowledgeable using BOSSDesk and BOSS Support Central. The support user needs to have valid TeamViewer credentials and an associated Premium or Corporate subscription license.
📌Please note: All screenshots provided are taken from BOSS Support Central’s platform.
Software Requirements
TeamViewer’s integration for BOSS Solutions is supported for both Cloud and On-Premise BOSS Solutions:
- BOSSDesk Cloud Solution
- BOSS Support Central On-Prem Solution
Supporters establish outgoing remote sessions via TeamViewer Full Client. Supported administrator platforms for Attended Access: Windows Client, macOS Client, Linux Client, iOS and Android.
Customers allow incoming remote sessions via TeamViewer QuickSupport. Supported customer endpoint platforms for Attended Access: Windows Desktops 7+, MacOS, Linux, iOS, and Android.
About TeamViewer for BOSS Solutions
The TeamViewer integration for BOSS Solutions embeds TeamViewer remote control functionality into your BOSSDesk Cloud based IT Service Management and BOSS Support Central On-Premise ITIL Service Desk environments. This allows you to:
- Create and join a support session directly from a service record
- Remotely control the customer’s device
- View and Manage TeamViewer session reports
With TeamViewer, you can easily create TeamViewer Service Cases and provide remote support right from your IT Service Records. The remote troubleshooting experience is improved by optimizing communication between end users and Help Desk staff. Remote control helps to increase efficiency of service desks and to improve customer satisfaction significantly.
About this article
This article describes the installation and configuration of the TeamViewer App for BOSS Solutions Cloud and On-premise environments. It also provides a short overview of the various features provided by the application.
TeamViewer Client Installation
Installing the TeamViewer application is optional. In case you do not install TeamViewer, a run-once version of TeamViewer is downloaded when you try to join/initiate a TeamViewer session. Else, the TeamViewer window will be opened automatically. We recommend installing the TeamViewer application as this will reduce the time required to join a session. However, please note that you will need administrator access on your system to install TeamViewer. To install the TeamViewer App, follow the below steps:
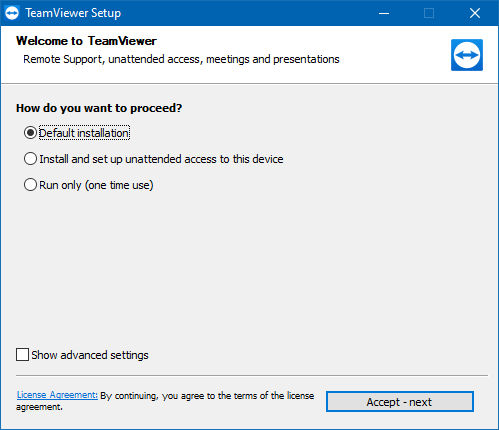
1) Download the TeamViewer (Classic) installer for your OS by invoking the following URL: https://www.teamviewer.com/en/download/
2) Run the downloaded application. Choose the Basic Installation option as shown below and then click the Accept – Finish button
3) In case the User Account Control dialog pops up, click the Yes button. TeamViewer installation will proceed and complete.
Enabling TeamViewer-BOSS Integration
For both Cloud and On-Premise BOSS Solutions, Administrators will need to follow the same configurations steps to enable the integration.
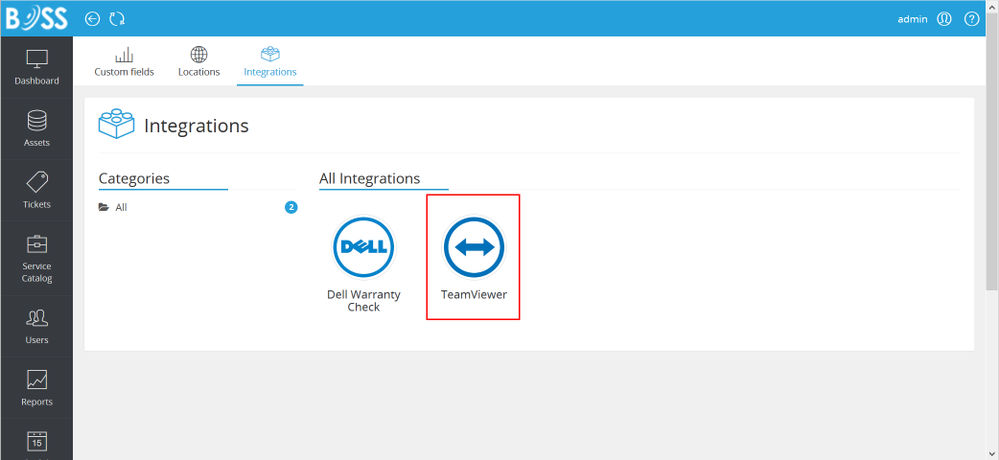
1) Navigate within the BOSS platform to Settings ➜ General ➜ Integrations ➜ TeamViewer:
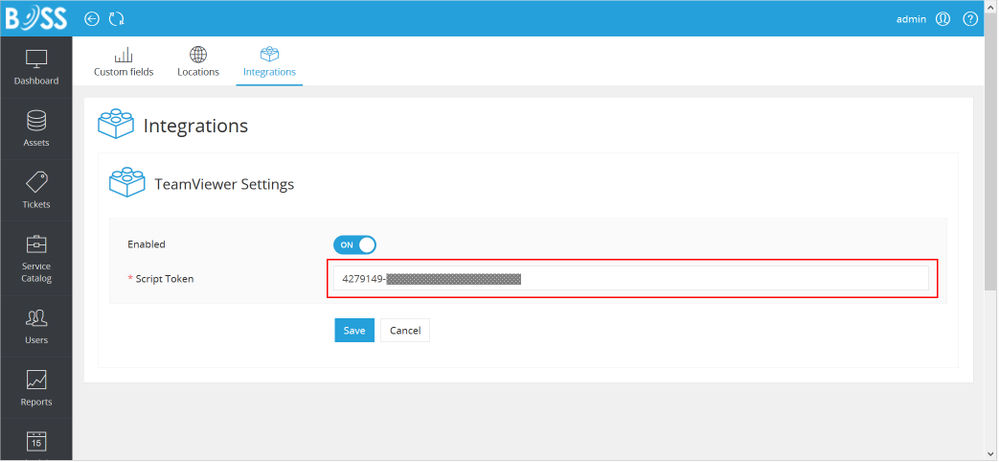
2) Administrators will be required to enter their Script Token (see next steps to generate App token):
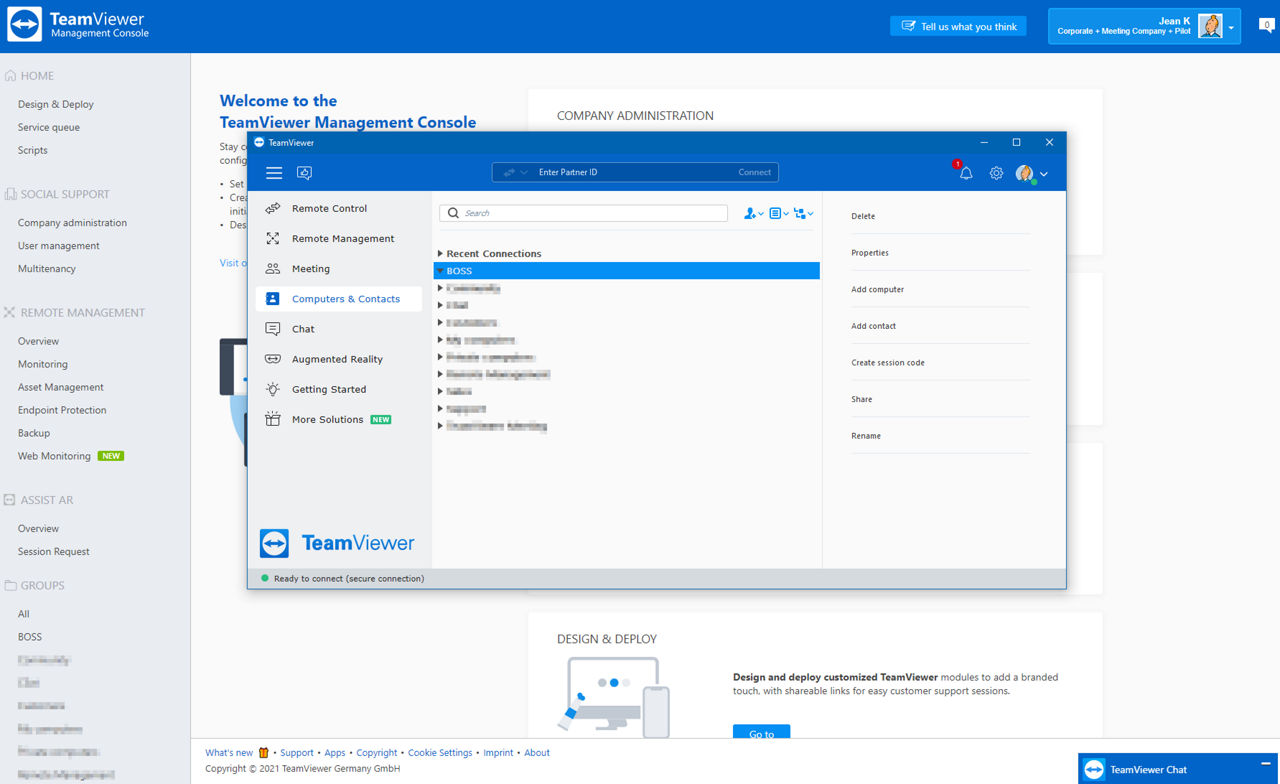
3) To retrieve the script token, navigate to the TeamViewer (Classic) Management Console
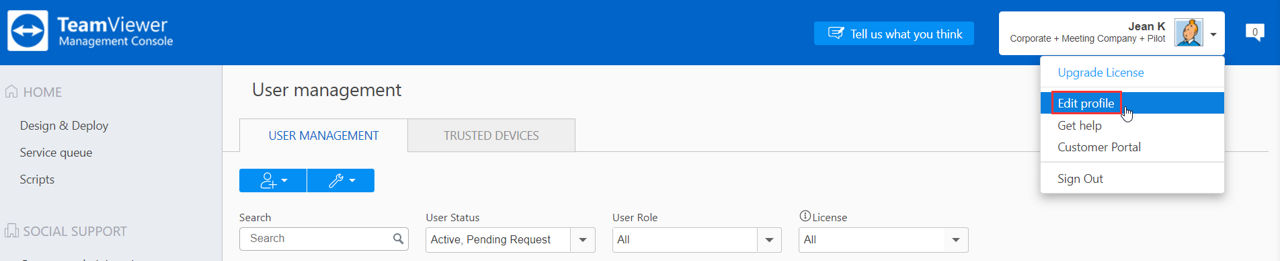
4) Once signed in, select the User Profile in top right corner ➜ Edit Profile
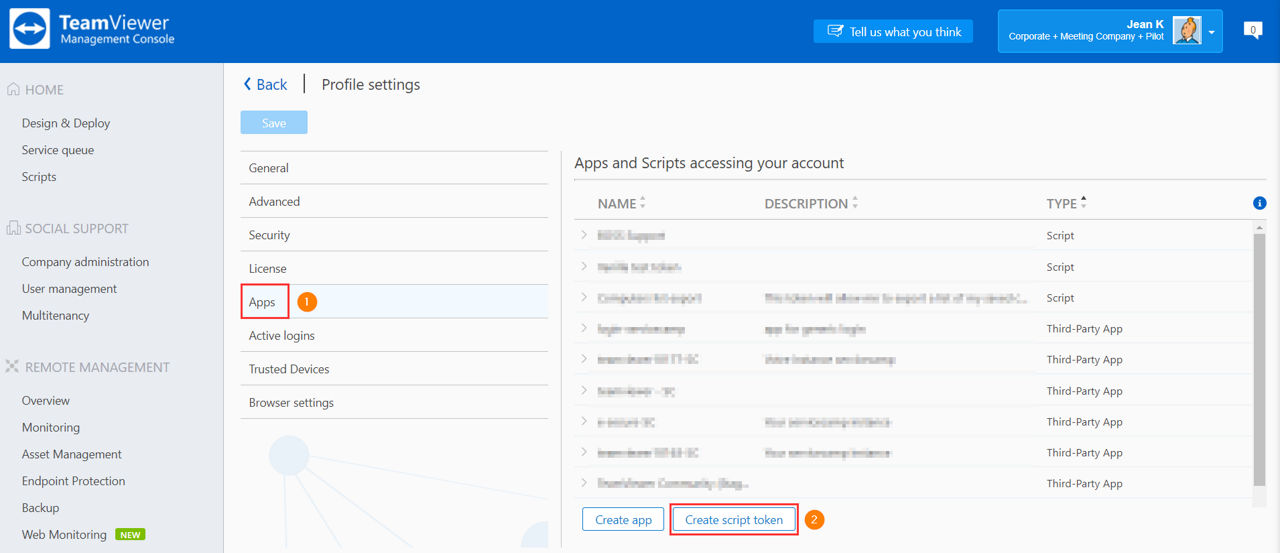
5) The Profile settings will display, choose Apps ➜ Create Script Token
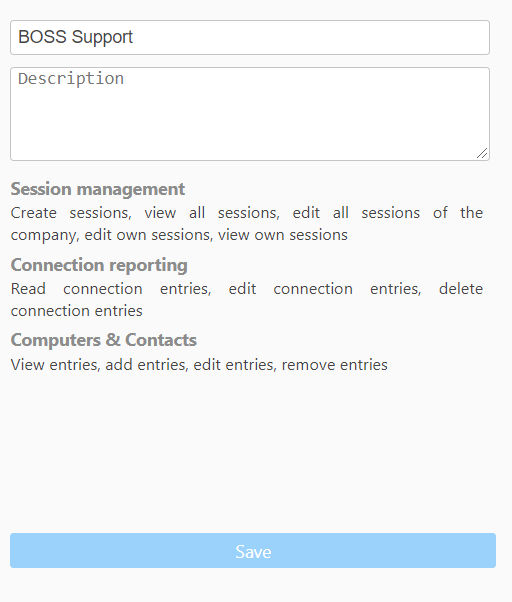
6) Provide the App a unique name ex. BOSS Support and choose proper permissions:
- Session Management: Create, view and edit all sessions
- Connection reporting: View, edit and delete connection entries
- Computers & Contacts: View, add, edit and delete entries
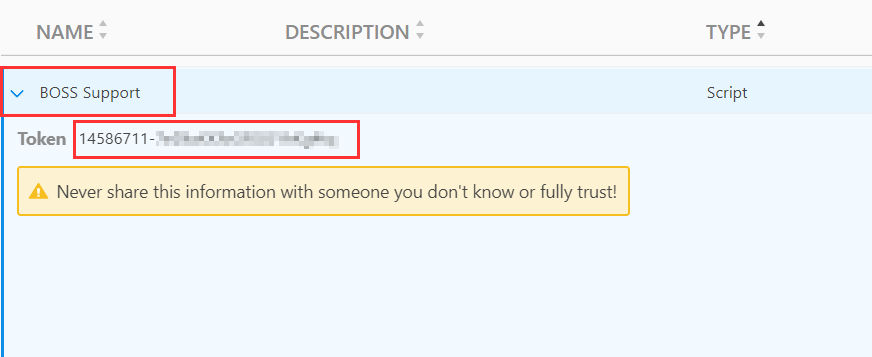
7) Click on the created script. Copy the token from the menu as below.
Using TeamViewer for BOSS Solutions
Once enabled, TeamViewer displays in the integration widget on the right sidebar. Supporters can create one active service case per ticket instance. Creating a service case initiates a new TeamViewer session.
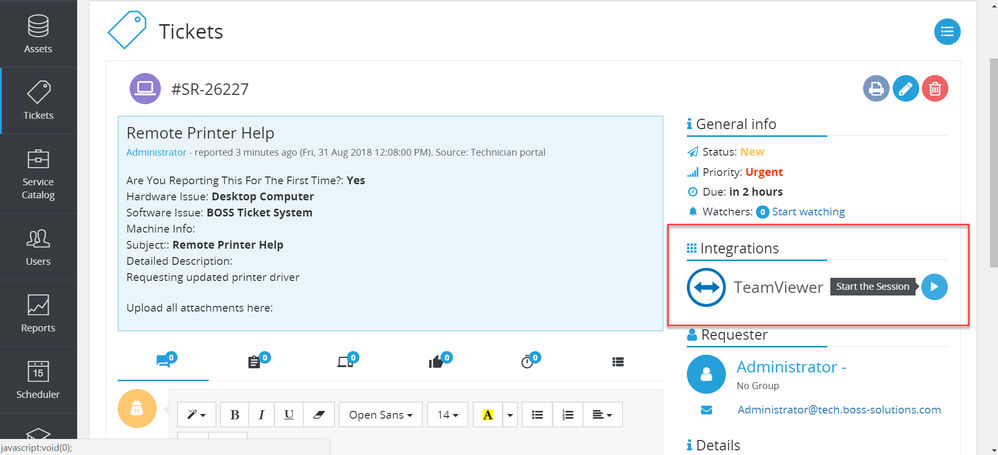
Starting a TeamViewer Session
The play button allows you to create a new service case i.e. to establish a TeamViewer session. This button remains enabled if no valid service case exists for this entity instance or if the service case has expired. To create a new service, click the play button.
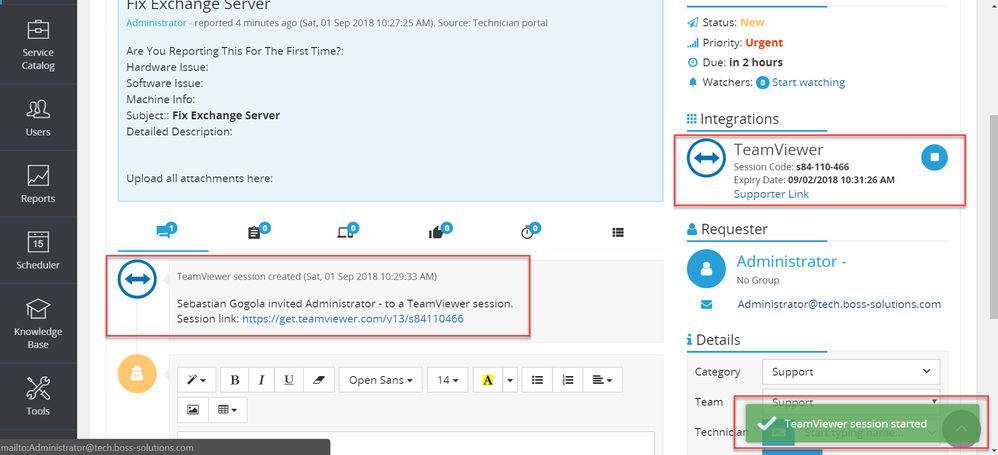
You will notice the play button turns to a stop button and the system automatically sends the requestor a pre-defined template with the Customer Link (to customize the template, please see section ‘Defining TeamViewer Email Template’). Also, service case details are shown, displaying the Session Code, Expiry Date and the Supporter Link.
Session Code
This is the ID of the TeamViewer session that was just created prefixed with a ‘s’ to an 8-digit code XX-XXX-XXX for tracking purposes.
Expiry Date
TeamViewer generated session links remain valid up to 24 hours or if the support user closes the session (to close a service case, please see section ‘Closing a TeamViewer Session’).
Supporter Link
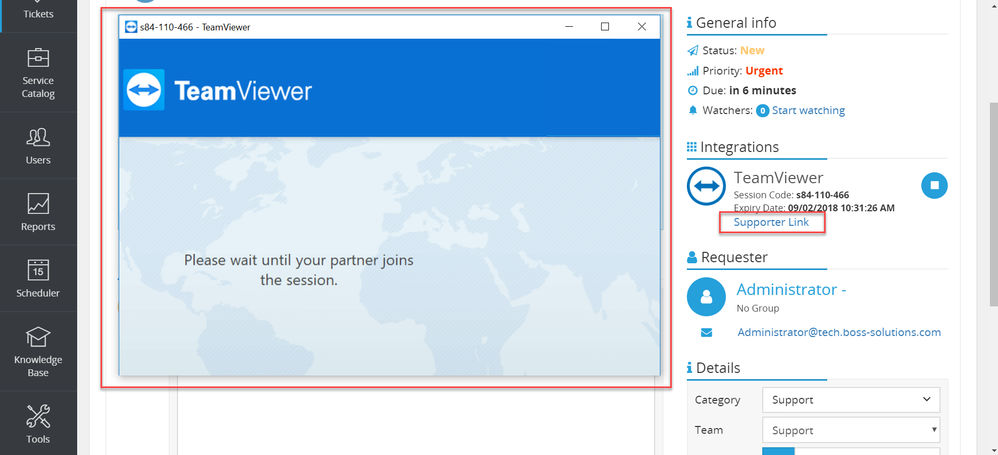
Clicking the Supporter Link allows the Admin to connect to a remote device.
Customer Link
Clicking the Customer Link allows a remote connection to take place on the end user’s device.
Additionally, after the first session has been created, the TeamViewer administrator who has enabled the integration will automatically have a new group named ‘BOSS’ within their Computers & Contacts list, located in the MCO & full client. This will be useful when administrators wish to enable Additional Features.
Connecting to a TeamViewer Session
Once the customer receives the email and joins the TeamViewer session by clicking on the customer link, you will be notified via an email or desktop notification message through the full client (to enable notifications, please see section ‘Service Case Notifications’). Once notified, you can join the TeamViewer session by clicking on the Supporter link available in the widget.
Supporter Side
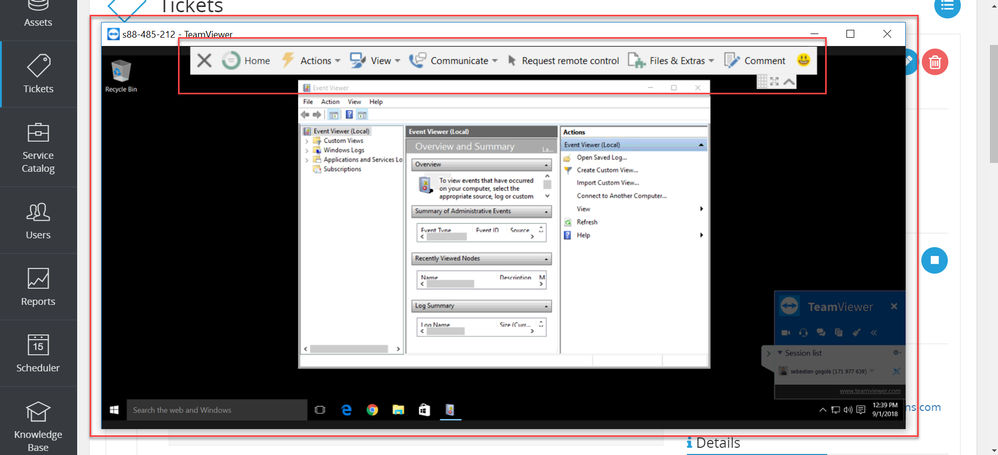
Once the support user clicks the Support Link a separate webpage opens prompting the user permission to launch the full client. For convenience, check the box to have the action perform automatically. Once the TeamViewer window is launched, the support user is brought to the waiting portal until the customer allows the remote request.
After the customer allows the request, the remote connection begins allowing the support user to perform various remote tasks via the top navbar.
Customer Side
When the end user clicks the Customer Link they will be redirected to support organization’s branded landing page (to brand and customize your QuickSupport, please see section ‘Company Branding’) and launch the downloaded QuickSupport executable to initiate the remote session. The requestor’s name will be pre-populated with the signed in computer user and the session will start automatically.
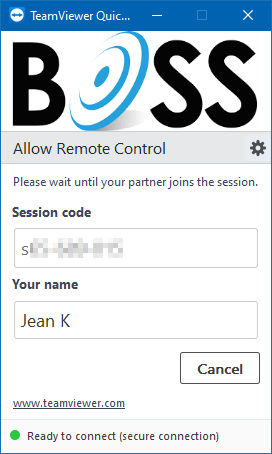
The support user after being notified the session has started will be able to request control of the end user’s device displaying their user name and picture. Once the end user clicks ‘Allow’ the support user will have full control of their device.

Closing a TeamViewer Session
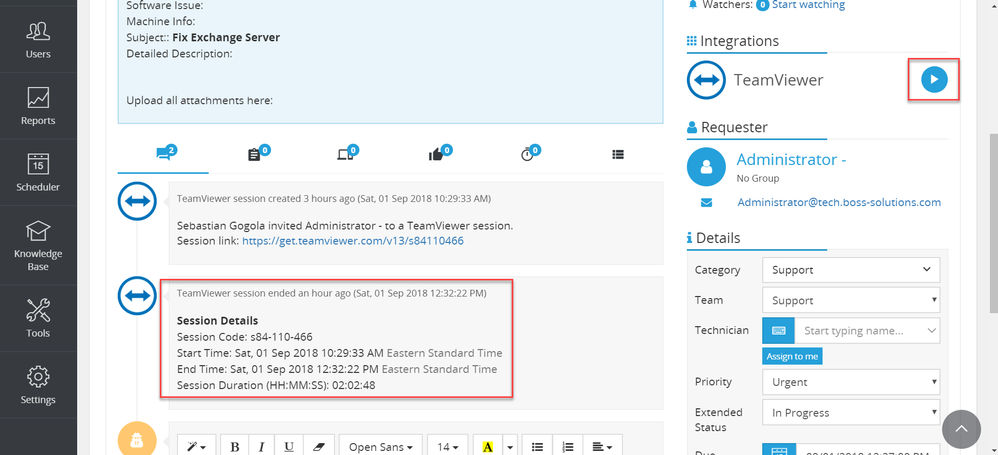
Once the remote support session has ended you will need to close the service case by clicking the stop button . When the service case closes, session details displaying start/end times and session duration are shown in the comments of the service record. Support users will then be able to generate a new session if needed by clicking the re-enabled play button.
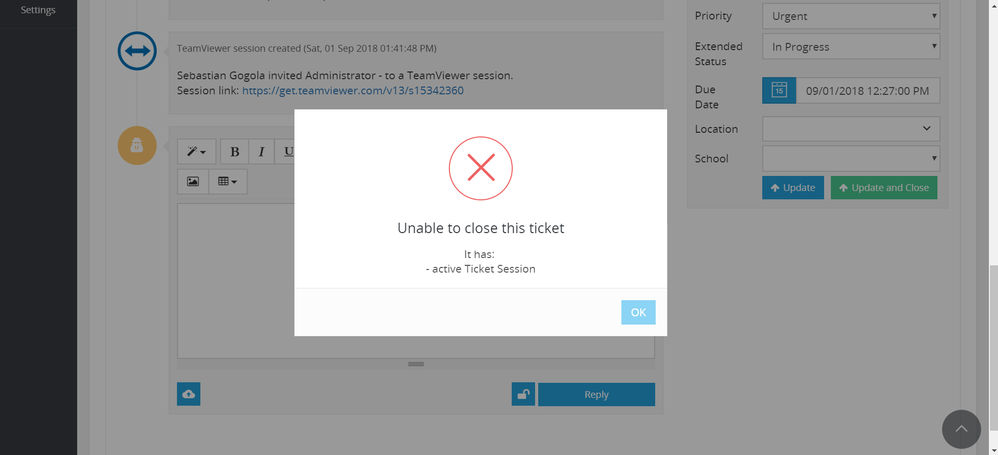
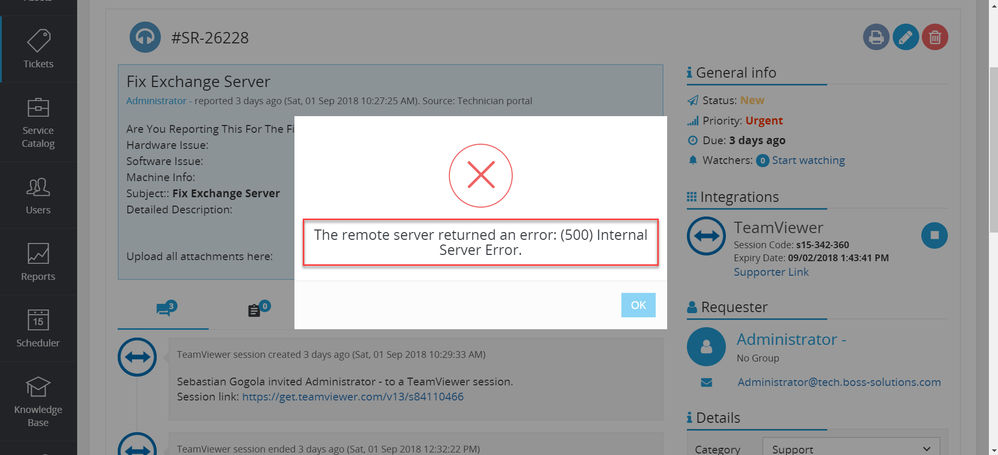
📌Note: Session times/dates/durations are taken from BOSS-Solutions server and before closing a service ticket any active TeamViewer service cases must be closed as well. Otherwise, the support user will receive an error as shown below:
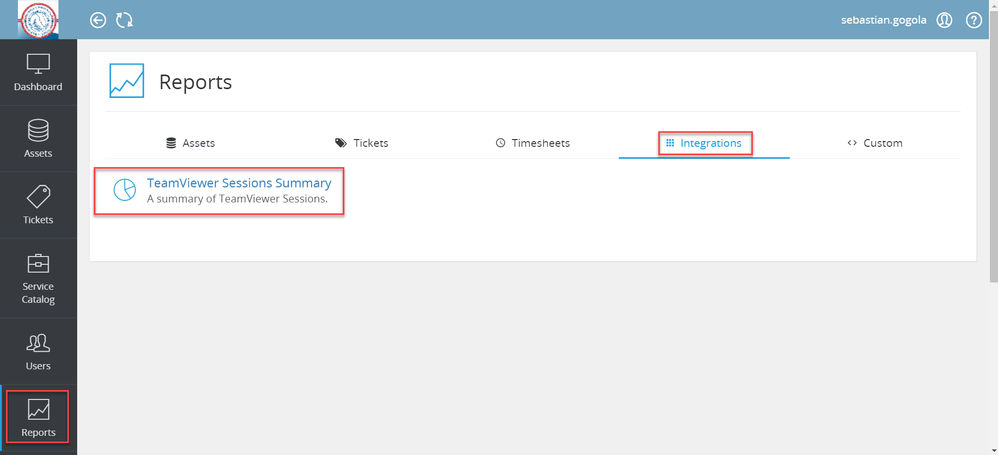
Session Reporting (TeamViewer Connection History)
To view session reports, navigate in the BOSS dashboard to Reports ➜ Integrations ➜ TeamViewer Sessions Summary.
In the TeamViewer Sessions Summary dashboard, IT staff generate reports filtering by technician and date range. Please see below for available report types.
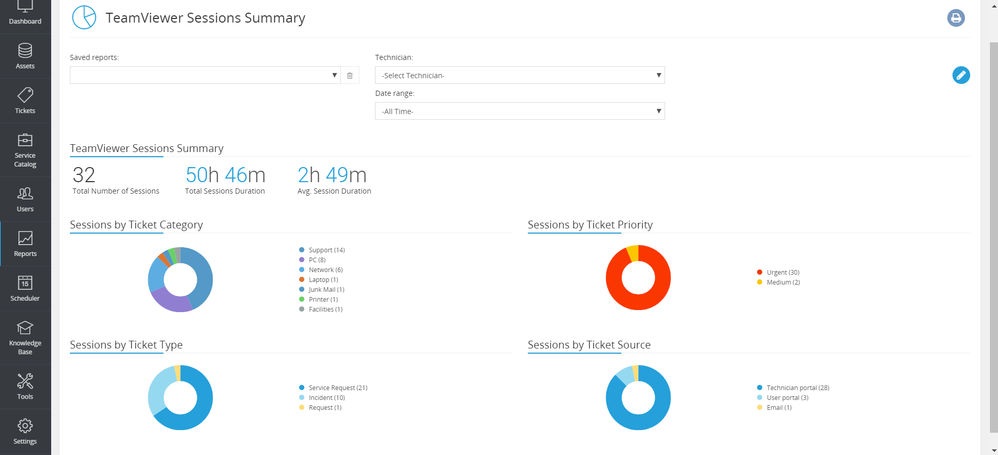
TeamViewer Sessions Summary
Displays total number of sessions generated by the system, total session duration time and average session duration performed by the IT staff.
Sessions by Ticket Category
Displays type of ticket categories e.g. Support, PC, Network, Printer associated with the remote session
Sessions by Ticket Type
Displays associated remote session to ticket type i.e. Service Request, Incident, Request.
Sessions by Ticket Priority
Displays associated remote session to ticket priority e.g. Urgent, Medium, Low, etc.
Sessions by Ticket Source
Displays associated remote session to ticket source where end users initiated the request i.e. technician portal, user portal, email, etc.
Additional Features
TeamViewer users accessing the Management Console can enable additional features such as customizations to brand the QuickSupport module/landing page and share service case notifications to other support users.
Company Branding
To apply your company’s logo and customize the QuickSupport App’s verbiage, you must sign into the Management Console. Please see steps below:
1) Log into https://login.teamviewer.com and enter TeamViewer account credentials
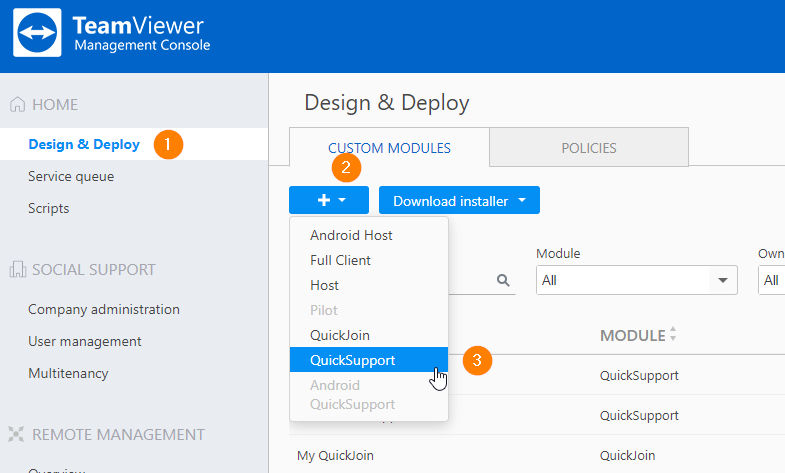
2) Navigate to Design & Deploy section and click the + button and select QuickSupport
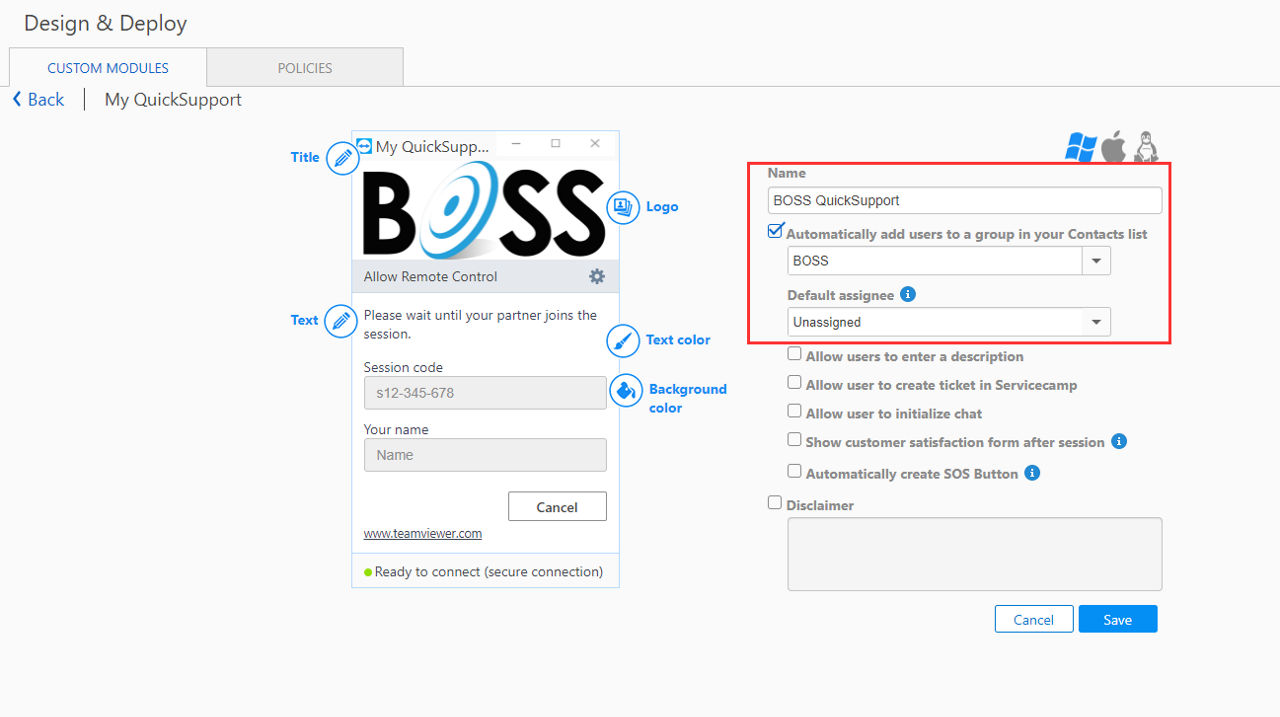
3) Name the module meaningful to BOSS and apply the desired customizations. Please make sure to leave the default assignee as ‘unassigned’ and choose the group ‘BOSS’ in the dropdown options
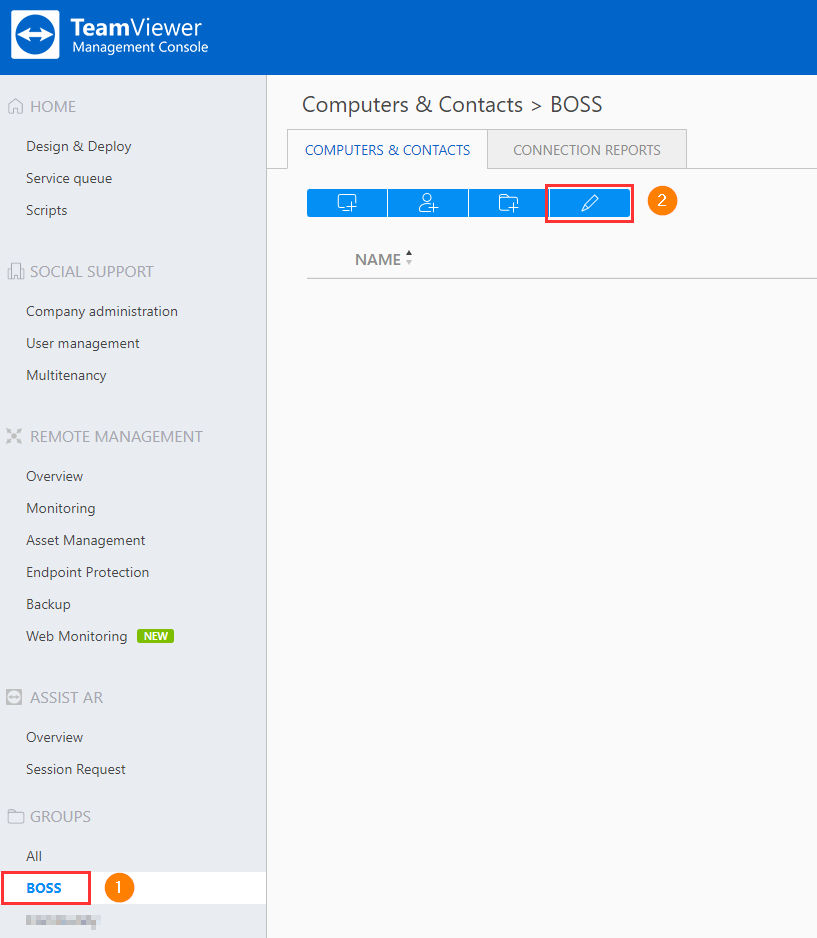
4) Once the settings have been saved, click on the BOSS group in the left sidebar, click the pencil icon (Edit) ➜ and select the previous created QuickSupport module in the Custom QuickSupport dropdown and click on Save
Now the customized QuickSupport changes will be applied to the customer link when the end user requests remote assistance.

Service Case Notifications
TeamViewer by default will notify Supporters when a service case has come online either through a desktop notification via the full client or an email notification. To enable these notifications for the administrator and other helpdesk staff, please see steps below:
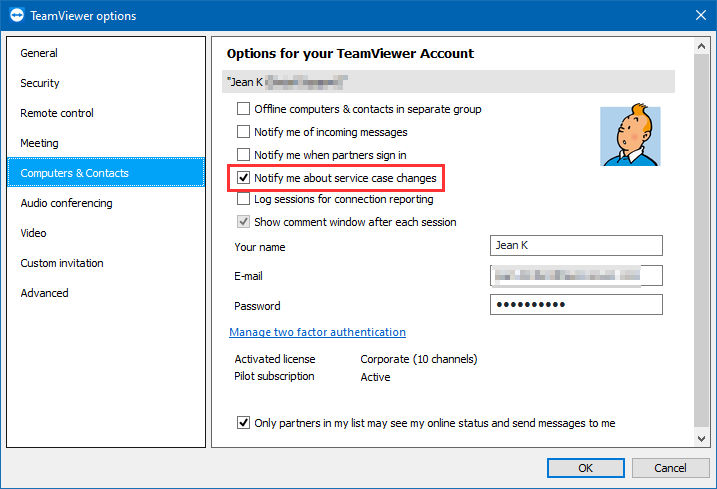
To enable desktop notifications via full client, please make sure to have this enabled by navigating to Extras ➜ Options ➜ Computers & Contacts ➜ and select the checkbox Notify me about service case changes.
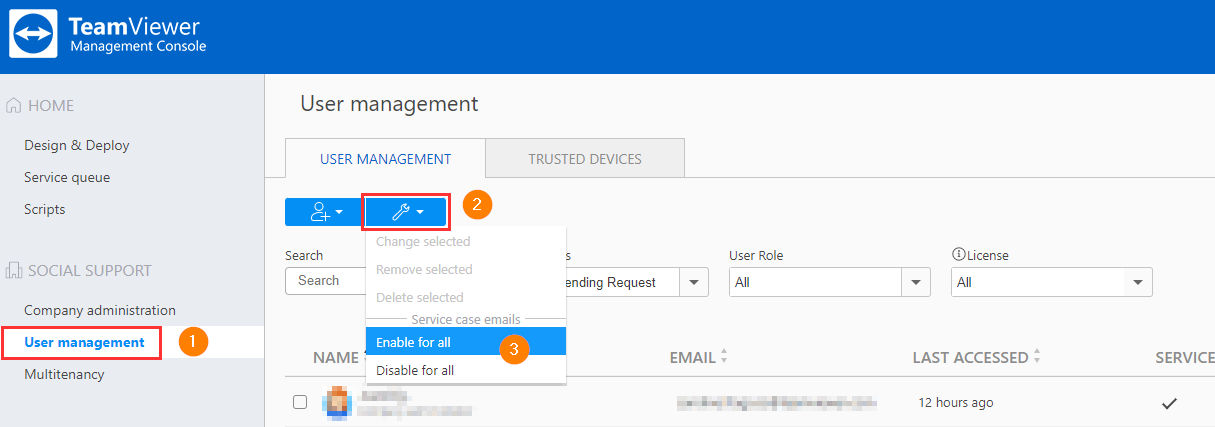
To enable email notifications, please make sure you are signed into the Management Console and under User Management click Tools ➜ Service case emails: Enable for all.
The next step is for the administrator who has enabled the TeamViewer integration, share the group with other support users to receive notifications when the service case has become online. Please note that to receive these notifications, the helpdesk users would need to be added to the TeamViewer company profile.

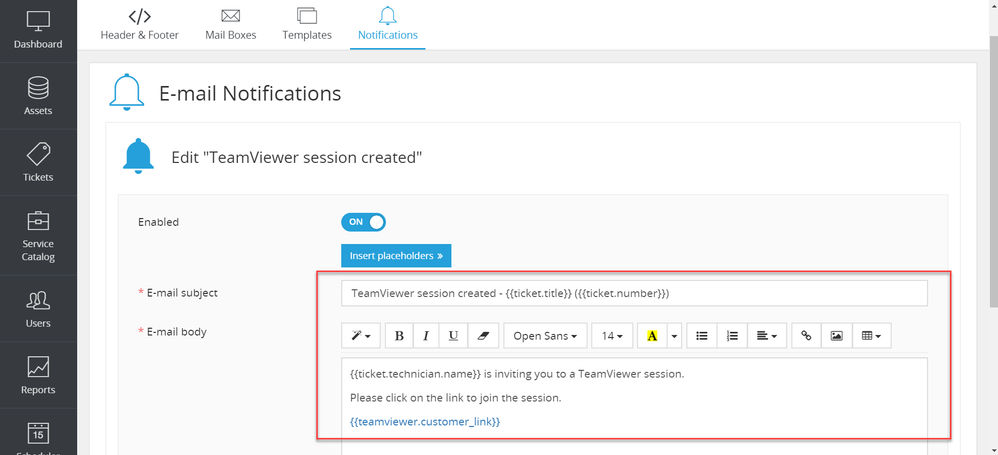
Defining TeamViewer Email Template
Administrators can customize the pre-defined email notification sent to customers when requesting a remote session. Please see below steps:
Navigate to Settings ➜ under Email Settings ➜ click Notifications ➜ Integrations ➜ click pencil icon to Edit.
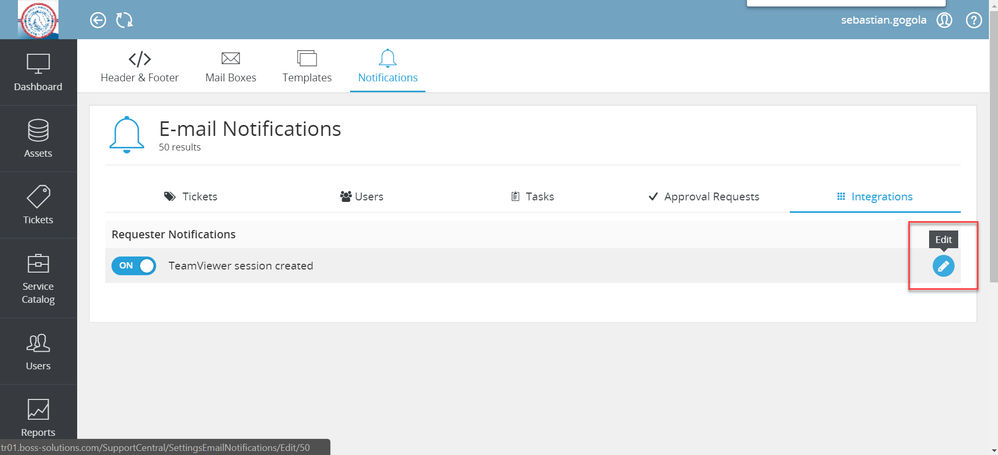
Here you will be able to customize the service case message, placing parameters within the Subject and Body of the email notification.
Available parameters:
- Customer link: {{teamviewer.customer_link}}
- Ticket Subject: {{ticket.title}}
- Service Record #: ({{ticket.number}})
- Help Desk Technician: {{ticket.technician.name}}
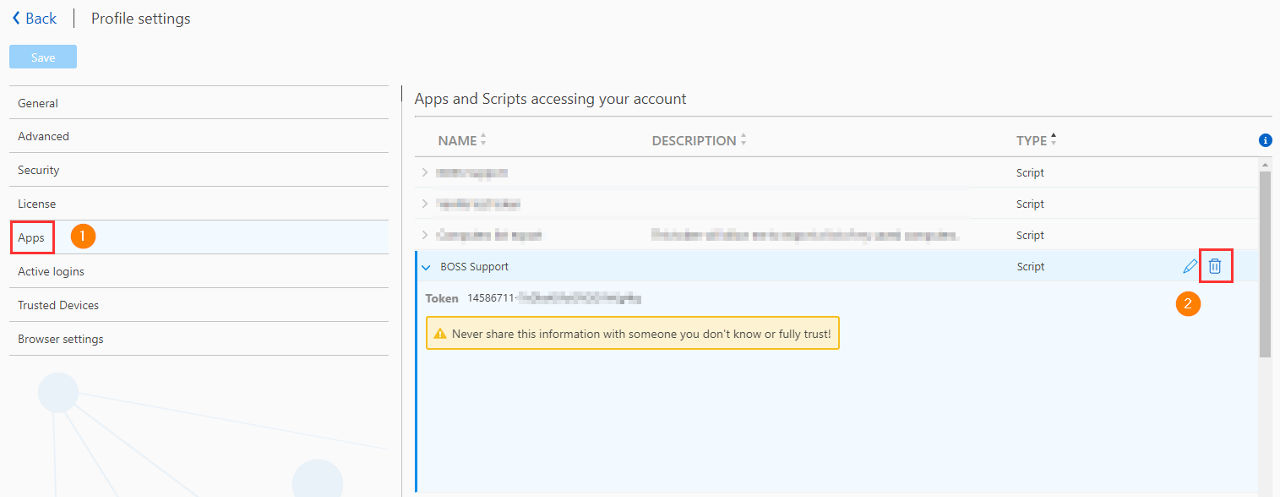
Revoking App Access
In the event an administrator wishes to assign management of the integration to another support user, they will need to first revoke App access to allow another user to authenticate with their TeamViewer account.
📌Please note: Remember to close all active service cases before proceeding. Any customizations pertaining to “Additional Features” will have to be re-created by the new administrator of the integration. When attempting to close an active session after revoking App access, users will see the following error message display:
To revoke App access
1) Navigate to TeamViewer (Classic)’s Management Console https://login.teamviewer.com
2) In top right corner, click Account ➜ Edit profile
3) Click Apps ➜ [Name of App e.g. BOSS] ➜ click on the Bin to delete the script