
Knowledge Base
Share the screen on your iPad/iPhone
Last Modified 20 апр. 2026 г.
Since the release of the TeamViewer QuickSupport app for iOS 11, it is generally possible to share your iOS screen via TeamViewer (Classic).
This article applies to iOS users in all licenses.
Screen sharing allows supporters to provide the best possible support for iPhone and iPad users, as they can see exactly what’s happening on the device screen and can guide users better on solving issues on their devices.
Since the launch of TeamViewer 14 and iOS 12, the screen-sharing solution has improved even further, allowing you to start broadcasting with one tap in the QuickSupport app.
Hint: For more information about supporting Mobile Devices, click here.
Requirements
To be able to use this feature, you must meet the following requirements:
- An iOS device (iPhone or iPad) running iOS 15.
- TeamViewer QuickSupport app is installed on the remote iOS device.
- TeamViewer 14 or higher is installed on the local device.
Hint: It is possible to connect to an iOS device with Windows, macOS, Linux, Android, or iOS devices.
Basic setup
Make sure every device is set up correctly in order to use the screen-sharing functionality for iOS devices. Therefore, you’ll need to do some preparations before you can connect to an iOS device.
The following initial steps must be done to start a screen-sharing session for remote support:
How to connect to iOS for remote support
Compared to connections to other operating systems like Android, iOS does not allow the remote controlling of any iOS device.
Therefore, when connecting to an iOS device, TeamViewer is providing a solution to make support easier for these devices as it provides the ability to see the screen of the iOS device live and be thus able to better guide users on solving issues in their device themselves.
Please follow these steps to use iOS screen sharing for remote support.
On the iOS device
1. Follow the instructions on the initial setup
2. Open up your iOS settings
3. Go to Control Center ➜ Customize Control
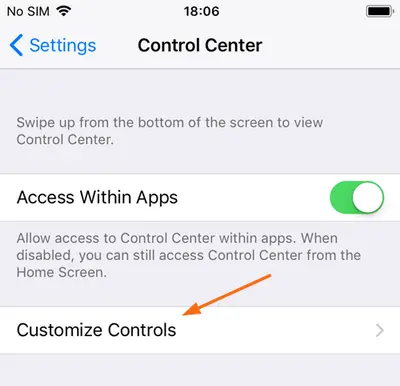
- Add Screen Recording to be displayed in the Control Center
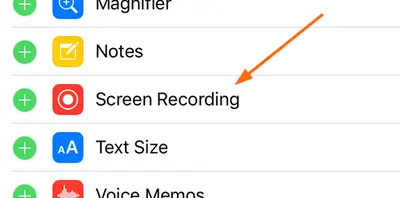
4. Open the TeamViewer QuickSupport app
5. Give your TeamViewer ID to your supporter
6. Confirm the connection request by clicking on Allow or reject the request by clicking Cancel
Note: In the Advanced Options within your TeamViewer QuickSupport app, you will see a TeamViewer ID and a Screen share ID. The Screen share ID is used for Apple´s Broadcast Extension, which gives TeamViewer the capability to share the screen of the iOS device. You do not need to give this ID to anyone for a successful connection, and a direct connection to the Screen share ID is impossible.
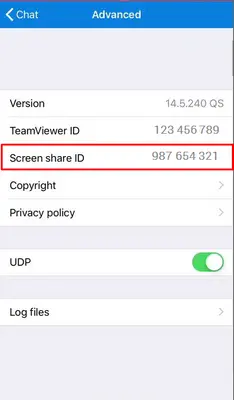
On the supporting device
1. Open TeamViewer full version on Windows, macOS, Linux, Android, or iOS
2. Enter the TeamViewer ID (1) from the iOS device and click Connect to partner (2)
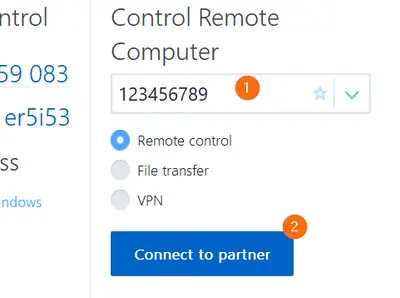
- The remote partner will receive a connection prompt
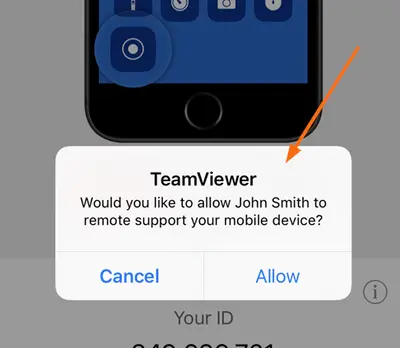
3. If accepted and after the user activates the screen sharing in their iOS control center, you can see the screen of the device and are able to guide the iOS user on how to solve issues in the device
New iOS screen-sharing workflow - video
How to stop screen sharing on the iOS device
To stop screen sharing via TeamViewer (Classic) on the iOS device, there are several approaches:
- Open the Control Center and tab the red blinking screen recording icon
- Tab on the title bar and select Stop in the Screen Broadcasting popup
After screen sharing is stopped, the title bar will no longer be in red.