Session Insights is an AI-powered feature that generates concise summaries of TeamViewer sessions.
This article applies to Business, Premium, Corporate, Tensor, and TeamViewer ONE customers running Windows and macOS on their devices.
Benefits of Session Insights
- Facilitates learning and continuous improvement from recent support cases, increasing productivity and efficiency in technical issue resolution.
- Provides efficient documentation for faster support case reviews and handover, enhancing collaboration and saving time for support teams.
- Offers a clear overview of services provided, ensuring compliance with requirements, proof of service, and increased customer satisfaction.
- Enables Tia (TeamViewer Intelligent Agent) to access session summaries during remote support sessions and suggest verified solutions, based on user permissions.
How to setup Session Insights
TeamViewer AI services are activated by default for your company. You can disable AI features at any time.
To do so, please follow the instructions below:
- Sign in with your TeamViewer account via https://web.teamviewer.com/ or via the TeamViewer full client.
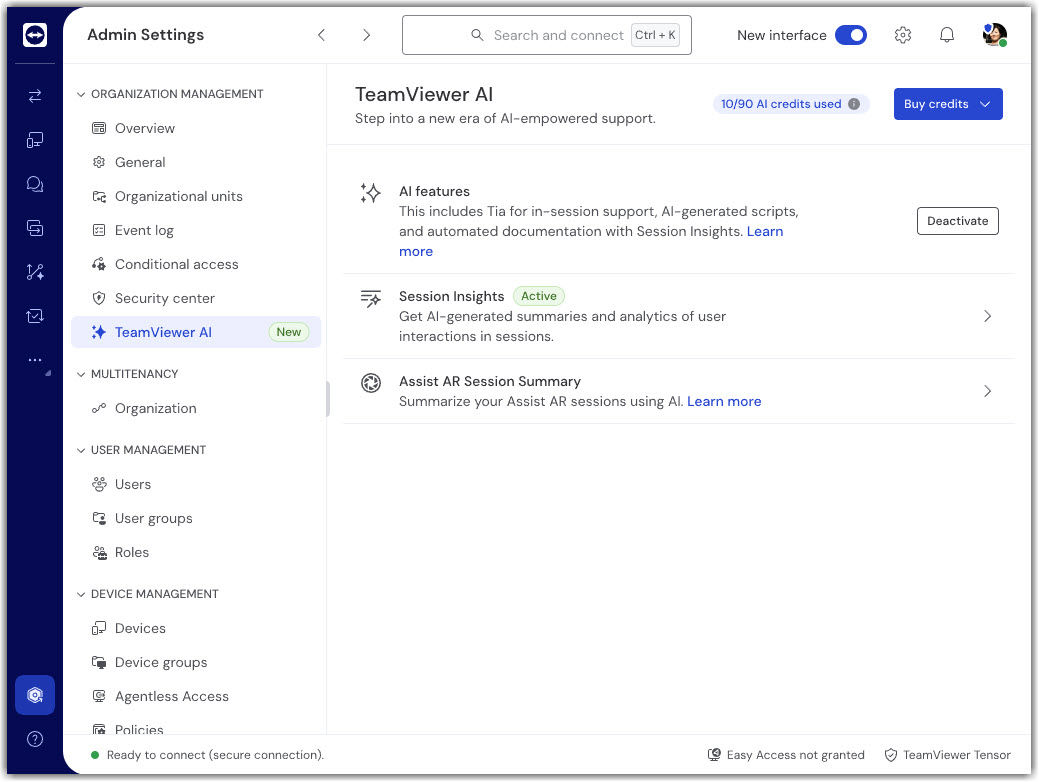
- Click Admin settings.
- Within the Organization management section, go to TeamViewer AI.
- Click Session Insights to configure summary generation.
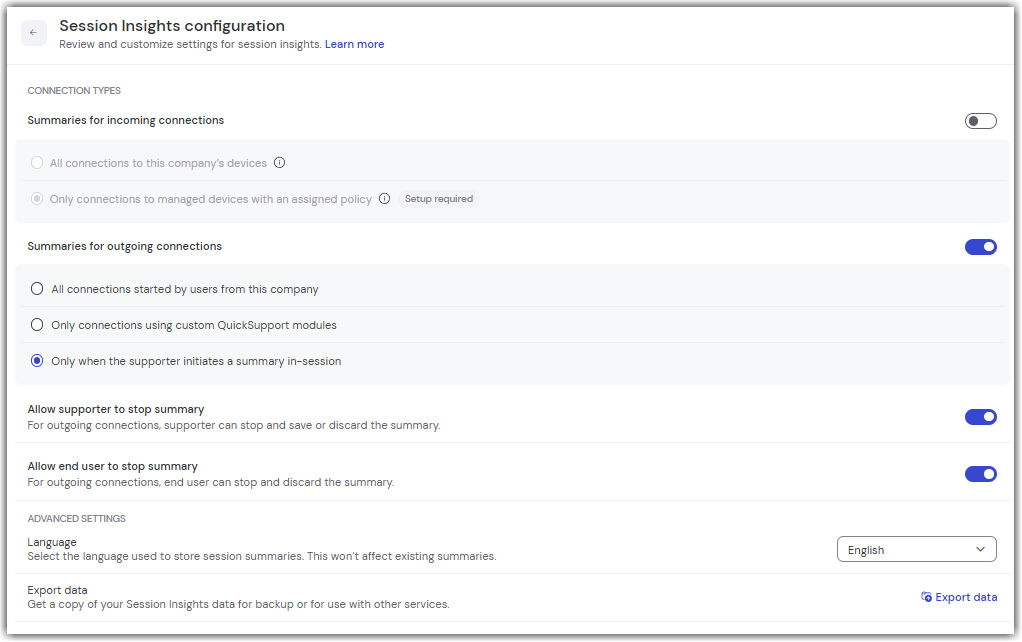
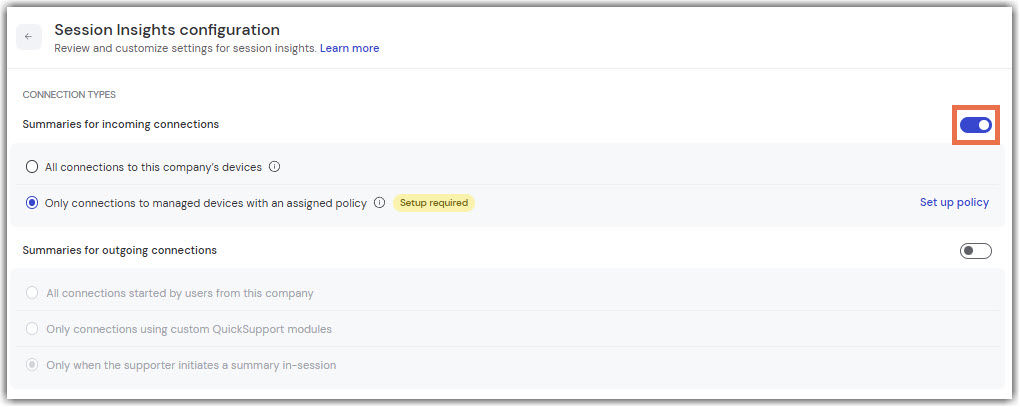
Click the Session Insights item and choose how you want to configure Session Insights.
You have two options that can be activated independently: Summaries for incoming connections and Summaries for outgoing connections.
Two separate sections further down cover details on the set-up process for each option. Before, you may need advice on which choice is right for your company. The table below compares options 1 and 2 along selected decision criteria.
- For outgoing connections
- For incoming connections
To be able to generate Session Insights for connections going from any of your company’s users to any device, the toggle Summaries for outgoing connections must be switched on.
Note: The default setting for outgoing connections is set to Only when the supporter initiates a summary in-session, meaning the session summary won’t start automatically, but has to be started by the supporter.
For a more granular control, we recommend using the Only connection using custom QuickSupport modules option. Please find more details in the section below.

Control who can stop a summary
During an outgoing connection, you can also decide who is allowed to stop a summary during an outgoing session:
-
Allow supporter to stop summary
Lets the supporter stop the summary and either save or discard it. -
Allow end user to stop summary
Lets the end user stop the summary and discard it.
For more granular control, you can decide for which custom QuickSupport modules outgoing session summaries should be generated.
Step 1: Enable the option in the general AI Settings
To begin, enable the option Only connection using custom QuickSupport modules within the Session Insights configuration section.
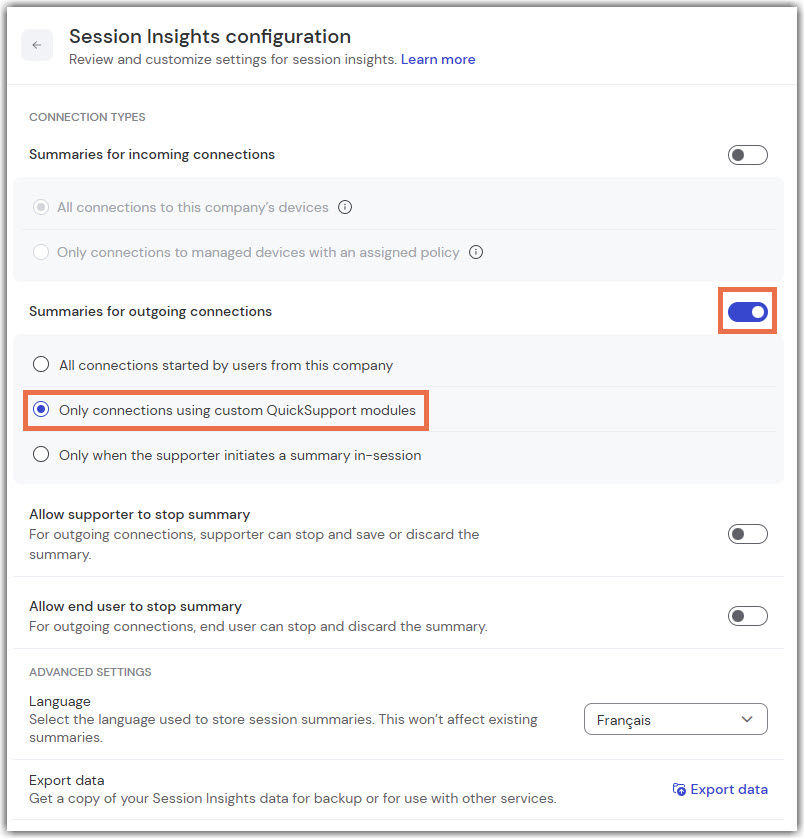
Step 2: Activate the option for your custom QuickSupport module
Once enabled, go to your custom QuickSupport module configuration. Check the option Enable Session Insights for this module and click Save.
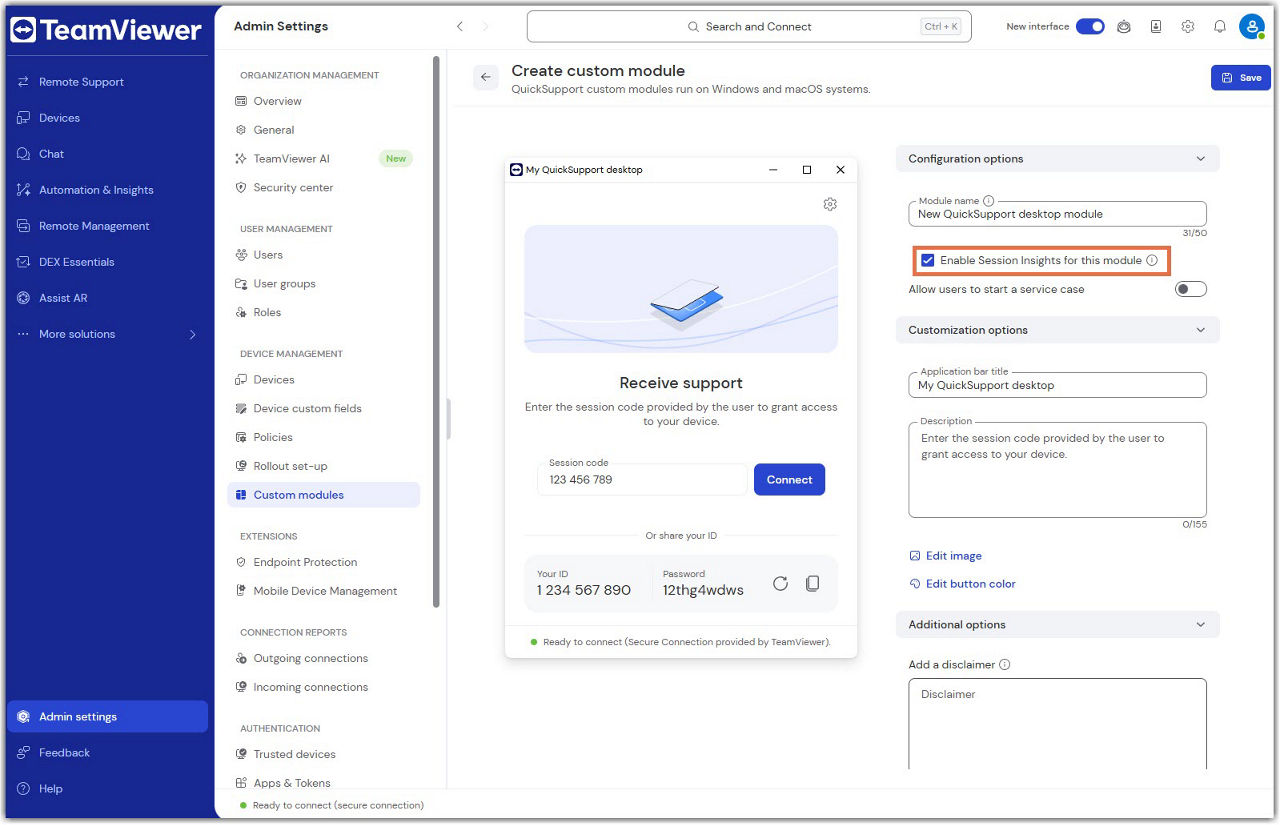
This option allows you to specify whether Session Insights should be generated for sessions initiated through this particular QuickSupport module.
Start, stop, and save a session summary during an outgoing session
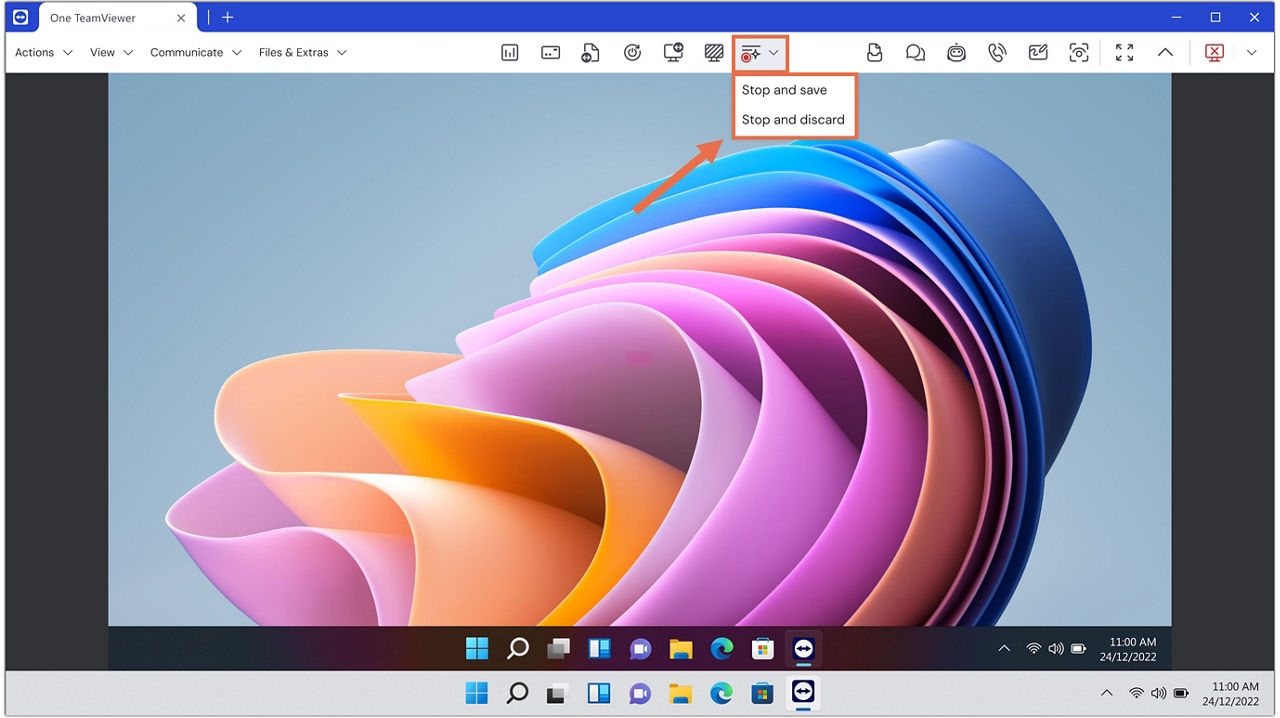
- Supporter controls (remote session toolbar)
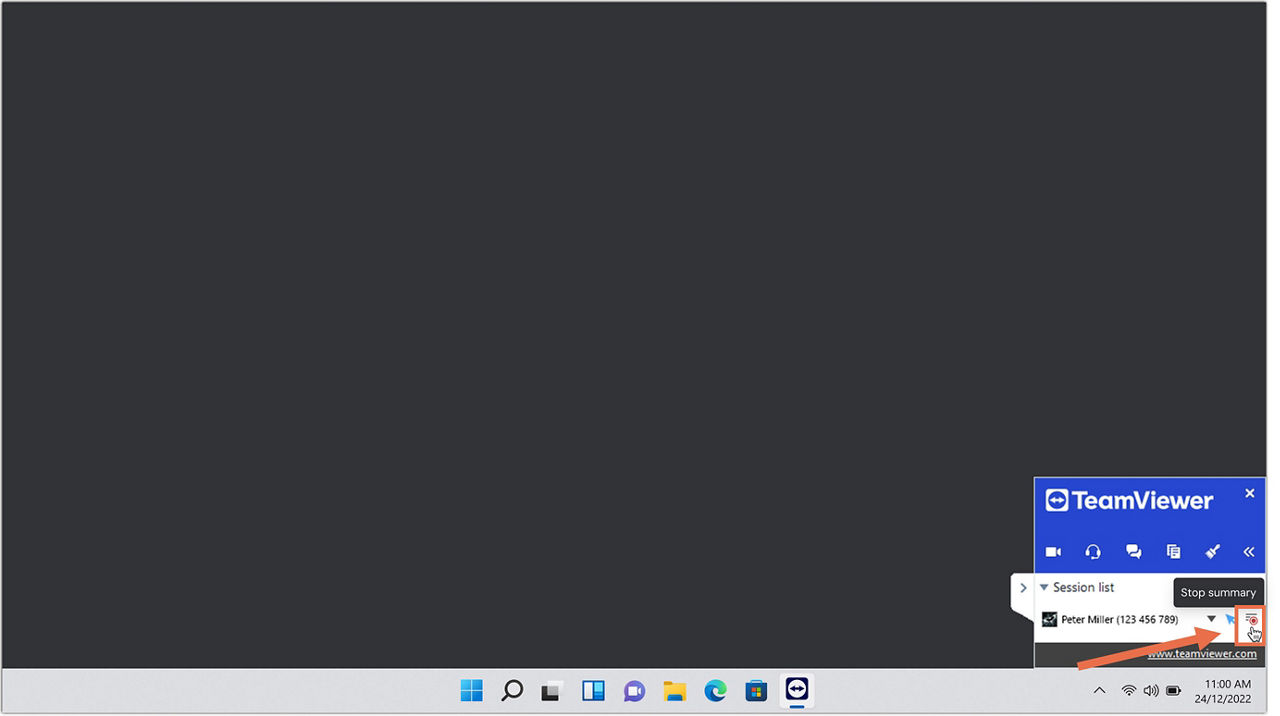
- End user controls (TeamViewer panel on the remote device)
If the setting Only when the supporter initiates a summary in-session is enabled, the supporter can manually start the session summary generation from the remote session toolbar via the Quick actions section. Otherwise, the session summary will start automatically.

While the summary generation is running, the same button lets the supporter stop the process with two options: Stop and save or Stop and discard. Only if the Allow supporter to stop summary option is enabled.
The end user can stop the ongoing session summary generation in the TeamViewer panel by clicking the Stop summary button, provided the Allow end user to stop summary option has been enabled.
The end-user cannot save a summary; only the supporter can choose Stop and save.
The collected data will always be discarded.
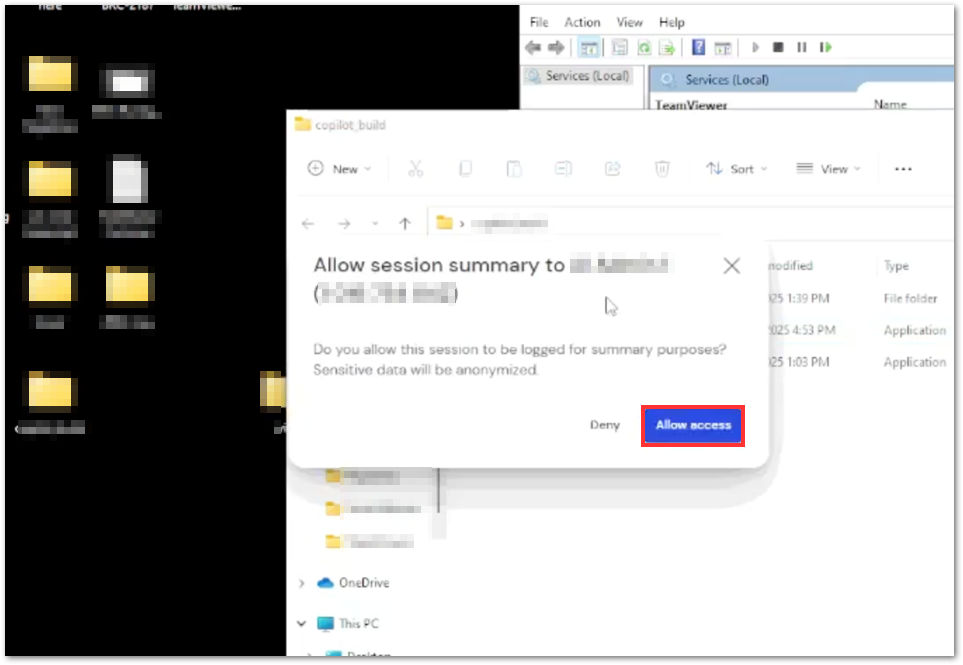
Remote side user experience
Once configured as described above, Session Insights can be generated for outgoing connections. Note that by default, the user on the remote side will see a pop-up at the beginning of the session. The user will allow a session summary to be generated by clicking on the Allow access button.
Users can modify the default behavior using Access control settings.
To open the Access control settings:
- Click Settings (⚙) on the top right corner of the interface.
- Go to the Device section and click Advanced settings, then Open advanced settings, and scroll down to Advanced settings for connections to this computer.
- Put Access control to Custom settings and click Configure.
At the bottom of the pop-up page, you will find Session Insights logging in. By default, it comes with the setting After confirmation.
- Allowed will not require a user confirmation of Session Insights in the future.
- Denied will always reject the session to be logged.
- After confirmation is the default setting which will show a pop-up at the beginning of every session.
To be able to generate Session Insights for connections from any supporter inside or outside your company to any of your company’s devices, the toggle Summaries for incoming connections must be switched on.
Enable Session Insights for all company devices
If you want summaries generated for all company devices, please enable the All connections to this company's devices option.
Note: To generate summaries, the device must either be managed or have the full TeamViewer client installed, and the user must be signed in with a TeamViewer account linked to your company.
Enable Session Insights for a selection of managed devices
If you want summaries generated for a selection of devices, please enable the Only connections to managed devices with an assigned policy.
Set up a policy setting for your devices
1. Create a TeamViewer policy that includes the setting Connection reporting and Session Insight (AI).
- If you already have a policy set up, edit the policy and add the setting Connection reporting and Session Insight (AI) to it.
- If you already have a policy set up with the setting Connection reporting and Session Insight (AI), edit it as explained in the next step.
2. Within the Enable reports policy setting, make sure to enable the policy and Session Insights by clicking the first two toggles.
Optional: You also can enforce the policy so end users can't disable it.
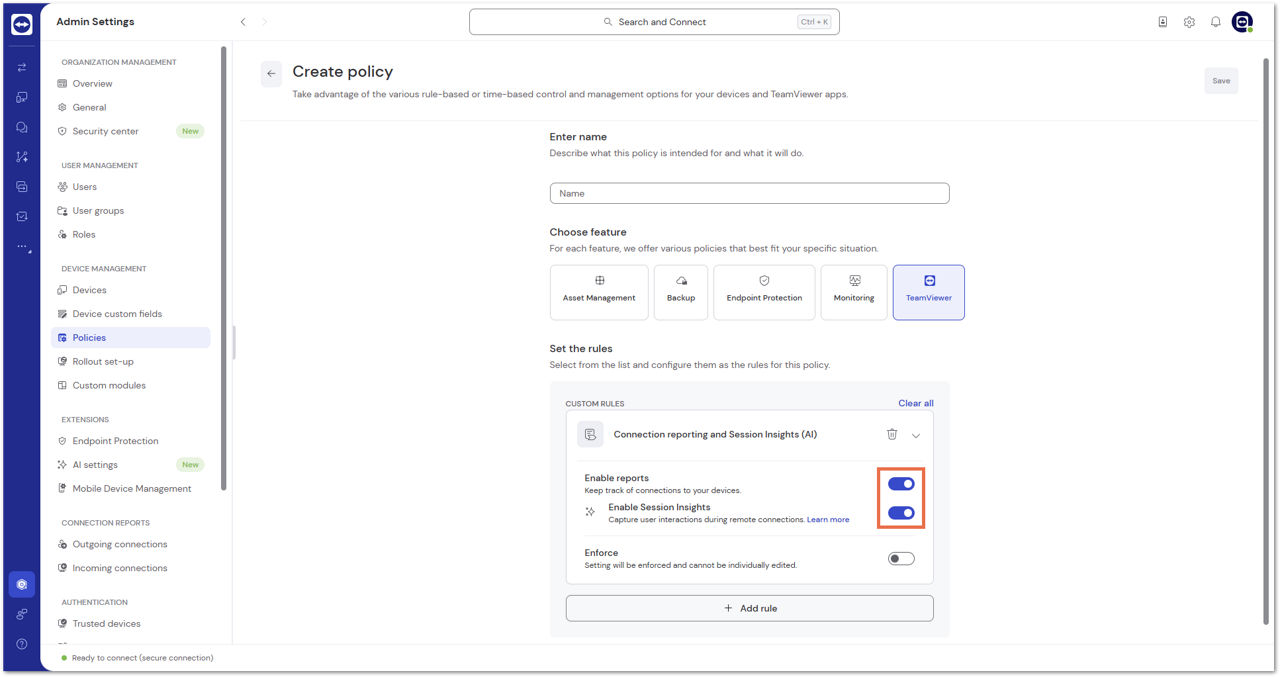
3. Once you have set up the policy, assign the policy to the remote devices on which you want the interactions capturing to be active.
For more information on creating and assigning a TeamViewer policy to your devices, please read this article.
Important note: Policies can only be assigned to managed devices. Learn more about how to manage devices here.
How to define permissions for Session Insights
You can define the permissions of your users regarding Session Insights through roles.
To grant the respective permissions, please follow the instructions below:
- Go to Admin settings.
- Click the role you want to edit.
- Click Edit role.
- Go to Permissions (key icon).
- Within TeamViewer, scroll down to Session Insights.
- Select the desired Session Insights permissions and click Save.
How to access the summary of remote sessions
Generated session summaries are available in the Automation & Insights menu.
To access the summaries, please follow the instructions below:
- Sign in with your TeamViewer account via https://web.teamviewer.com/ or via the TeamViewer full client.
- Click Automation & Insights.
- Within the Smart data section, go to Session Insights.
All session summaries will be listed in the section Session summaries at the bottom of the screen.
The system will automatically assign issue types and what applications are involved in the sessions and generate an overview in the respective sections at the top of the interface.
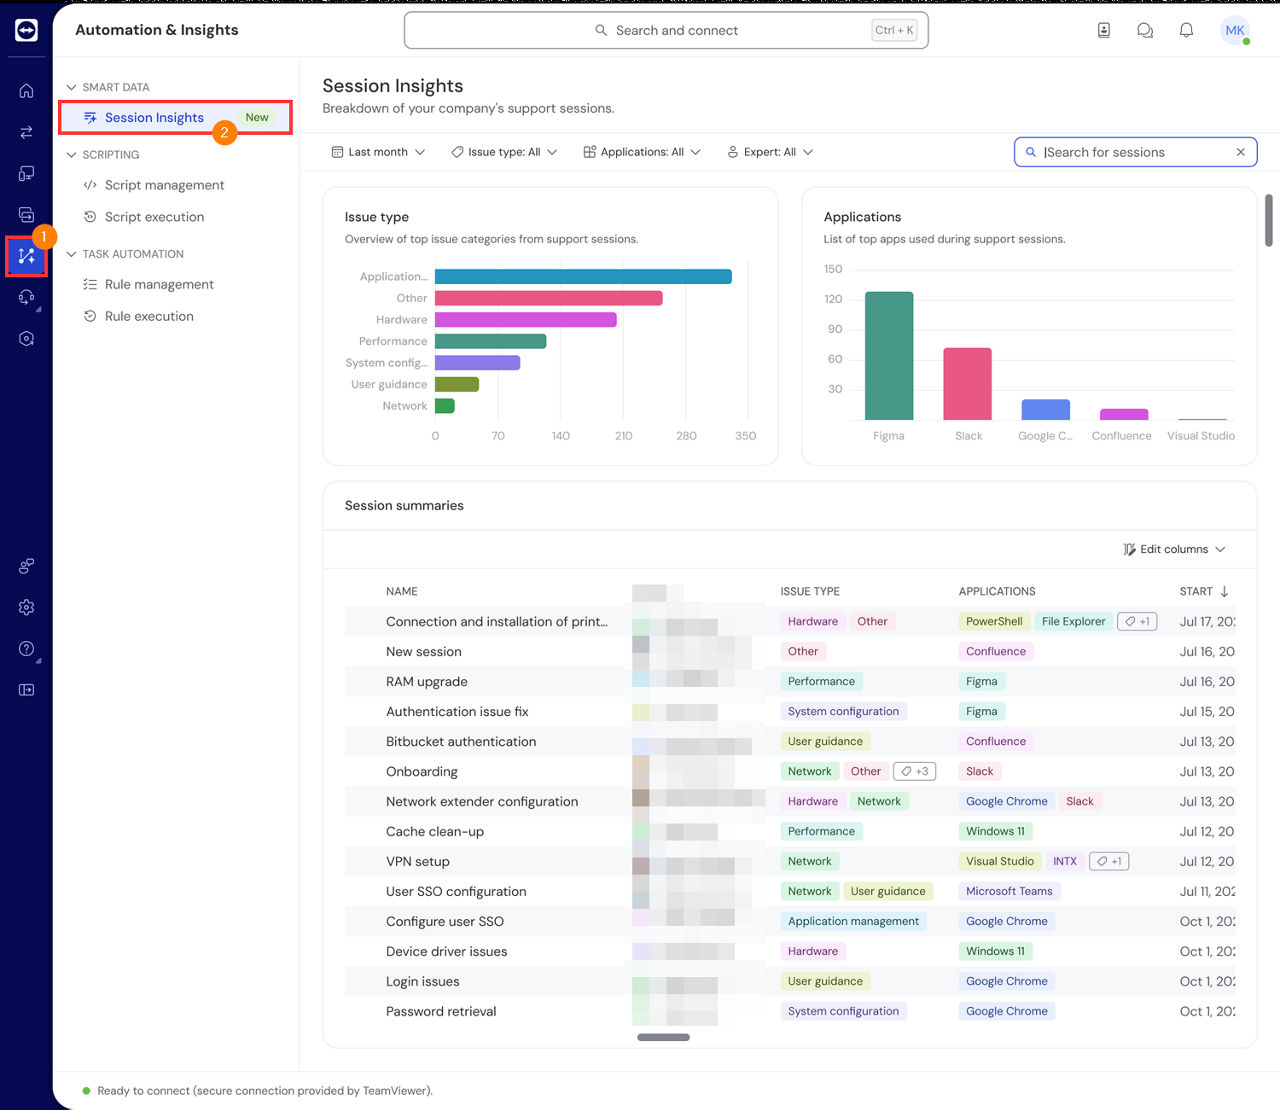
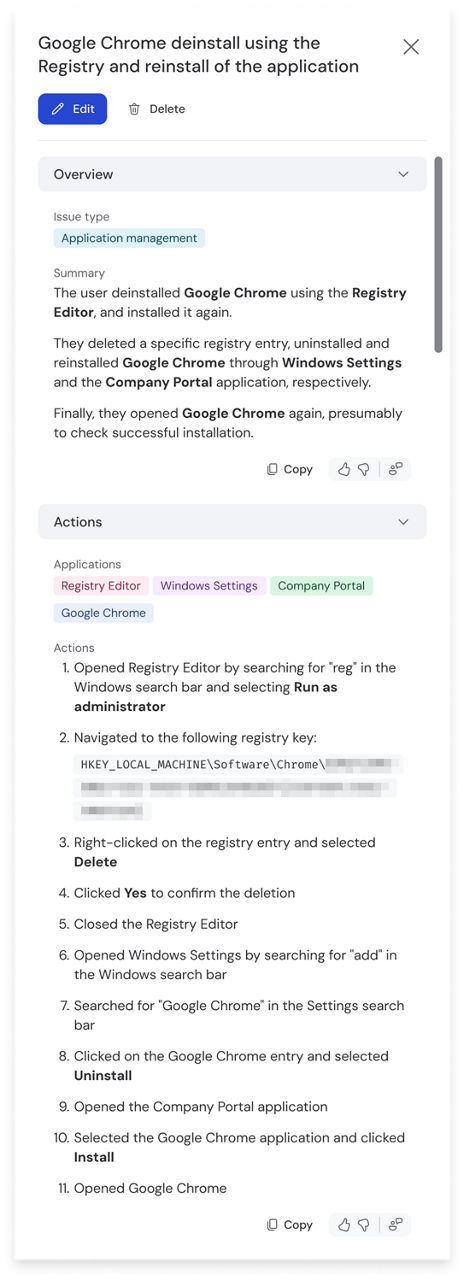
You can click on a session summary, and its content will be displayed on the right side of your screen.
Opening a summary will provide you the ability to:
- Edit the summary
- Delete the summary
How to export session summaries
To export session summaries, please follow the instructions below:
- Sign in with your TeamViewer account via https://web.teamviewer.com/ or via the TeamViewer full client.
- Go to Automation & Insights.
- Within the Smart Data section, go to Session Insights.
- Select the session summary you want to export and click the Export button.
- Select the desired format and language and click Export.
You have successfully exported and downloaded your session summary.
How to change the default language for session summaries
The default session summary generation language is English. You can change the default language if you want them to be generated in other languages.
To change the session summary generation language, please follow the instructions below:
- Sign in with your TeamViewer account via https://web.teamviewer.com/ or via the TeamViewer full client.
- Click Admin settings.
- Within the Organization management section, go to TeamViewer AI.
- Within the Session Insights section, open the languages drop-down.
- Change the desired language.
You have successfully changed the default language for session summaries.
Note: Service cases that belong to legacy device groups are also visible in the Device list. From there, you can view and manage these service cases in the same way as in the Service Queue.
AI credit-based payment model
Session Insights is part of the AI‑powered TeamViewer Intelligence services and uses an AI credit‑based payment model.
For details about the AI credit‑based payment model, see here.
Exposing Session Insights to standard integrations or via TeamViewer API
Session Insights can be integrated into third-party applications such as ITSM platforms or CRM systems. We offer off-the-shelf integrations of Session Insights into major platforms, including ServiceNow or Salesforce.
Alternatively, you can integrate Session Insights into your own system using TeamViewer API.
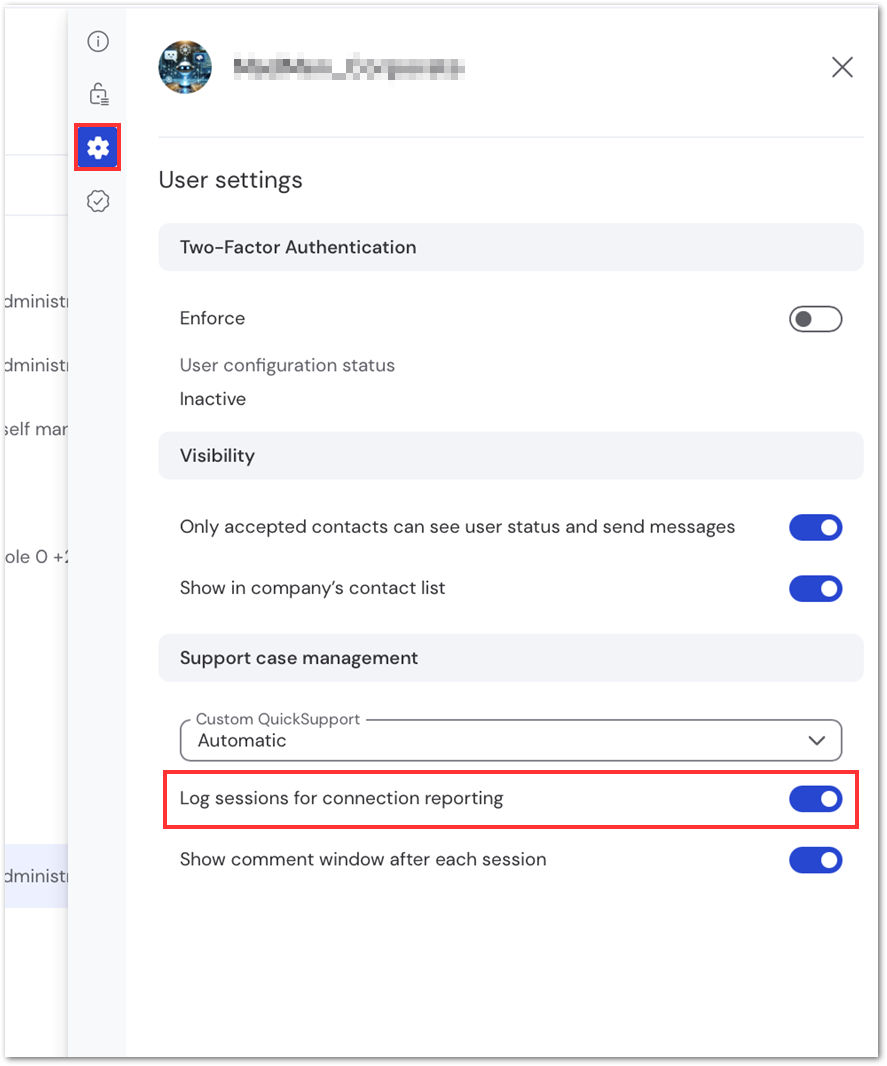
Customers using TeamViewer integrations and API must review the user settings of users whose outgoing connections should be logged with session insights:
- Select all users whose outgoing connections should be logged using session insights, except for your own user.
- Click Edit and click User settings.
- Ensure the toggle Log sessions for connection reporting is switched on.
- Click Change setting.
If you want your own user’s connections logged as well, deselect all users, then select only your user. Again, click on Edit, then click Edit user information.
In the side navigation, click on user settings. At the bottom of the side drawer, you will find the Log sessions for connection reporting setting. Ensure it is switched on.