During a TeamViewer remote control session, the TeamViewer remote session toolbar appears on the local computer's top screen.
This article explains all available toolbar features in a remote session.
This article applies to all TeamViewer Remote users.
- Windows
- macOS
The toolbar's functions
This is the main view of the TeamViewer Remote control toolbar for Windows devices:

The following chapters describe each of the different features found in the remote control toolbar.

The Actions menu provides quick access to many features in controlling the remote device.
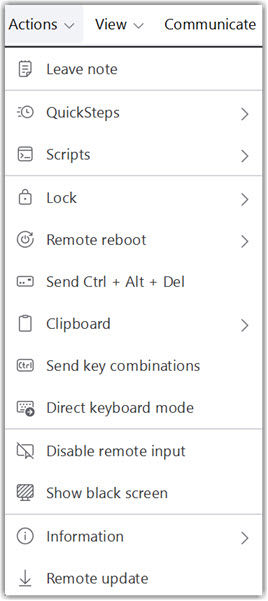
Leave note
Opens the note function.
Note: The note will still be displayed to the customer even after closing the remote control session.
Quick Steps
Note: The Quick Steps feature requires a Premium License or higher.
Access to all available Quick Steps options.
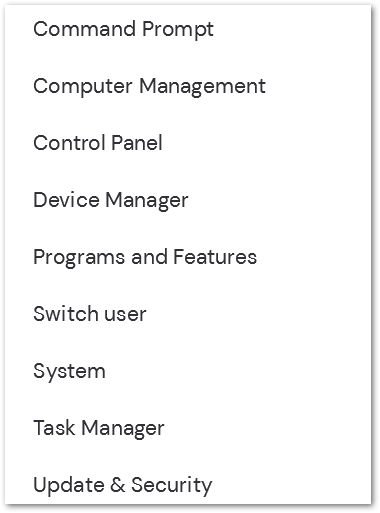
Scripts
Allows execution of remote scripts during the session.
Hint: For more information about how to execute scripts, please read this article: Execute scripts remotely.
Note: The feature Scripts requires a license.
Lock
Offers multiple options to affect the current user on the remote machine:
- Lock now locks the remote computer immediately.
- Lock on session end is checked, the device will be locked at the end of the TeamViewer session.
- Sign out on remote computer signs the current user logged into the remote machine out, bringing the session back to the login screen.
Remote Reboot
Reboots the remote computer immediately. You can choose between
- Reboot and
- Reboot in safe mode
Send Ctrl + Alt + Del
Sends Control/Alt/Delete command to the remote machine, allowing access to Task Manager and other services.
Clipboard
Offers access to the shared clipboards in a TeamViewer session:
- Paste as keystrokes pastes your clipboard content into the remote device as simulated keystrokes.
- Sync clipboards automatically syncs clipboard content both ways.
- One-time send to remote only sends the last copied item from the local device to the remote device.
- One-time receive from remote only sends the last copied item from the remote device to the local device.
More information on the clipboard feature can be found here.
Send key combinations
Forwards key combinations (such as Win+E, Ctrl+P, etc.) to the remote device, allowing the use of all keyboard shortcuts remotely.
Direct keyboard mode
Forwards every key press directly to the remote device without translating keyboard layouts. This ensures more predictable input, especially for applications that rely on precise or long key presses.
Read more about this feature here.
Disable remote input
Disables the remote device's keyboard and mouse, preventing interruption during maintenance work or other remote connection needs.
Show black screen
The remote computer's screen gets immediately hidden by the TeamViewer security image.
Note: The feature Show black screen requires a license.
Information
- Remote System Information Hardware/OS information, similar to what is found in the Extended Remote Device Dashboard
- Connection Information Information related to the current connection between the two devices
- Duration of connection
- Display resolution
- Remote partner's TeamViewer version
- Local and Remote Fingerprint
- Session Information shows which of the following settings applies to this session
- Connect and view remote screens
- Transfer files
- Establish VPN connections
- Control remote computers
- Control the remote TeamViewer
- Lock the remote keyboard and mouse
- File transfer using the file box
- Use TeamViewer Printing
- Execute scripts
- Switching sides
Remote Update
- Installs the latest version of TeamViewer on the remote device if an update is available.
Hint: For more information on how to update TeamViewer, please see the following article: Update TeamViewer.

The View menu offers quick access to options and capabilities to optimize the current TeamViewer session.
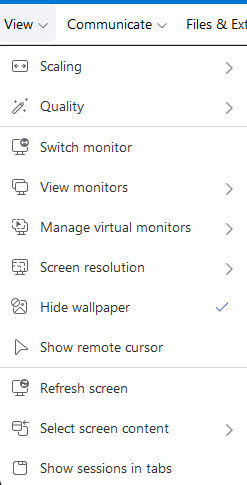
Scaling
- Best fit Provides a balance between the remote device's and controller device's current display settings.
- Original Displays the current screen resolution of the remote device.
Note: If there is a large difference between the two devices, the remote screen may appear too large or too small to view correctly when set to Original.
- Scaled Stretches the remote device display to get the best viewing size on the controller computer.
Quality
- Auto select Automatically calculate the best balance between Optimize quality and Optimize Speed.
- Optimize Speed Optimize the fluidity of the remote session, allowing for a more responsive control.
Note: The graphic quality of the remote session may be negatively affected when using Optimize Speed.
- Optimize quality Optimize the graphic quality of the remote session, allowing for a more accurate display of the remote device's graphics.
Note: The connection fluidity of the remote session may be negatively affected when using Optimize Quality.
- Custom settings you can set your own settings for
- Colors
- Quality
- Fast video streaming
- Enable GUI animations
- Improve application compatibility (reduces performance)
Monitors
- Switch between remote device's monitors by clicking the monitor number.
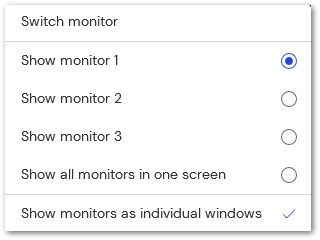
- Monitors as individual windows to view the remote device's separate monitors on separate tabs in the same remote control window.
Hint: For more information on how to view multiple monitors with TeamViewer, please see the following article: Use multi-monitor support
Screen Resolution
Change the current screen resolution of the remote device.
Note: Available resolutions depend on the remote device's current options. TeamViewer cannot provide any resolutions not currently provided by the remote device's hardware/OS.
Hide Wallpaper
Replaces the remote device's wallpaper with a blank black overlay.
Show remote cursor
The mouse cursor of the remote computer will also be visible to the controller during the connection.
Refresh screen
Sends a request to update the graphics display of the remote device. It can help if the screen appears frozen in the connection or many tasks are running on the remote machine.
Select screen content
- Select single window: Instead of viewing the entire display of the remote device, view a single screen or app. When selected, a crosshair appears to select the desired window to focus on.
- Select whole desktop: View the entire display of the remote device instead of focusing on a single window or app.
Show sessions in tabs
When connected to multiple devices, each connection appears as a separate tab in the same TeamViewer window.

The Communicate menu provides different methods of communication with the connection partner in a remote control session.

Chat
Opens a chat window between devices within the connection, allowing for quick communication.
Audio and video
Activates a video call.
Note: During remote sessions, free users can no longer use VoIP, video, and chat.
Computer Sound
Allows the audio output of the remote device to route through the audio output of the controller's device.
Whiteboard
Enables the whiteboard function.
Hint: For more information on how to use the Whiteboard, please see the following article: Use Whiteboard in Remote Control.
Invite more participants
Choose the contact you want to invite into your session. This contact will receive a notification, which must be confirmed within 20 seconds.
Switch sides with partner
Reverses the roles of the connection - the remote user can now view and control the local user's computer.
Note: The feature Switch sides with partner requires a license.
Augment session
See the environment of your remote partner and support them with augmented reality.

The Files & Extras menu provides access to additional services from within each remote control session.

File transfer
Opens the file transfer window. The File Transfer window lets you transmit files to and from your partner’s computer.
Note: During file transfer sessions, free users can transfer only one file at a time.
File box
Opens a dialog that lets you share files with your partner during the remote control session.
Tia (TeamViewer Intelligent Agent)
Opens a chat interface where you can describe the issue in natural language, and Tia will analyze the remote device’s real-time system data to provide intelligent troubleshooting suggestions and solutions
Learn more about Tia here.
Dashboard
The Dashboard pulls up the General Information tab of the Extended Remote Device Dashboard.
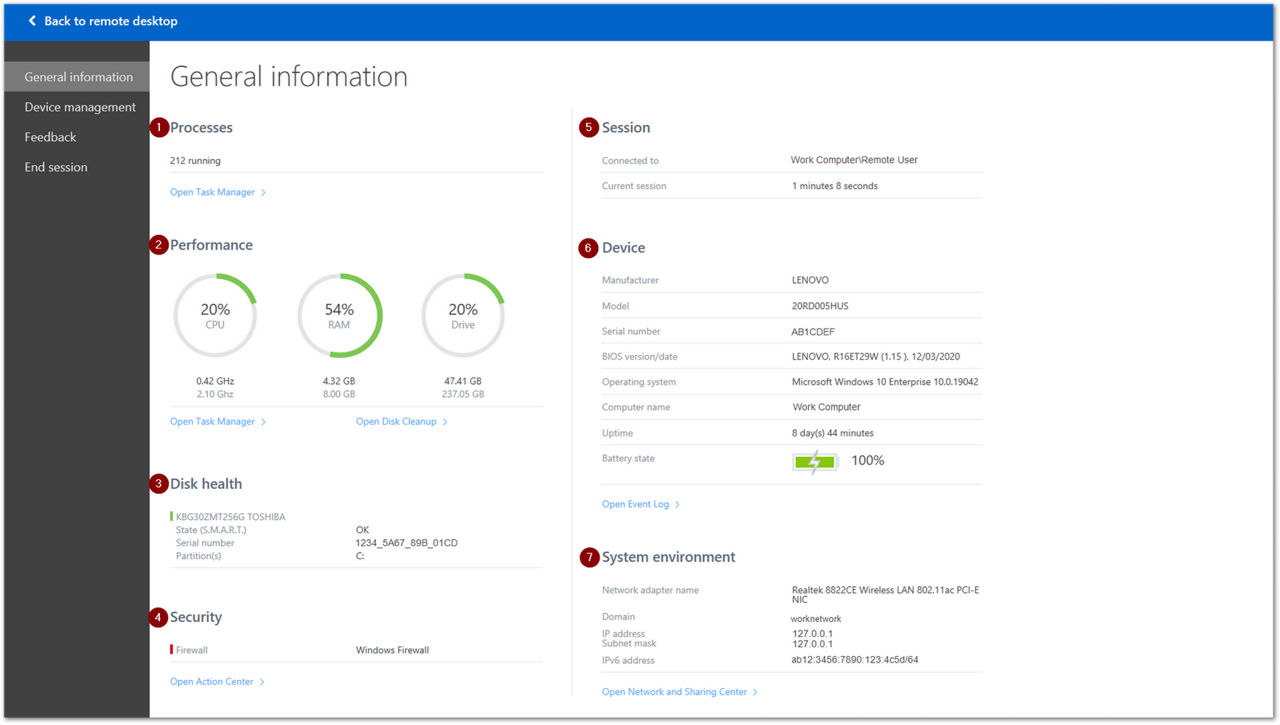
This provides useful information about the remote device:
- The total number of processes running on the remote device
- The Performance of the device
- Disk health information
- Security information
- Session information
- Device information
- System environment
Use TeamViewer Printing
Enables remote printing.
Hint: The print driver must be installed to use remote printing with TeamViewer. For more information about remote printing, please see the following article: Remote printing with TeamViewer.
Note: The feature TeamViewer printing requires a license.
VPN
Enables the TeamViewer VPN.
Hint: The VPN driver must be installed to use TeamViewer VPN. For more information about the TeamViewer VPN, please see the following article: About TeamViewer VPN.
Note: The feature TeamViewer VPN requires a license.
Save screenshot
Creates a screenshot of the current display of the remote device. After taking a screenshot, you can select how to proceed with it:
- Save as...
- Copy to clipboard
- Cancel
Start recording
- Start
- Pause
- Stop and save recording
Note: If the Record partner's video and VoIP is checked (Settings ➜ Device's settings ➜ Remote Control ➜ Session settings ➜ Outgoing connections), a prompt will appear asking the remote device to allow their camera and microphone to be recorded. If no confirmation is given, the recording will still begin, but not contain the remote device's video or VoIP.

Hint: For more information on recording a TeamViewer session and converting the recording, please see the following article: Record TeamViewer session or meeting.
Start/Stop summary
Starts or stops a session summary that captures key information for the remote session using Session Insights. The summary helps document what happened during the session. Read more about this feature here.
Comment
The Comment button lets you note connections. This button produces a pop-up window where details regarding the connection can be entered.
Comments entered here can be retrieved in the Management Console under Connection Reports. Comments for each session will appear under the Notes column.
Hint: For more information about incoming and outgoing connections reports, please see the following article: Connection Reports.

The remote session toolbar includes a set of toolbar quick actions that provide quick access to commonly used features during a remote control session. All toolbar quick actions are shortcuts to features that are already explained in the dropdown sections above.
a. Send Ctrl + Alt + Del: Sends Control/Alt/Delete command to the remote machine, allowing access to Task Manager and other services.
b. File transfer: Opens the file transfer window. The File Transfer window lets you transmit files to and from your partner’s computer.
c. Remote Reboot: Reboots the remote computer immediately.
d. Switch monitors: Switch between remote device's monitors by clicking the monitor number.
e. Show black screen: The remote computer's screen gets immediately hidden by the TeamViewer security image.
f. Start/Stop summary: Starts or stops a session summary that captures key information for the remote session using Session Insights. The summary helps document what happened during the session.
g. File box: Opens a dialog that lets you share files with your partner during the remote control session.
h. Chat: Opens a chat window between devices within the connection, allowing for quick communication.
i. Tia (TeamViewer Intelligent Agent): Opens a chat interface where you can describe the issue in natural language, and Tia will analyze the remote device’s real-time system data to provide intelligent troubleshooting suggestions and solutions
j. Audio and video: Activates a video call.
k. Whiteboard: Enables the whiteboard function.
l. Enter / exit full screen: Switches the remote session between windowed mode and full‑screen mode.
m. Collapse / expand toolbar: Hides or shows the remote session toolbar to free up screen space.
Note: Toolbar quick actions vary by session context. Some actions appear only when a feature is available or active, and disabled features are not shown.

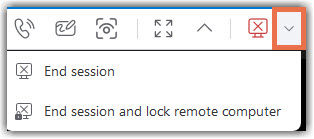
With this button, you can close the remote session. If a lock symbol is visible, it means that the session of the remote device will be locked after closing the TeamViewer session.
Note: This function can be changed in the TeamViewer settings of your local computer under Settings ➜ Device's settings ➜ Remote Control ➜ Session settings ➜ Outgoing connections. You can choose between Always, Never, and Automatic.
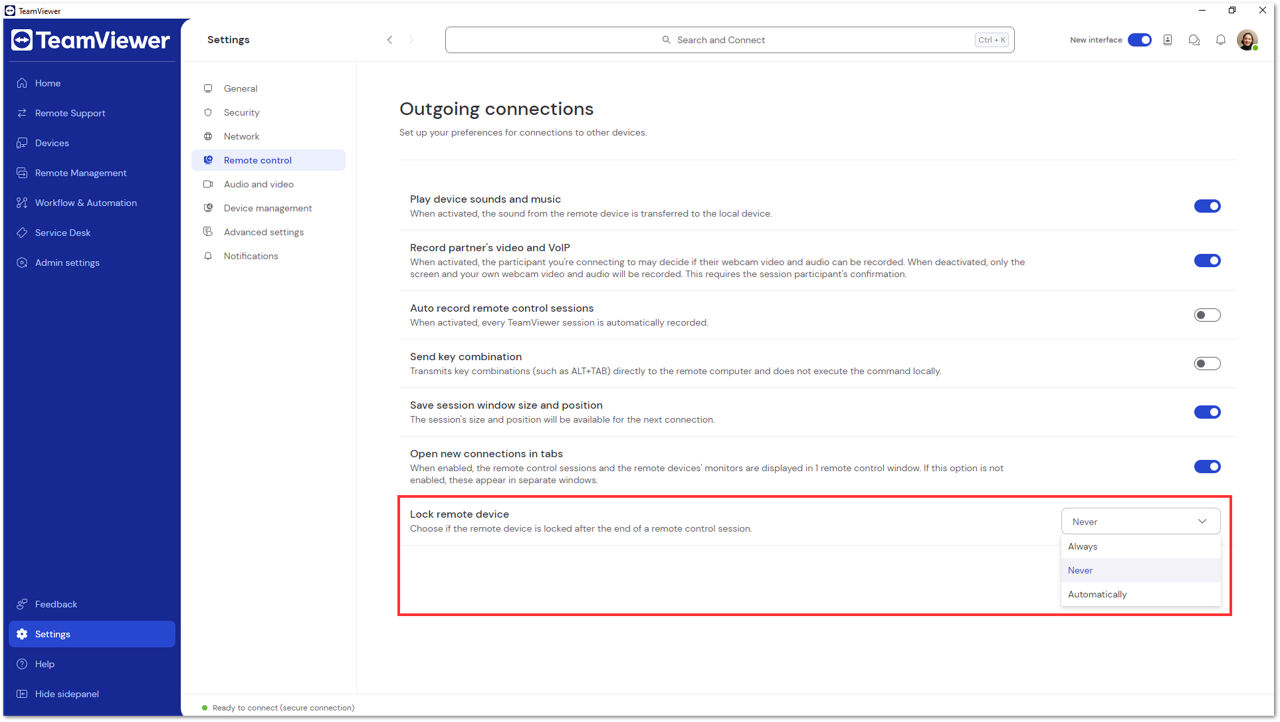
- Always: At the end of every TeamViewer session, the remote device will be locked, regardless of the device's status before the session
- Never: At the end of every TeamViewer session, the remote device will remain unlocked and visible, regardless of the device's status before the session
- Automatic: If the remote device was locked before the session, the device will again lock at the end of the session. If the device was unlocked before the session, it would remain unlocked
Note: It is always recommended to end a session using the X in the remote control toolbar. It is not recommended to end sessions closing the X provided by the operating system.
Hint: If you don't want to close the session according to the predefined Advanced settings for connections to other computers you can choose the appropriate action in the dropdown menu.
The toolbar's functions
This is the main menu of the TeamViewer Remote toolbar for macOS devices:

The following chapters describe each of the different features found in the remote control toolbar.
The Actions menu provides quick access to many features in controlling the remote device.

Leave note
Opens the note function.
Note: The note will still be displayed to the customer even after closing the remote control session.
Scripts
Allows execution of remote scripts during the session.
Hint: For more information about how to execute scripts, please read this article: Execute scripts remotely.
Note: The feature Scripts requires a license.
Lock
Offers multiple options to affect the current user on the remote machine:
- Lock now locks the remote computer immediately.
- Lock on session end is checked, the remote device will be locked at the end of the TeamViewer session.
- Sign out on remote computer signs the current user logged into the remote machine out, bringing the session back to the login screen.
Reboot
Reboots the remote computer immediately. You can choose between
- Reboot and
- Reboot in safe mode
Note: The reboot function is not yet supported on macOS and is currently under development.
Clipboard
Offers access to the shared clipboards in a TeamViewer session:
- Paste as keystrokes pastes your clipboard content into the remote device as simulated keystrokes.
- Sync clipboards automatically syncs clipboard content both ways.
- One-time send to remote only sends the last copied item from the local device to the remote device.
- One-time receive from remote only sends the last copied item from the remote device to the local device.
More information on the clipboard feature can be found here.
Send key combinations
Forward key combinations (e.g., Command+P, Command+O) to the remote device, allowing the use of all keyboard shortcuts remotely.
Disable remote input
Disables the remote device's keyboard and mouse, preventing interruption during maintenance work or other remote connection needs.
Show black screen
The remote computer's screen gets immediately hidden by the TeamViewer security image.
Note: The feature Show black screen requires a license.
Connection information
Displays technical details about the current session connection.
Remote Update
Installs the latest version of TeamViewer on the remote device if an update is available.
Hint: For more information on how to update TeamViewer, please see the following article: Update TeamViewer.
The View menu offers quick access to options and capabilities to optimize the current TeamViewer session.
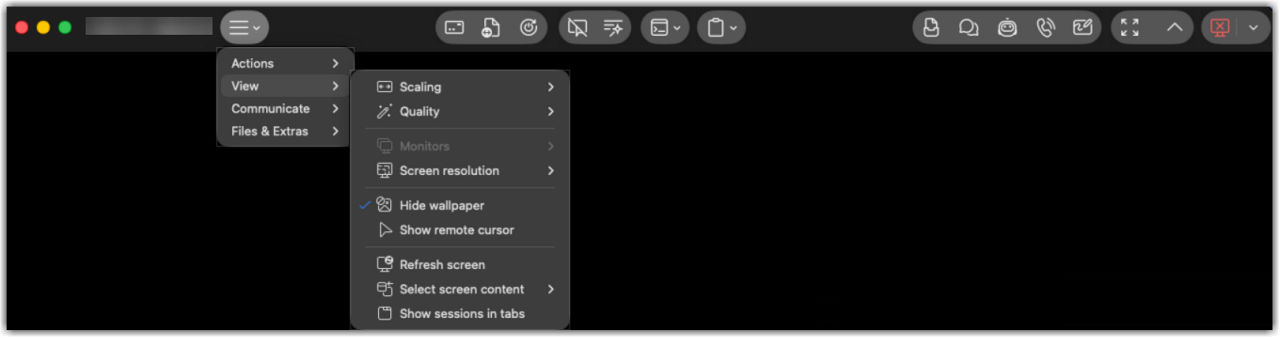
Scaling
- Best fit provides a balance between the remote device's and local device's current display settings.
- Scaled stretches the remote device display to get the best viewing size on the controller computer.
- Original displays the current screen resolution of the remote device.
Note: If there is a large difference between the two devices, the remote screen may appear too large or too small to view correctly when set to Original.
Quality
- Auto select automatically calculate the best balance between Optimize quality and Optimize speed.
- Optimize speed optimizes the fluidity of the remote session, allowing for a more responsive control.
Note: The graphic quality of the remote session may be negatively affected when using Optimize speed.
- Optimize quality optimizes the graphic quality of the remote session, allowing for a more accurate display of the remote device's graphics.
Note: The connection fluidity of the remote session may be negatively affected when using Optimize quality.
- Custom settings you can set your own settings for
- Colors
- Quality
- Fast video streaming
Note: To set the user-defined optimization settings, click Edit custom settings.

Monitors
- Switch between remote device's monitors by clicking the monitor number.
- Monitors as individual windows to view the remote device's separate monitors on separate tabs in the same remote control window.
Hint: For more information on how to view multiple monitors with TeamViewer, please see the following article: Use multi-monitor support
Screen Resolution
Change the current screen resolution of the remote device.
Note: Available resolutions depend on the remote device's current options. TeamViewer cannot provide any resolutions not currently provided by the remote device's hardware/OS.
Hide Wallpaper
Replaces the remote device's wallpaper with a blank black overlay.
Show remote cursor
The mouse cursor of the remote computer will also be visible to the controller during the connection.
Refresh screen
Sends a request to update the graphics display of the remote device. It can help if the screen appears frozen in the connection or many tasks are running on the remote machine.
Select screen content
- Select single window: Instead of viewing the entire display of the remote device, view a single screen or app. When selected, a crosshair appears to select the desired window to focus on.
- Select whole desktop: View the entire display of the remote device instead of focusing on a single window or app.
Show sessions in tabs
When connected to multiple devices, each connection appears as a separate tab in the same TeamViewer window.
The Communicate menu provides different methods of communication with the connection partner in a remote control session.

Chat
Opens a chat window between devices within the connection, allowing for quick communication.
Audio and video call
Activates a video call.
Note: During remote sessions, free users can no longer use VoIP, video, and chat.
Open whiteboard
Enables the whiteboard function.
Hint: For more information on how to use the Whiteboard, please see the following article: Use Whiteboard in Remote Control.
Invite more participants
Choose the contact you want to invite into your session. This contact will receive a notification, which must be confirmed within 20 seconds.
Show participants
Displays the contacts currently participating in the session.
Switch sides with partner
Reverses the roles of the connection - the remote user can now view and control the local user's computer.
Note: The feature Switch sides with partner requires a license.
Play remote computer sound
Allows the audio output of the remote device to route through the audio output of the controller's device.
The Files & Extras menu provides access to additional services from within each remote control session.

File transfer
Opens the file transfer window. The File Transfer window lets you transmit files to and from your partner’s computer.
Note: During file transfer sessions, free users can transfer only one file at a time.
File box
Opens a dialog that lets you share files with your partner during the remote control session.
Tia (TeamViewer Intelligent Agent)
Opens a chat interface where you can describe the issue in natural language, and Tia will analyze the remote device’s real-time system data to provide intelligent troubleshooting suggestions and solutions
Learn more about Tia here.
Dashboard
The Dashboard pulls up the General Information tab of the Extended Remote Device Dashboard.
This provides useful information about the remote device:
- The total number of processes running on the remote device
- The Performance of the device
- Disk health information
- Security information
- Session information
- Device information
- System environment
Activate TeamViewer Printing
Enables remote printing.
Hint: The print driver must be installed to use remote printing with TeamViewer. For more information about remote printing, please see the following article: Remote printing with TeamViewer.
Note: The feature TeamViewer printing requires a license.
Start recording
- Start
- Pause
- Stop and save recording
Note: If the Record partner's video and VoIP is checked (Settings ➜ Device's settings ➜ Remote Control ➜ Session settings ➜ Outgoing connections), a prompt will appear asking the remote device to allow their camera and microphone to be recorded. If no confirmation is given, the recording will still begin, but not contain the remote device's video or VoIP.
Hint: For more information on recording a TeamViewer session and converting the recording, please see the following article: Record TeamViewer session or meeting.
Comment
The Comment button lets you note connections. This button produces a pop-up window where details regarding the connection can be entered.
Comments entered here can be retrieved in the Management Console under Connection Reports. Comments for each session will appear under the Notes column.
Hint: For more information about incoming and outgoing connections reports, please see the following article: Connection Reports.

The remote session toolbar includes a set of toolbar buttons that provide quick access to commonly used features during a remote control session. All toolbar buttons are shortcuts to features that are already explained in the dropdown sections above.
a. Send Ctrl + Alt + Del: Sends Control/Alt/Delete command to the remote machine, allowing access to Task Manager and other services.
b. File transfer: Opens the file transfer window. The File Transfer window lets you transmit files to and from your partner’s computer.
c. Remote Reboot: Reboots the remote computer immediately.
d. Switch monitors: Switch between remote device's monitors by clicking the monitor number.
e. Start/Stop summary: Starts or stops a session summary that captures key information for the remote session using Session Insights. The summary helps document what happened during the session.
f. File box: Opens a dialog that lets you share files with your partner during the remote control session.
g. Chat: Opens a chat window between devices within the connection, allowing for quick communication.
h. Tia (TeamViewer Intelligent Agent): Opens a chat interface where you can describe the issue in natural language, and Tia will analyze the remote device’s real-time system data to provide intelligent troubleshooting suggestions and solutions
i. Audio and video: Activates a video call.
j. Whiteboard: Enables the whiteboard function.
k. Enter / exit full screen: Switches the remote session between windowed mode and full‑screen mode.
l. Collapse / expand toolbar: Hides or shows the remote session toolbar to free up screen space.
Note: Toolbar buttons vary by session context. Some buttons appear only when a feature is available or active, and disabled features are not shown.

With this button, you can close the remote session. If a lock symbol is visible, it means that the session of the remote device will be locked after closing the TeamViewer session.
Note: This function can be changed in the TeamViewer settings of your local computer under Settings ➜ Device's settings ➜ Remote Control ➜ Session settings ➜ Outgoing connections. You can choose between Always, Never, and Automatic.
- Always: At the end of every TeamViewer session, the remote device will be locked, regardless of the device's status before the session
- Never: At the end of every TeamViewer session, the remote device will remain unlocked and visible, regardless of the device's status before the session
- Automatic: If the remote device was locked before the session, the device will again lock at the end of the session. If the device was unlocked before the session, it would remain unlocked
Note: It is always recommended to end a session using the X in the remote control toolbar. It is not recommended to end sessions closing the X provided by the operating system.
Hint: If you don't want to close the session according to the predefined Advanced settings for connections to other computers you can choose the appropriate action in the dropdown menu.
How to customize the remote session toolbar
The remote session toolbar can be customized per supporter device. Users can choose which quick actions are displayed in the in-session toolbar and define their order.
To customize your remote session toolbar, please follow the instructions below:
-
Start a remote session on your Mac.
-
Right‑click the remote session toolbar.
-
Click Customize Toolbar…
-
Drag the desired actions into the toolbar and arrange them as needed.
Note: You can remove items by dragging them out of the toolbar. -
Click Done to apply your changes.
You have successfully customized your remote session toolbar.
If available space is limited, the toolbar items are automatically moved to the macOS overflow menu (chevron icon) on the right.
Note: This feature is currently available on macOS only.