The mentioned video features are accessible to the Web and Device Users when they are on a call. The Guest User only has the capability to utilize Annotation Tools. Any screenshots or pictures taken or media uploaded are displayed in the chat and within the files menu.
The AR Marker arrow shown in the image below sticks to real-world objects and is supported only if the Frontline Worker is using Frontline Workplace on iOS or Frontline Workplace on Andorid Smartphone and activates the AR marker. The Web expert can simply point to the live view and a pointer will stick to the real-life object.
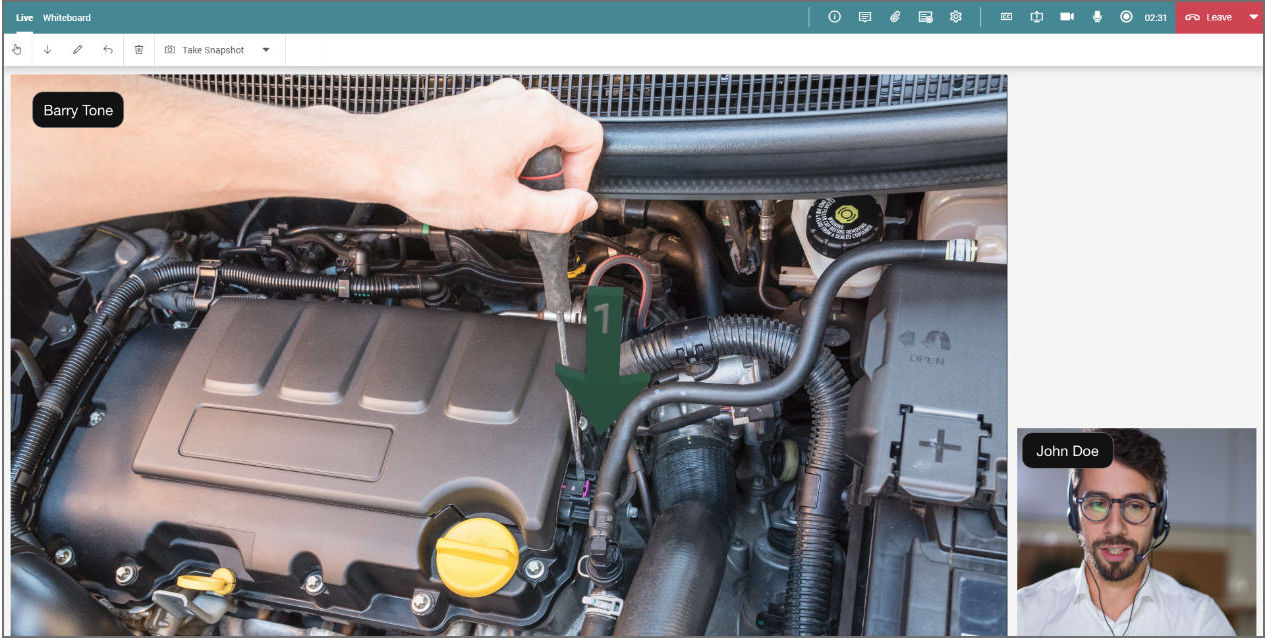
However, if the Frontline Worker is using an Android application the Web Expert can point out the right location using the Pointer or AR Marker feature explained below.
Live Options
The Web Expert has the following features on the live mode of the active call page:


Pointer: Graphical Indicator to show position on the screen

Arrow: Allows placing AR Markers, once the feature is activated by Frontline Workplace for Android Smartphone or iOS user

Drawing: Allows drawing when the AR Marker feature is activated by Frontline Workplace for Android Smartphone or iOS user

Remove last: Removes the last AR Marker or drawing by the Expert

Remove all: Deletes all drawings and arrows

AR Marker: AR-based Marker which sticks to real-life objects (active by default)

Capture: Takes a Snapshot or HD-Picture or Scans a Text (OCR) in the video stream

Capture Options: Possibility to Take Snapshots or Take HD-Picture or Scan Text
Note: The AR Marker can only be used with the rear camera.
Call Options
The options available on the call screen are:

Info: Shows the call details.

Chat Messages: Opens the chat functionality.

Files: Displays all shared files during the call.

Settings: Provides access to the call settings.
Transcription: Enables transcription and creates a written record of the call.

Live Captions: Toggles the live captions (transcription).

Share Screen: Starts screen sharing.

Camera: Toggles the video stream on/off.

Microphone: Toggles the microphone on/off.

Start Recording: Records the current call session including the markers, drawings and files.

Time: Shows the duration of the call.

Leave: Ends the call only for you.
Note: By default, this button’s function is set to “Leave”. Alternatively, you can also click on the arrow icon on the right side of the button, which will open a drop-down menu with the following options:
● Leave: Ends the call only for you.
● End Call: Ends the call for all participants.
The Web Expert can hover on top of the remote video stream and access the following features:


Microphone: Toggles the microphone on/off

Flashlight: Toggles the flashlight on/off

Brightness: Defines the brightness of the video stream

Warning Signal: Sends a warning signal to the user and notifies the user with an alarm sound and the verbal warning message: Attention, warning message has been received.

More: Displays the Zoom, Brightness, Swap Screen, or Presentation Mode

Zoom: Defines the zoom percentage of the video stream

Swap: Switches between the Frontline Worker's and Expert's video streams

Fullscreen: Opens the video stream in the full-screen mode
Note: The Zoom function is not available while using AR Marker.
Debug Mode
If you wish to inform your Administrator regarding issues you may be encountering while being on an Assist call, the following debug information can be helpful.
To open debug mode as a Web Expert, simply press Ctrl + Alt + D, and it gives you detailed information on Local and Remote connection quality.
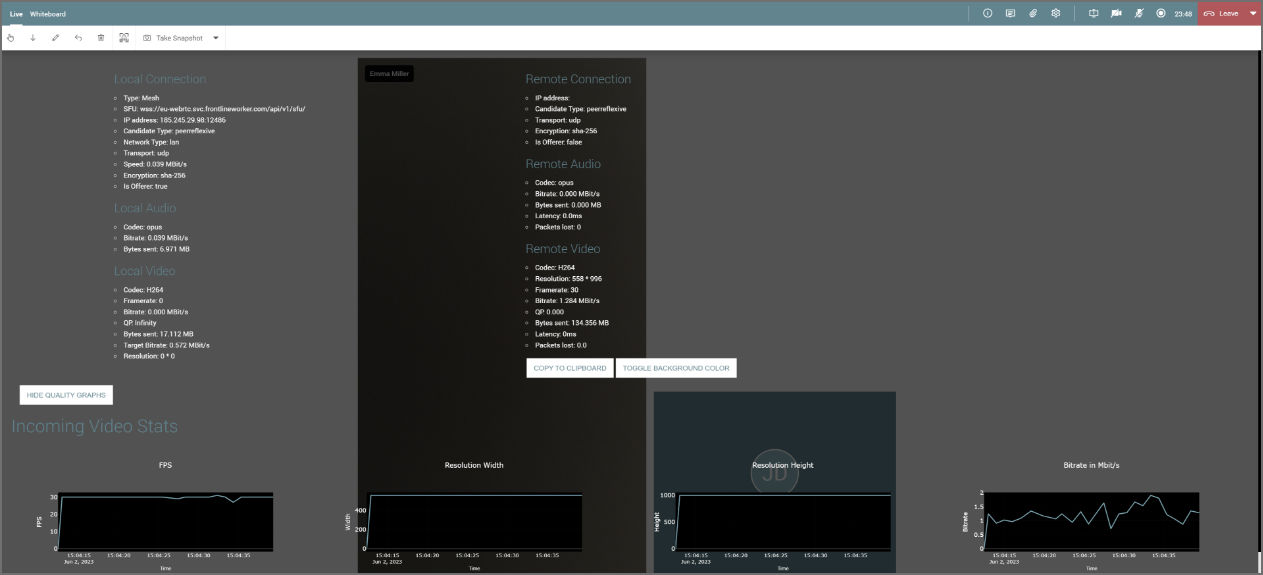
Also, Show Quality Graphs allow viewing details on Incoming and Outgoing Video Stats on charts.
Recommended video links for this guide: