Endpoint Detection and Response (EDR) est une solution intégrée de sécurité des terminaux qui utilise des données télémétriques pour détecter, analyser et corriger les cybermenaces. Optimisé par Malwarebytes ThreatDown, EDR bloque les attaques contre les postes de travail et les serveurs grâce à une sécurité qui détecte ce que les autres solutions ne voient pas.
Cet article s'applique à tous les clients Endpoint Detection and Response.
Qu'est-ce que Endpoint Detection and Response ?
Endpoint Detection and Response (EDR) englobe les outils de cybersécurité conçus pour surveiller en permanence et traiter en temps réel les menaces visant les terminaux. Ces terminaux comprennent tous les appareils connectés au réseau, tels que les ordinateurs, les serveurs, les appareils mobiles et les gadgets IoT. Les solutions EDR sont essentielles pour détecter, analyser et neutraliser les activités malveillantes sur ces appareils.
Fonctionnalités principales
EDR utilise plusieurs solutions pour fournir une offre complète pour la sécurité de vos terminaux et serveurs. Cela comprend :
- Surveillance continue : Collecte constante de données à partir des terminaux. Cela inclut l'activité des fichiers, les connexions réseau, l'exécution des processus et les modifications du registre système.
- Analyse : À l'aide de l'IA et de l'apprentissage automatique, l'EDR analyse les données collectées afin d'identifier les anomalies pouvant indiquer une activité malveillante.
- Détection des menaces : Identification des menaces potentielles, y compris les vulnérabilités zero-day.
- Réponse automatisée : L'EDR peut répondre automatiquement aux menaces détectées, notamment en mettant en quarantaine les fichiers et en isolant les appareils infectés.
Quelle est la différence entre les services Endpoint Detection and Response (EDR) et Endpoint Protection (EPP) ?
Les services EDR et EPP diffèrent dans leur approche de la sécurisation des appareils. L'EDR est une solution conçue pour détecter, analyser et répondre aux menaces avancées en temps réel. Elle offre une visibilité complète sur les activités des terminaux, permettant aux équipes de sécurité d'analyser l'ampleur et la nature d'une attaque. En s'appuyant sur l'analyse comportementale et les techniques d'apprentissage automatique, l'EDR peut identifier les menaces connues, les vulnérabilités zero-day, les attaques sans fichier et d'autres menaces avancées. Elle offre également des outils de réponse aux incidents, tels que l'isolation des appareils infectés ou la restauration des modifications malveillantes.
En revanche, la protection des terminaux basée sur les signatures s'appuie sur des signatures de menaces prédéfinies pour détecter et bloquer les activités malveillantes. Elle compare les fichiers ou les processus à une base de données contenant des modèles de logiciels malveillants connus. Bien qu'efficace pour prévenir les menaces connues, cette méthode peut s'avérer insuffisante face à des logiciels malveillants en constante évolution pour lesquels il n'existe aucune signature correspondante. Elle est principalement axée sur la prévention plutôt que sur l'investigation ou la réponse post-attaque.
Comment accéder à Endpoint Protection and Response
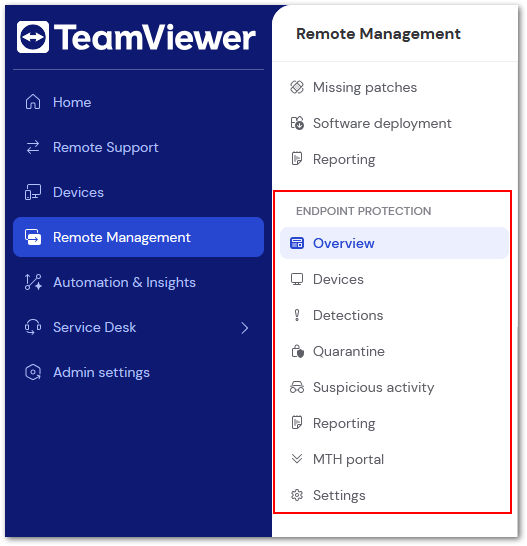
EDR est accessible dans TeamViewer Remote ou via l'application Web dans l'onglet Gestion à distance, sous la section Endpoint Protection.
Comment afficher l'état de protection d'un appareil spécifique
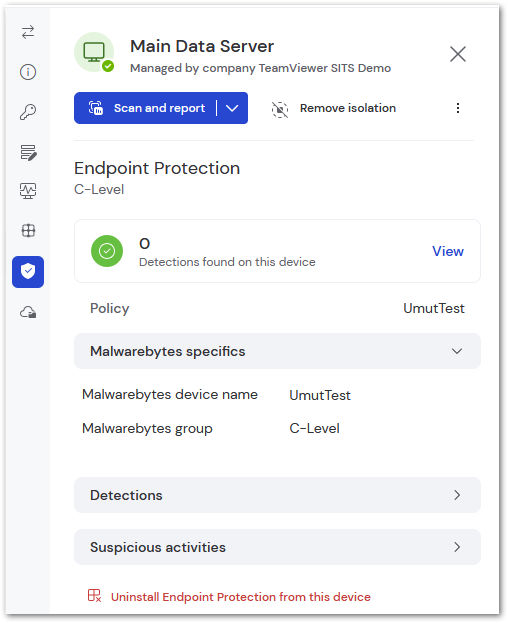
La méthode recommandée pour accéder à l'état d'un appareil spécifique consiste à utiliser le volet des appareils. Pour ce faire, cliquez sur le nom de l'appareil dans l'onglet Appareil de TeamViewer Remote ou dans la liste des appareils.
Le volet s'ouvrira à droite ; sélectionnez l'onglet avec un bouclier et une coche pour accéder aux informations EDR de l'appareil. Le volet des appareils EDR fournit les informations de base sur l'appareil, notamment :
- Stratégie appliquée
- Nom et groupe de l'appareil Malwarebytes
- Détections
- Activité suspecte
L'EDR est divisé en plusieurs sections :
- Appareils
- Détections
- Quarantaine
- Activités suspectes
- Rapports
Veuillez sélectionner l'onglet approprié ci-dessous pour obtenir plus d'informations sur chaque section :
- Appareils
- Détections
- Quarantaine
- Activités suspectes
- Rapports
Appareils
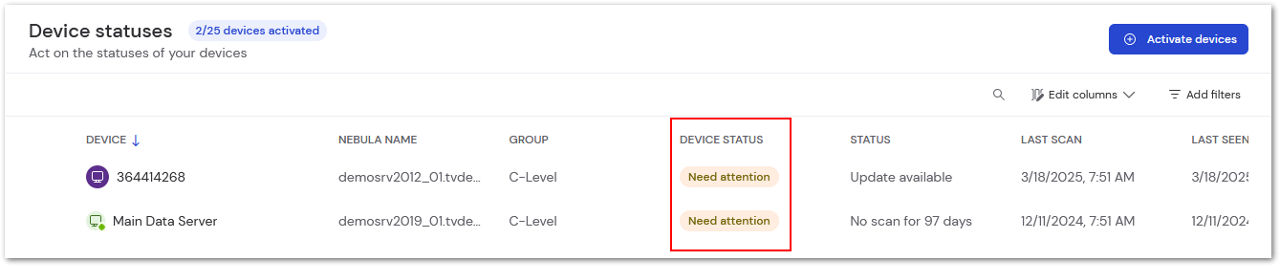
Une liste de tous les appareils est fournie dans l'onglet Appareils, ainsi que les informations suivantes :
- Nom Nebula
- Groupe
- État de l'appareil
- Statut
- Date du dernier scan
- Date de la dernière détection
Tout appareil nécessitant une attention particulière affichera le statut Attention requise.
Détections
L'onglet Détections fournit une vue d'ensemble de toutes les menaces détectées sur vos terminaux. Tous les fichiers figurant dans l'onglet Détections ont été identifiés, analysés et traités en temps réel, ce qui minimise les dommages potentiels.
En cas de faux positif, vous pouvez créer automatiquement une exclusion en sélectionnant la menace et en cliquant sur + Créer une exclusion.
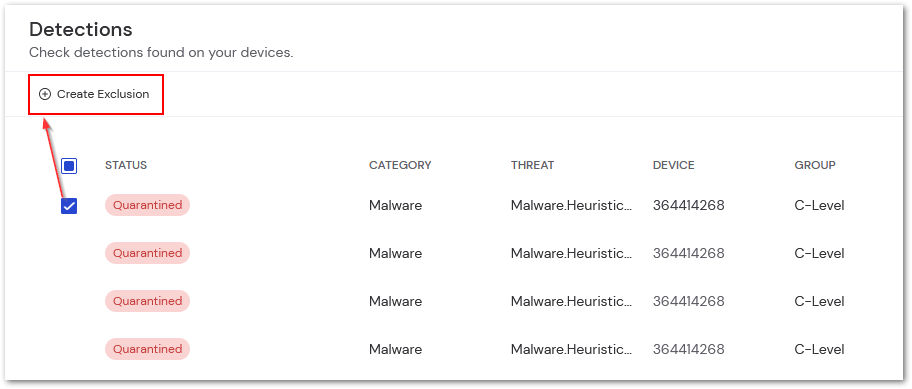
Les informations suivantes sont fournies pour chaque menace :
- Statut
- Catégorie
- Menace
- Appareil et groupe d'appareils
- Date d'analyse
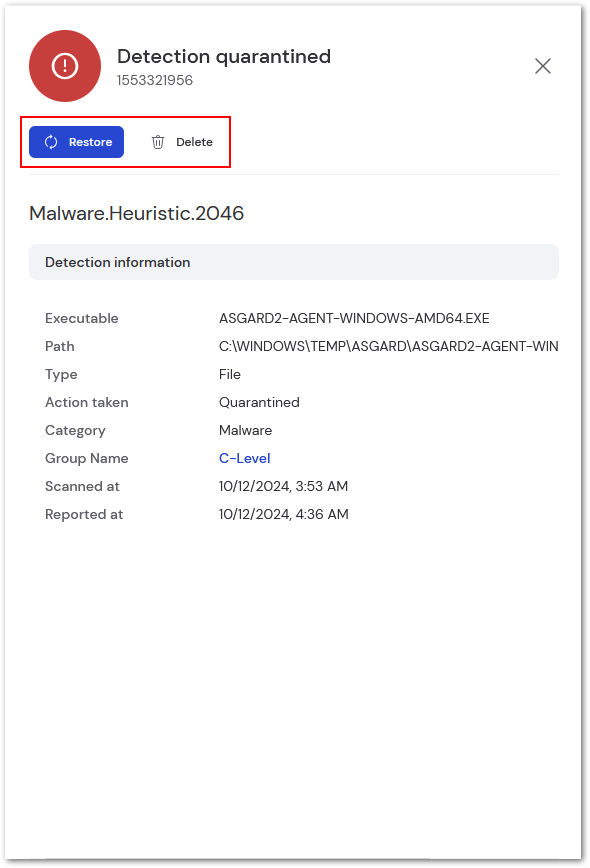
En cliquant sur le statut de la menace, vous affichez le tiroir des menaces, qui fournit plus d'informations sur la détection. Cela comprend :
- Fichier exécutable détecté
- Chemin d'accès
- Type de fichier
- Action effectuée
- Catégorie de menace
- Groupe d'appareils
- Analysé à / Signalé à horodatage
Les fichiers qui ont été mis en quarantaine peuvent également être restaurés ou supprimés via le volet des menaces.
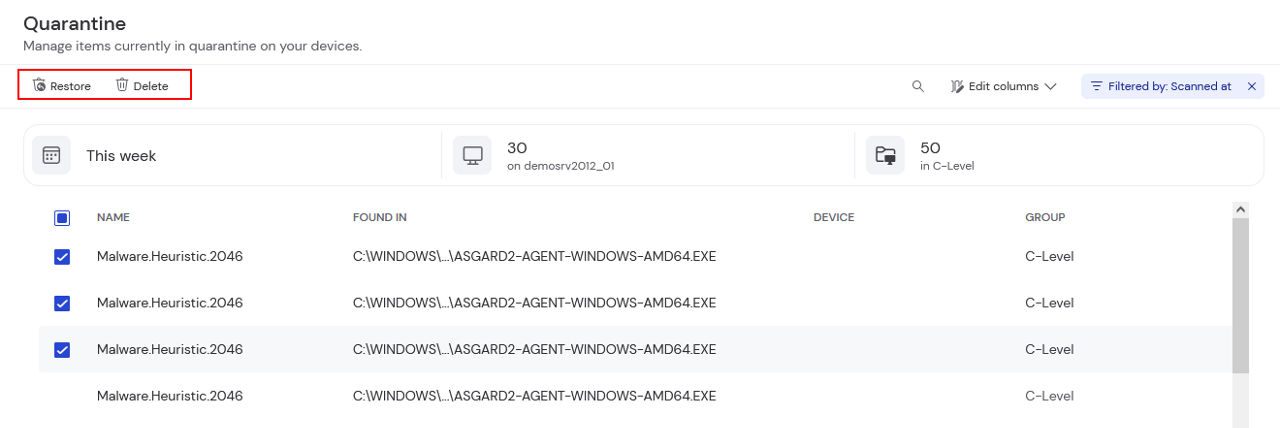
Quarantaine
Les fichiers mis en quarantaine sont des détections qui correspondent à une certaine signature ou à d'autres détails de menace potentielle, mais qui peuvent être des faux positifs. Si une menace potentielle est mise en quarantaine, cet onglet vous permettra de restaurer ou de supprimer le fichier.
Activités suspectes
La fonctionnalité Activités suspectes surveille les comportements potentiellement malveillants en contrôlant les processus, le registre, le système de fichiers et l'activité réseau sur le terminal. La surveillance des activités suspectes utilise des modèles d'apprentissage automatique et des analyses basées sur le cloud pour détecter les activités douteuses.
Veuillez noter que toutes les activités détectées ne sont pas nécessairement malveillantes ; certaines opérations système inoffensives peuvent également déclencher des détections.
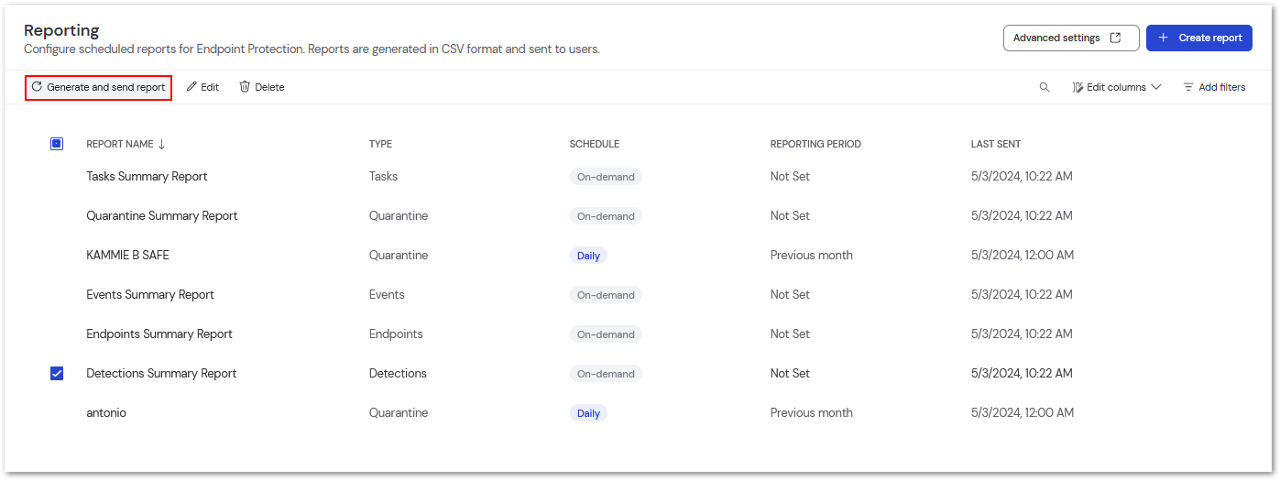
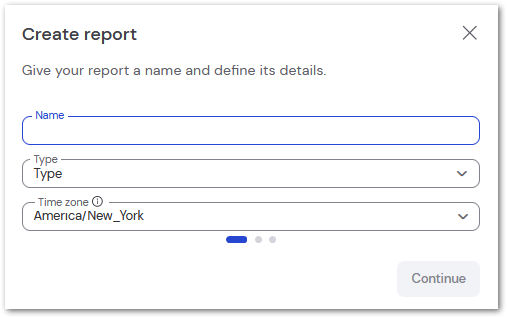
Comment exporter des rapports
Endpoint Detection and Response fournit une multitude de rapports qui vous fournissent les informations dont vous avez besoin quand vous en avez besoin. Pour créer un rapport, accédez à l'onglet Rapports d'Endpoint Protection et sélectionnez + Créer un rapport dans le coin supérieur gauche.

Donnez un nom au rapport et sélectionnez le type de rapport souhaité. Ensuite, entrez le fuseau horaire souhaité puis cliquez sur Continuer.
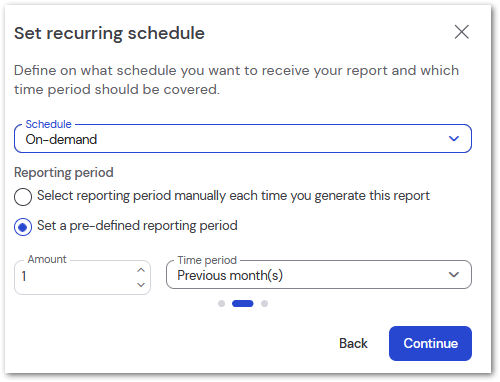
Si vous souhaitez que le rapport soit créé automatiquement, entrez la fréquence souhaitée (mensuelle, quotidienne ou hebdomadaire). Vous pouvez également le configurer pour qu'il ne s'exécute qu'à la demande, lorsque vous en avez besoin.
Définissez la période souhaitée pour le rapport, c'est-à-dire les dates à inclure dans le rapport. Vous pouvez définir une période prédéfinie pour chaque rapport ou entrer manuellement les périodes à chaque fois que vous exécutez le rapport demandé.
Dans la dernière étape, ajoutez les destinataires qui recevront le rapport. Cliquez sur Créer pour finaliser et exécuter le rapport initial.
Générer et envoyer un rapport
Qu'il s'agisse d'un rapport à la demande ou programmé, vous pouvez exécuter n'importe quel rapport à la demande en sélectionnant le rapport souhaité puis en cliquant sur ↻ Générer et envoyer le rapport.