Base de Conocimientos
Las opciones de TeamViewer Meeting
Última modificación: 8 mar 2024
Este artículo se aplica a todos los usuarios y clientes de TeamViewer Meeting
TeamViewer Meeting ofrece una serie de configuraciones que te permiten personalizar TeamViewer Meeting según tus preferencias o necesidades personales.
📌Nota: Algunos de los ajustes descritos en este artículo son específicos de Microsoft® Windows. Puede que no estén disponibles en otras plataformas.
Acceder a las opciones de reunión de TeamViewer
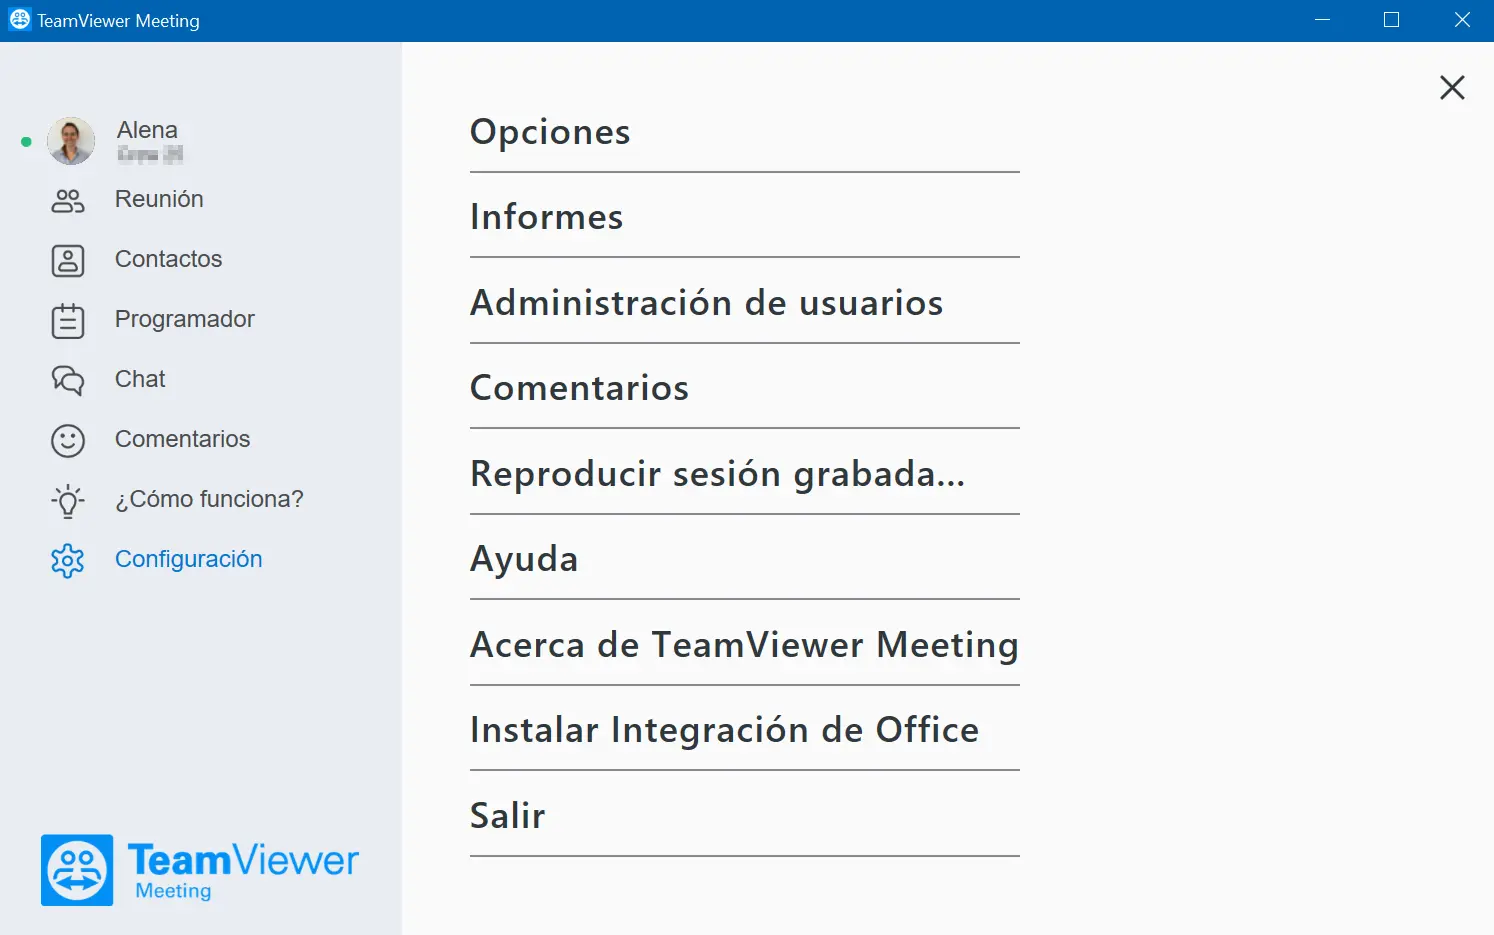
En la barra de navegación, haz clic en Configuración y luego en Opciones.
Perfil
En la pestaña Perfil, puedes cambiar la configuración general de tu cuenta:

Reunión
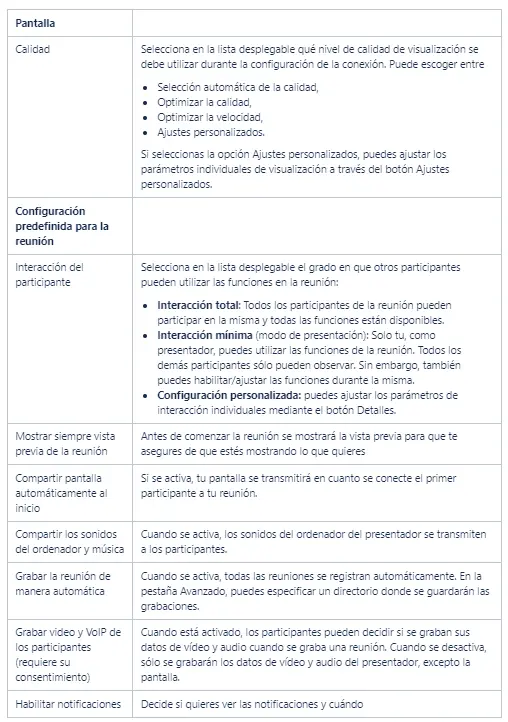
En la pestaña Reunión, puedes cambiar la configuración general de las reuniones desde este ordenador:
📌Nota: ¡Asegúrate de respetar las disposiciones legales sobre el registro de los enlaces de comunicación!
Conferencias de audio
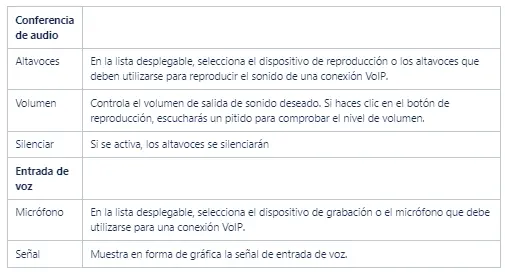
En la pestaña Conferencia de audio, puedes cambiar la configuración de la audioconferencia:
Vídeo
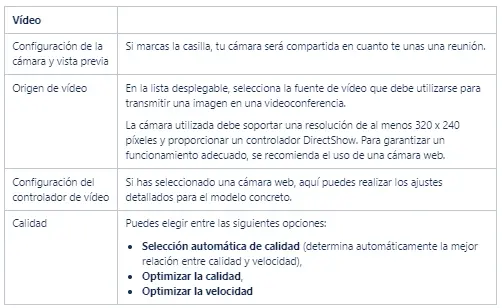
En la pestaña Vídeo, puedes cambiar la configuración de la fuente de vídeo:
Invitaciones personalizadas
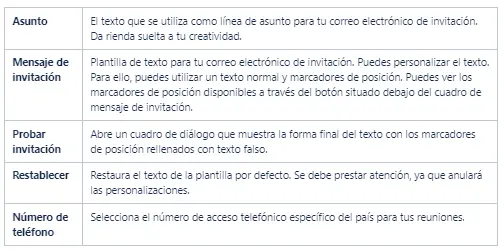
En la pestaña Invitaciones personalizadas, puedes diseñar una plantilla para eviarla en las invitaciones a reuniones:
Integraciones
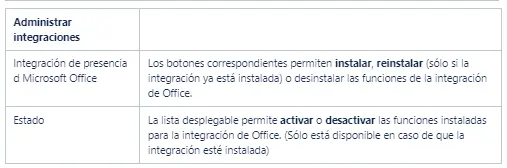
En la pestaña Integraciones, puedes gestionar el uso de la integración de presencia de Microsoft Office:
Administrar contactos
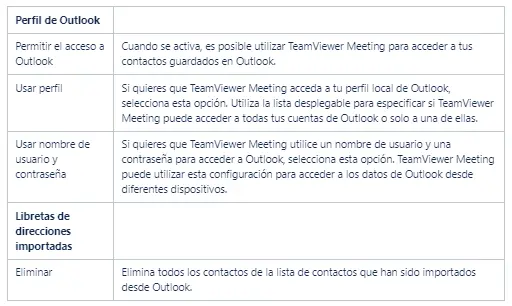
En la pestaña Administrar contactos, puedes cambiar la configuración para acceder a los datos de Outlook y gestionar los contactos importados:
Avanzado
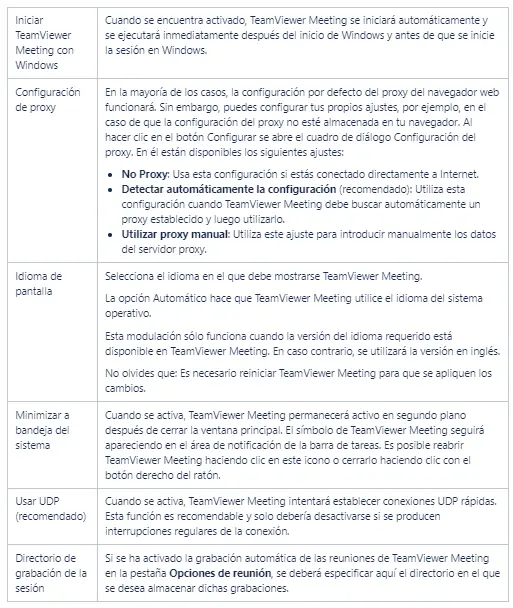
En la pestaña Avanzado, puedes cambiar la configuración adicional de cómo se comporta TeamViewer Meeting.
🚨 Precaución: Los cambios en la configuración avanzada podrían hacer que TeamViewer Meeting deje de funcionar correctamente. Asegúrate de comprender el impacto de un cambio antes de realizarlo.
Están disponibles los siguientes ajustes:
| columns/column | columns/column |
|---|---|
Your Name | Name that allows participants to recognize you during a meeting as long as you are logged in. For example. this name is visible in chats. and in the Team Viewer Meeting panel. |
Your email address | |
New Password | Password for your TeamViewer Meeting account |
Your subscription model | Shows your current subscription linked to your TeamViewer Meeting Account |
Notify me of Incoming messages | If the checkbox is ticked you will be notified with a short message when you receive a chat message. The message appears as a pop-up in the bottom right corner of your screen. |
Only partners on My list… | When activated, your online status is displayed only to those partners whom you have in your contact list. Similarly, these partners are the only ones that can send you a chat message |
Use new user interface | When activated, it uses a new interface. If the option is deactivated, exit TeamViewer Meeting and reopen it so changes take effect |
| Display | |
|---|---|
Quality | Select which display quality level should be used during connection setup from the drop-down list. You can choose between
If you select the Custom Settings option, you can adjust the individual display parameters via the Custom Settings button. |
Default Monitor | You can pre-select which monitor you want to share in a meeting per default. |
Meeting defaults | |
Participant Interaction | Select the extent to which other participants can use the meeting functions from the drop-down list:
|
Auto-Start Screen Sharing | When activated, your screen will be transmitted as soon as the first participant connects with your meeting. |
Share Computer Sounds and Music | When activated, the sounds from the presenter's computer will be transmitted to the participants. |
Auto-Record Meetings | When activated, all meetings are recorded automatically. On the Advanced tab, you can specify a directory where the records will be saved. |
Record Participant's Video and VoIP | When activated, participants can decide whether to record their video and audio data when a meeting is recorded. When deactivated, only your own video and audio data will be recorded except for the screen. |
Enable notification | Decide whether you want to see notifications |
| Voice Playback | |
|---|---|
Speakers | From the drop-down list, select the playback device or speakers that should be used to playback the sound from a VoIP connection. |
Volume | Controls the desired audio output volume. If you click on the Play button, you will hear a beep to check the volume level. |
Mute | When activated, the speakers will be muted. |
Voice Input | |
Microphone | From the drop-down list, select the recording device or microphone that should be used for a VoIP connection. |
Signal | Displays the speech input signal level as a graphic. |
| Camera settings and preview | |
|---|---|
Video Source | From the drop-down list, select the video source that should be used to transmit an image in a video conference. The camera used must support a resolution of at least 320 x 240 pixels and provide a DirectShow driver. To ensure proper functionality, the use of a webcam is recommended. |
Video Driver Settings | If you have selected a webcam, you can make the fine adjustments for the current model here. |
Quality | You can choose between the following options:
|
| columns/column | columns |
|---|---|
Subject | Text that is used as the subject line for your invitation email. Feel free to be creative. |
Invitation Message | Template text for your invitation email. You can customize the text. To do this, you can use normal text and placeholders. The placeholders available are accessible via a button underneath the invitation message box. |
E-Mail placeholder | Opens a list of available placeholders. The selected placeholder is inserted at the cursor position. |
Test invitation | Opens a dialog box that displays the final form of the text with the placeholders filled in with the mock text. |
Reset | Restores the default template text. Be careful as it will override your customizations. |
Phone number | Select the country-specific dial-in number for your meetings. |
| Manage integrations | |
|---|---|
Microsoft Office presence Integration | The corresponding buttons allow you to install, re-install (only if the integration is already installed) or uninstall the functions for Office integration. |
Status | The drop-down list allows you to activate or deactivate the installed functions for Office integration. (Only available in case the integration is installed) |
| Outlook profile | |
|---|---|
Allow Access to Outlook | When activated, you can use TeamViewer Meeting to access contacts that are saved in Outlook. |
Use Profile | If you want TeamViewer Meeting to access your local Outlook profile, select this option. Use the drop-down list to specify whether TeamViewer Meeting is allowed to access all of your Outlook accounts or just one of them. |
Use Username and Password | If you want TeamViewer Meeting to use a username and password to access Outlook, select this option. TeamViewer Meeting can use this setting to access Outlook data from different devices. |
Imported address book | |
Delete | Removes all of the contacts from the contact list that have been imported from Outlook. |
| columns/column | column |
|---|---|
Start TeamViewer Meeting with Windows | When activated, TeamViewer Meeting will start automatically and will run immediately after the Windows startup and before you log in to Windows. |
Proxy Settings | In most cases, the default web browser proxy settings will work. You can, however, configure your own settings, for example, in the event that your proxy settings are not stored in your browser. Clicking on the Configure button opens the Proxy Settings dialog box. The following settings are available there:
|
Display Language | Select the language that TeamViewer Meeting should be displayed in. The Automatic option causes TeamViewer Meeting to use the operating system language. This modulation only works when the required language version is available from the TeamViewer Meeting. Otherwise, the English version will be used. Keep in mind: Restarting the TeamViewer Meeting is required for this change to take effect. |
Close to Tray Menu | When activated, TeamViewer Meeting will remain active in the background after the main window is closed. The TeamViewer Meeting Symbol will continue to appear in the notification area of the taskbar. You can reopen TeamViewer Meeting by clicking on this icon or close it by right-clicking on it. |
Use UDP | When activated, TeamViewer Meeting will attempt to build up fast UDP connections. This function is recommended and should only be deactivated if there are regular connection interruptions. |
Session Recording Directory | If you enabled the automatic recording of TeamViewer Meeting meetings on the Meeting options tab, specify the directory where you want to store those recordings here. |
Este artículo se aplica a todos los usuarios y clientes de TeamViewer Meeting
TeamViewer Meeting ofrece una serie de configuraciones que te permiten personalizar TeamViewer Meeting según tus preferencias o necesidades personales.
📌Nota: Algunos de los ajustes descritos en este artículo son específicos de Microsoft® Windows. Puede que no estén disponibles en otras plataformas.
Acceder a las opciones de reunión de TeamViewer
En la barra de navegación, haz clic en Configuración y luego en Opciones.
Perfil
En la pestaña Perfil, puedes cambiar la configuración general de tu cuenta:
Reunión
En la pestaña Reunión, puedes cambiar la configuración general de las reuniones desde este ordenador:
📌Nota: ¡Asegúrate de respetar las disposiciones legales sobre el registro de los enlaces de comunicación!
Conferencias de audio
En la pestaña Conferencia de audio, puedes cambiar la configuración de la audioconferencia:
Vídeo
En la pestaña Vídeo, puedes cambiar la configuración de la fuente de vídeo:
Invitaciones personalizadas
En la pestaña Invitaciones personalizadas, puedes diseñar una plantilla para eviarla en las invitaciones a reuniones:
Integraciones
En la pestaña Integraciones, puedes gestionar el uso de la integración de presencia de Microsoft Office:
Administrar contactos
En la pestaña Administrar contactos, puedes cambiar la configuración para acceder a los datos de Outlook y gestionar los contactos importados:
Avanzado
En la pestaña Avanzado, puedes cambiar la configuración adicional de cómo se comporta TeamViewer Meeting.
🚨 Precaución: Los cambios en la configuración avanzada podrían hacer que TeamViewer Meeting deje de funcionar correctamente. Asegúrate de comprender el impacto de un cambio antes de realizarlo.
Están disponibles los siguientes ajustes:
| columns/column | columns/column |
|---|---|
Your Name | Name that allows participants to recognize you during a meeting as long as you are logged in. For example. this name is visible in chats. and in the Team Viewer Meeting panel. |
Your email address | |
New Password | Password for your TeamViewer Meeting account |
Your subscription model | Shows your current subscription linked to your TeamViewer Meeting Account |
Notify me of Incoming messages | If the checkbox is ticked you will be notified with a short message when you receive a chat message. The message appears as a pop-up in the bottom right corner of your screen. |
Only partners on My list… | When activated, your online status is displayed only to those partners whom you have in your contact list. Similarly, these partners are the only ones that can send you a chat message |
Use new user interface | When activated, it uses a new interface. If the option is deactivated, exit TeamViewer Meeting and reopen it so changes take effect |
| Display | |
|---|---|
Quality | Select which display quality level should be used during connection setup from the drop-down list. You can choose between
If you select the Custom Settings option, you can adjust the individual display parameters via the Custom Settings button. |
Default Monitor | You can pre-select which monitor you want to share in a meeting per default. |
Meeting defaults | |
Participant Interaction | Select the extent to which other participants can use the meeting functions from the drop-down list:
|
Auto-Start Screen Sharing | When activated, your screen will be transmitted as soon as the first participant connects with your meeting. |
Share Computer Sounds and Music | When activated, the sounds from the presenter's computer will be transmitted to the participants. |
Auto-Record Meetings | When activated, all meetings are recorded automatically. On the Advanced tab, you can specify a directory where the records will be saved. |
Record Participant's Video and VoIP | When activated, participants can decide whether to record their video and audio data when a meeting is recorded. When deactivated, only your own video and audio data will be recorded except for the screen. |
Enable notification | Decide whether you want to see notifications |
| Voice Playback | |
|---|---|
Speakers | From the drop-down list, select the playback device or speakers that should be used to playback the sound from a VoIP connection. |
Volume | Controls the desired audio output volume. If you click on the Play button, you will hear a beep to check the volume level. |
Mute | When activated, the speakers will be muted. |
Voice Input | |
Microphone | From the drop-down list, select the recording device or microphone that should be used for a VoIP connection. |
Signal | Displays the speech input signal level as a graphic. |
| Camera settings and preview | |
|---|---|
Video Source | From the drop-down list, select the video source that should be used to transmit an image in a video conference. The camera used must support a resolution of at least 320 x 240 pixels and provide a DirectShow driver. To ensure proper functionality, the use of a webcam is recommended. |
Video Driver Settings | If you have selected a webcam, you can make the fine adjustments for the current model here. |
Quality | You can choose between the following options:
|
| columns/column | columns |
|---|---|
Subject | Text that is used as the subject line for your invitation email. Feel free to be creative. |
Invitation Message | Template text for your invitation email. You can customize the text. To do this, you can use normal text and placeholders. The placeholders available are accessible via a button underneath the invitation message box. |
E-Mail placeholder | Opens a list of available placeholders. The selected placeholder is inserted at the cursor position. |
Test invitation | Opens a dialog box that displays the final form of the text with the placeholders filled in with the mock text. |
Reset | Restores the default template text. Be careful as it will override your customizations. |
Phone number | Select the country-specific dial-in number for your meetings. |
| Manage integrations | |
|---|---|
Microsoft Office presence Integration | The corresponding buttons allow you to install, re-install (only if the integration is already installed) or uninstall the functions for Office integration. |
Status | The drop-down list allows you to activate or deactivate the installed functions for Office integration. (Only available in case the integration is installed) |
| Outlook profile | |
|---|---|
Allow Access to Outlook | When activated, you can use TeamViewer Meeting to access contacts that are saved in Outlook. |
Use Profile | If you want TeamViewer Meeting to access your local Outlook profile, select this option. Use the drop-down list to specify whether TeamViewer Meeting is allowed to access all of your Outlook accounts or just one of them. |
Use Username and Password | If you want TeamViewer Meeting to use a username and password to access Outlook, select this option. TeamViewer Meeting can use this setting to access Outlook data from different devices. |
Imported address book | |
Delete | Removes all of the contacts from the contact list that have been imported from Outlook. |
| columns/column | column |
|---|---|
Start TeamViewer Meeting with Windows | When activated, TeamViewer Meeting will start automatically and will run immediately after the Windows startup and before you log in to Windows. |
Proxy Settings | In most cases, the default web browser proxy settings will work. You can, however, configure your own settings, for example, in the event that your proxy settings are not stored in your browser. Clicking on the Configure button opens the Proxy Settings dialog box. The following settings are available there:
|
Display Language | Select the language that TeamViewer Meeting should be displayed in. The Automatic option causes TeamViewer Meeting to use the operating system language. This modulation only works when the required language version is available from the TeamViewer Meeting. Otherwise, the English version will be used. Keep in mind: Restarting the TeamViewer Meeting is required for this change to take effect. |
Close to Tray Menu | When activated, TeamViewer Meeting will remain active in the background after the main window is closed. The TeamViewer Meeting Symbol will continue to appear in the notification area of the taskbar. You can reopen TeamViewer Meeting by clicking on this icon or close it by right-clicking on it. |
Use UDP | When activated, TeamViewer Meeting will attempt to build up fast UDP connections. This function is recommended and should only be deactivated if there are regular connection interruptions. |
Session Recording Directory | If you enabled the automatic recording of TeamViewer Meeting meetings on the Meeting options tab, specify the directory where you want to store those recordings here. |