Customer Requirements
The extension requires the setup of an OAuth2 client for the FSM Account and appropriate access permissions for each company. This needs to be done to enable the installation of the extension.
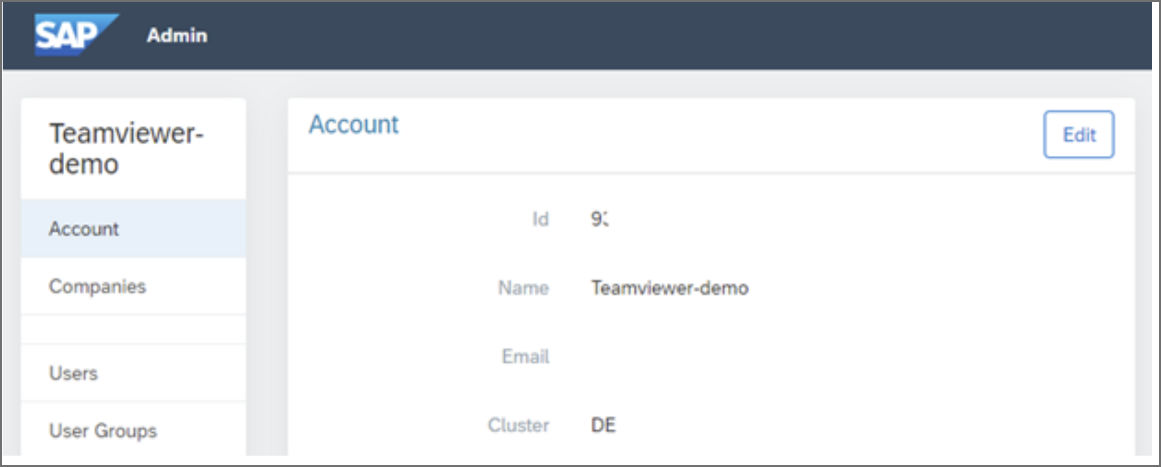
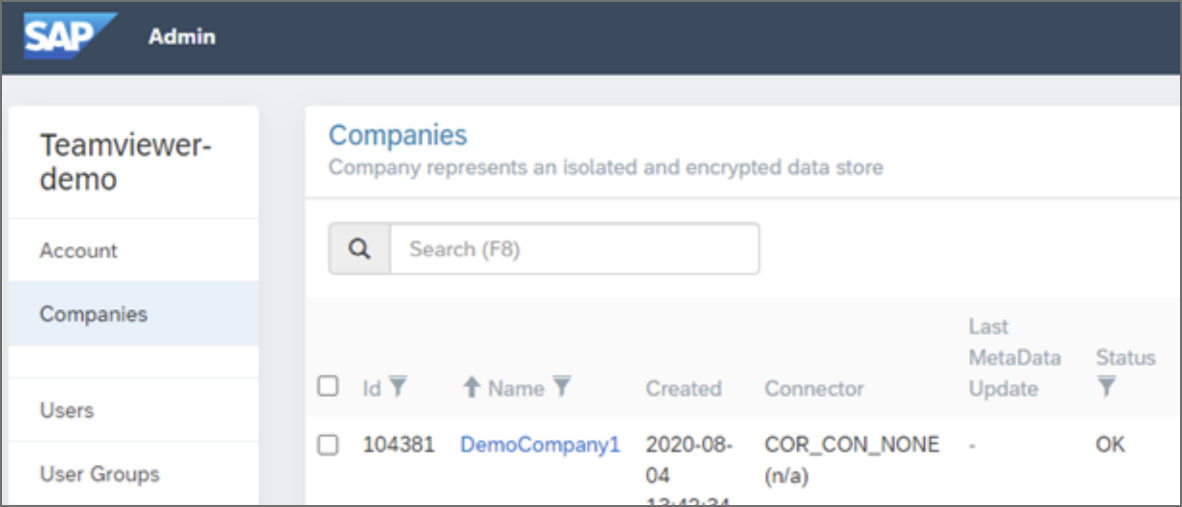
Account Information
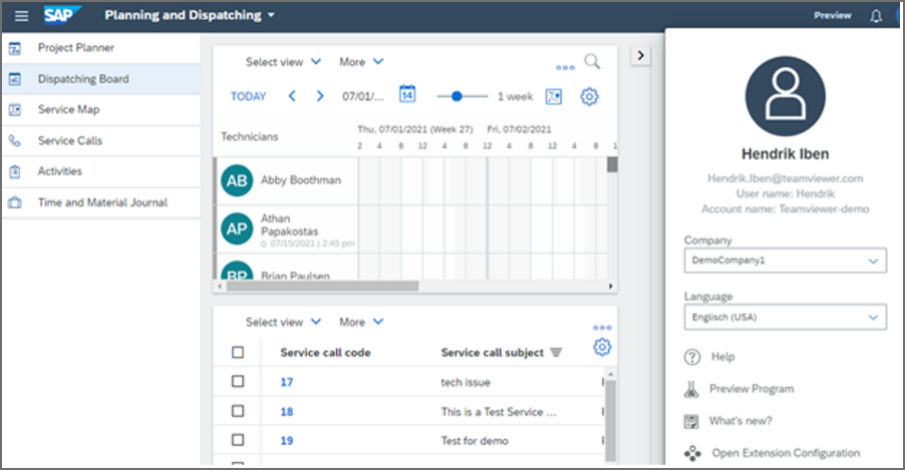
You need to provide the technical names of the account and company in FSM along with the cluster their instance is installed in. This information can be found in the administration panel as shown in the images below:
Company Information
In the above example images, the required information is:
- Account name: Teamviewer-demo
- Company: DemoCompany1,
- Cluster: DE
Note: The extension can support more than one company, please specify all companies that will use it.
User Group
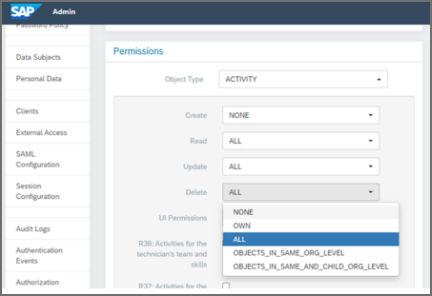
The extension requires only a few permissions to function. It acts as a ‘Dispatcher’ in the sense that it reads ‘ServiceCall’ and ‘Activity’ objects. It then creates an ‘Attachment’ object for the matching ‘ServiceCall’. It will also delete created assets in case of updates.
You can either decide the use of the existing ‘Dispatcher’ role in FSM or you can create a new one to be used by the client. One way to create a suitable group is copying the existing ‘Dispatcher’ group.
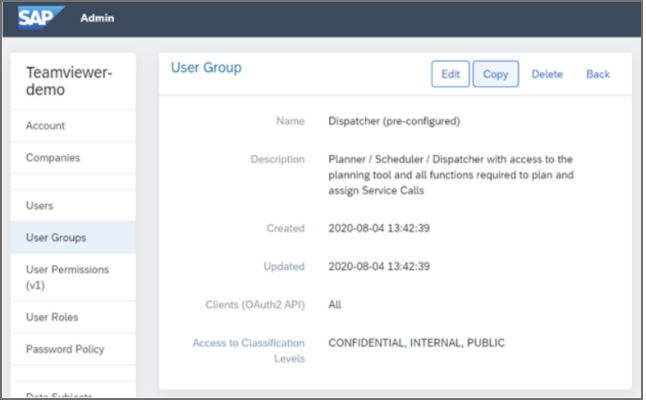
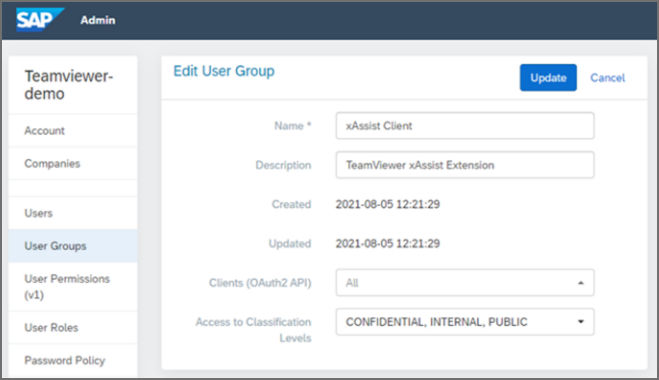
With this copy you can then further restrict the access if required, e.g. you can remove Create and Delete permissions for all objects (except for ‘Attachment’ objects).
Client
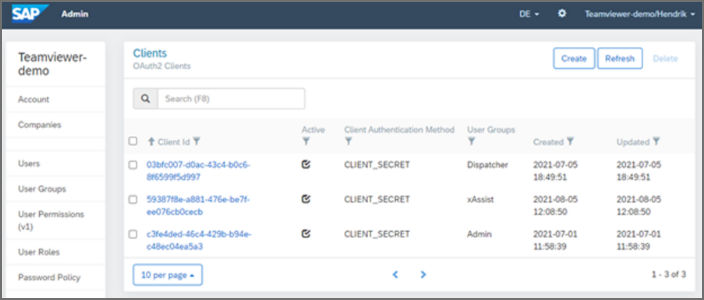
To technically access the FSM, the extension requires an OAuth2 client setup.
In the FSM Clients configuration, you need to create a new client.
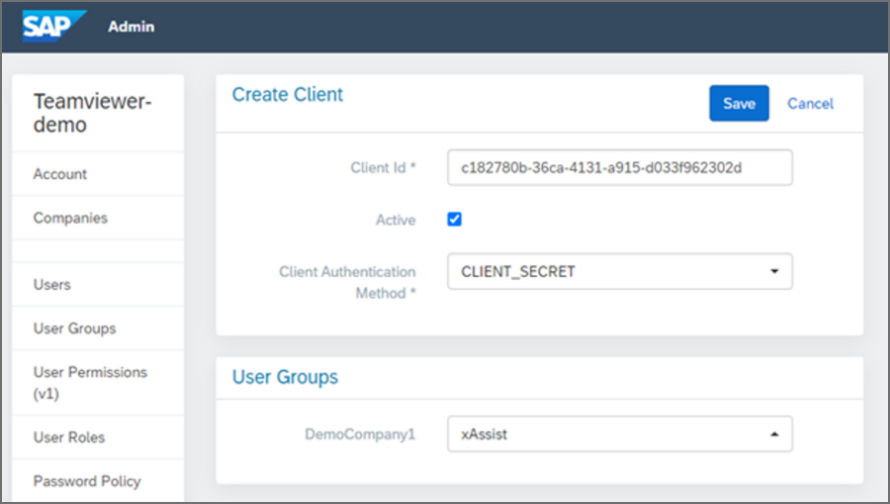
Note: While saving, make sure to note down the generated client secret. This is required by the TeamViewer Solution Delivery Team to provide the extension instance.
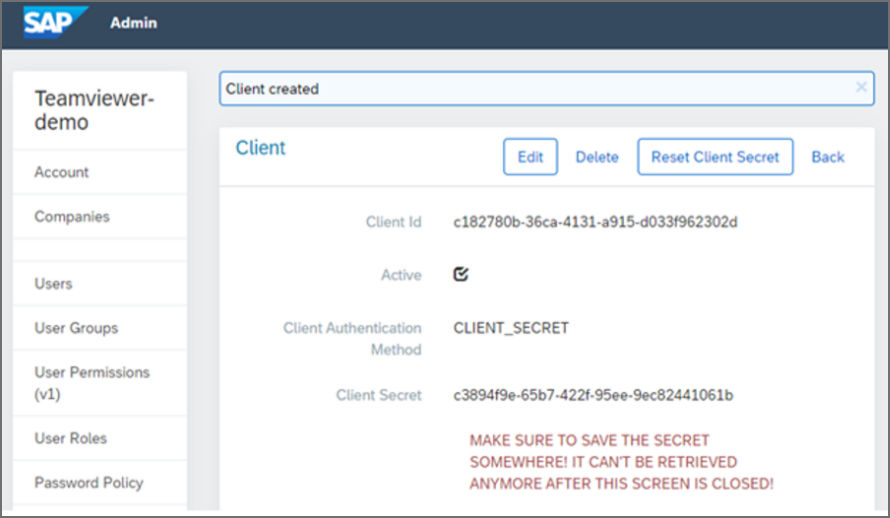
With the access permissions set and the client id and client secret pair TeamViewer can provision the extension for the FSM account. Provide the client id and client secret over a secure communication channel to your TeamViewer contact.
Extension Installation in FSM
Extension link
After the extension instance has been provisioned an Extension Access URL will be provided by TeamViewer that is used to install the extension.
Installation
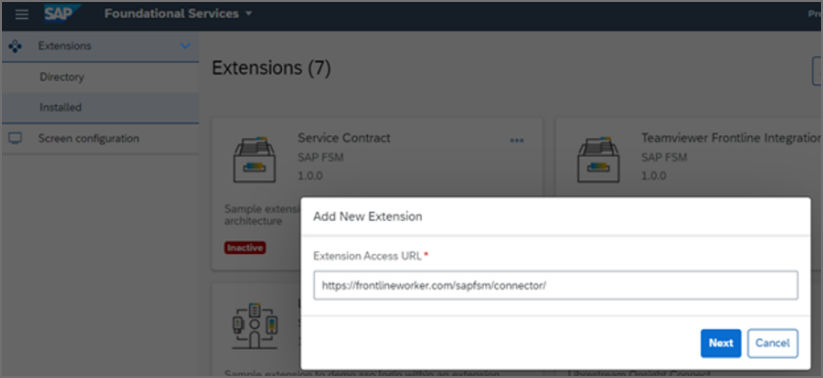
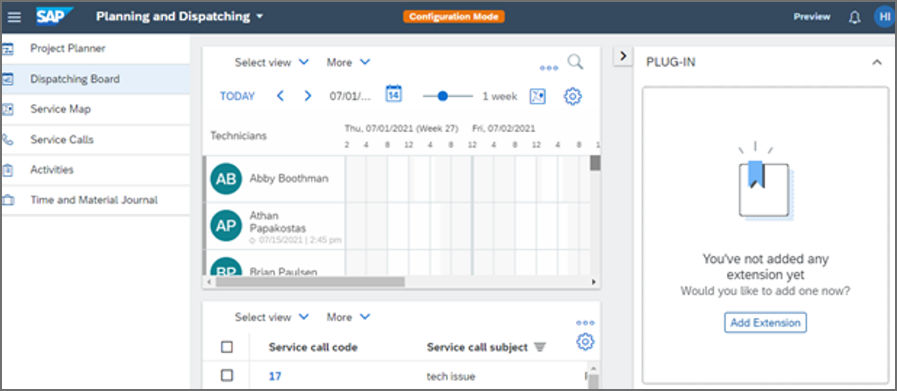
The extension is installed via the Foundational Services configuration in the Installed overview on the left.

⇒There will be an Extension tile in the FSM Directory for the integration, but the installation will only be supported via custom URL provisioning upon request.
1. Select Add Extension prompts you for the URL provided by TeamViewer.
Note: Please type in the URL exactly as provided (it may end with a ‘/’ that is required).
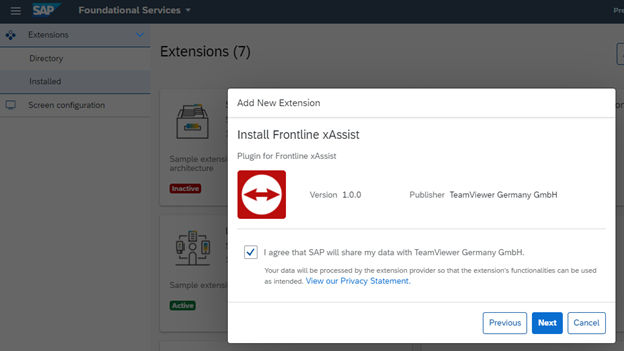
2. Review settings and allow data sharing with the extension.
3. Optional: You can put the extension into your sidebar. You can uncheck this if you would like to manually add the extension later.
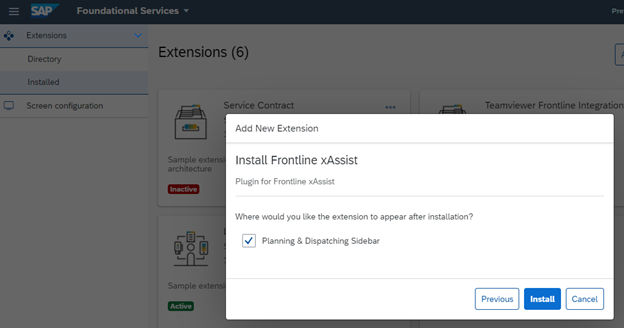
4. Click on Install.
⇒The extension is available.
Sidebar
If you selected to not install the extension into the sidebar at first, you can do so manually.
1. Open the Extension Configuration of your sidebar.
2. Click on Add Extension.
3. Select Frontline xAssist.
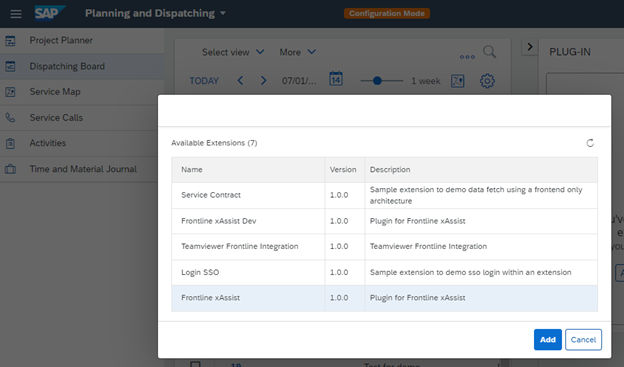
4. Click on Add. Close the Extension Configuration.

The extension is now installed!
Uninstalling/Removing from Sidebar
You can safely uninstall or remove the extension at any time. While your instance is still valid you can later reinstall or reenable the extension with the same Extension Access URL.
Add Users within xAssist Call Management
On the Frontline Command Center, roles and users are created to categorize and manage user aims. Here, we will create a role for FSM Experts and assign this role to the users or teams.
To create a Role in the Frontline Command Center:
1. Sign in by using your Frontline Command Center credentials.
2. Go to Configuration which is on the left Navigation Pane.
3. Select Roles under Permissions.
4. Click on the Create Role button.
5. Enter a name for the role, e.g. FSM Expert.
6. Click on Add at the bottom of the page.
⇒The role is created. For more information on Roles, please see our Roles and Permissions article.
Now we will create Teams with FSM Experts.
To create Teams:
1. Go to Teams under Configuration.
2. Click on the Create Team button.
3. Enter a name to the team.
4. Type the FSM Expert role you have just created in the Roles bar and choose it.
5. Press Enter.
6. Add Users.
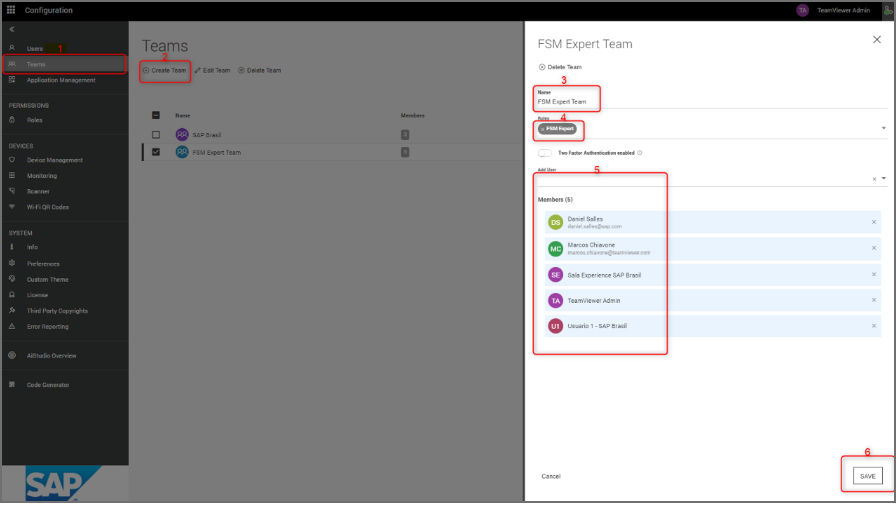
7. Click on Save.
⇒The Team is created. For more information on Teams, please see our User Management – Teams article.
Now, we will assign the FSM Expert team to xAssist Call Management. This will allow these users to be able to have a group call, or call each other.
To manage call groups:
1. Go to xAssist.
2. Select Call Management.
3. Click on the Plus icon under the Top Node.
⇒ Like the Roles and Teams creation, there is a modal opening.
4. Select Teams from the modal bar at the top.
5. Toggle the Include team members to group button. This will allow the FSM Experts to be automatically added as users for this call group.
6. Click on Save.
⇒ This created a branch under the Top Node Call Group. And the FSM Experts call group is added under it. Generally, a new call group is added under the one you have chosen the Plus icon belongs to. For more information on Call Groups, please see our Group Information article.
Support for SAP Field Service Manager Mobile Application
Since version 3.0.0 of the extension, the mobile application can make xAssist calls on its own. This integration is based on the Launch External App feature and is available for Android and iOS.
Since version 3.2.0 of the extension, the setup now requires a shared secret known to Frontline and the FSM service workflow.
Shared Secret Setup (since 3.2.0)
1. Sign in to Frontline Command Center (Administrator role is required).
2. Go to Preferences under Configuration.
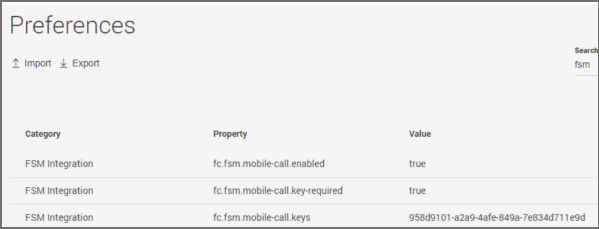
3. Find the FSM preference (type fsm in the top-right Search bar).
4. Enter at least one value (e.g. random UUID) into the fc.fsm.mobile-call.keys field as the shared secret.
5. Optional: Add multiple values by separating them with a comma.
6. Make sure that fc.fsm.mobile-call.key-required is set to true to ensure key checks.
7. Make sure that fc.fsm.mobile-call.enabled is set to true to enable the call feature.
The chosen preferences should look like the following:
Service Workflow Setup
You need to create a step for xAssist that can be run after the work step of a technician. Technically, to make a xAssist call, the technician needs to have an assigned Activity.
Here is a configured example:
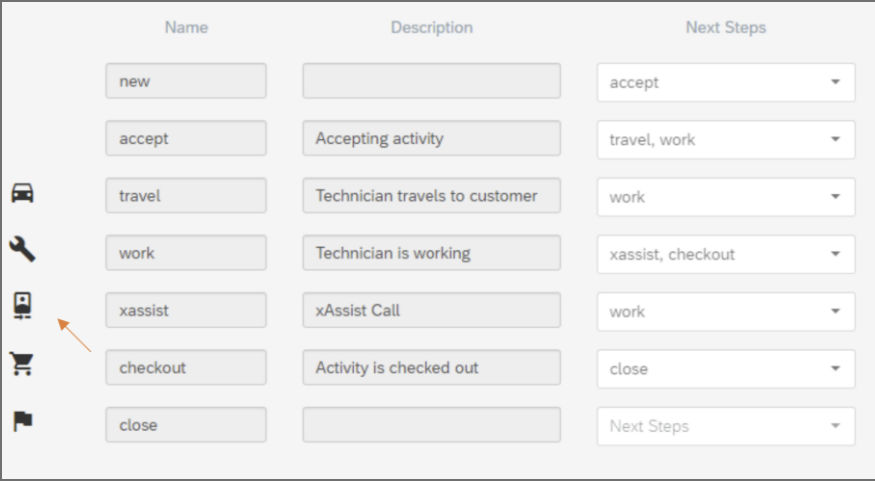
The xAssist step here has been inserted after the work step. The work step can either go to xAssist or checkout as the next step. This allows a workflow where the technician can start a call multiple times while working, and then perform checkout when the work is completed.
The xasxAssist sist step is an External application screen. It should be configured to go back to work step next so that the configuration allows going back after work. Depending on your needs, you can also continue with different steps.
In the given example, the following setup is used:
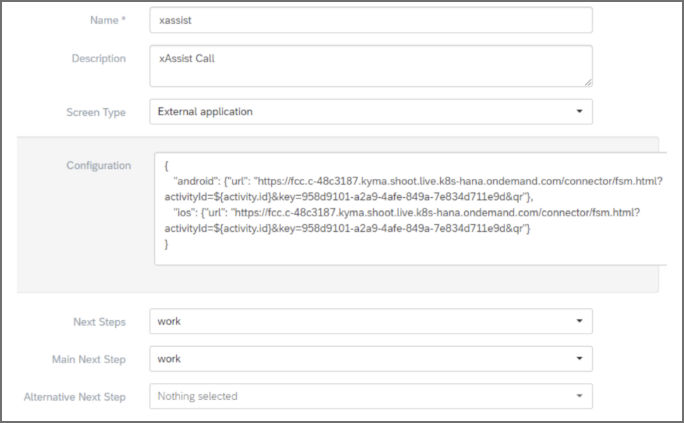
The configurations for Android and iOS have the same URL. This is based on the extension link provided for your extension installation with additional parameters.
If your extension link is https://frontline/connector/ the URL for the external app becomes https:////frontline/connector/fsm.html?activityId=${activity.id}&key=[keydata]&qr’.
The ${activity.id} parameter is provided dynamically by FSM to identify the current Activity.
The key parameter must contain one of the values from the shared secret setup (see above).
The qr parameter will show a QR code on the mobile device that can be scanned by a different device to start a call. The call can still be started on the mobile device itself.
When the technician enters the xAssist step, the mobile device will open a browser that will guide the user to start the xAssist call.
This example uses the standard camera front icon to provide a visual clue for the technician.
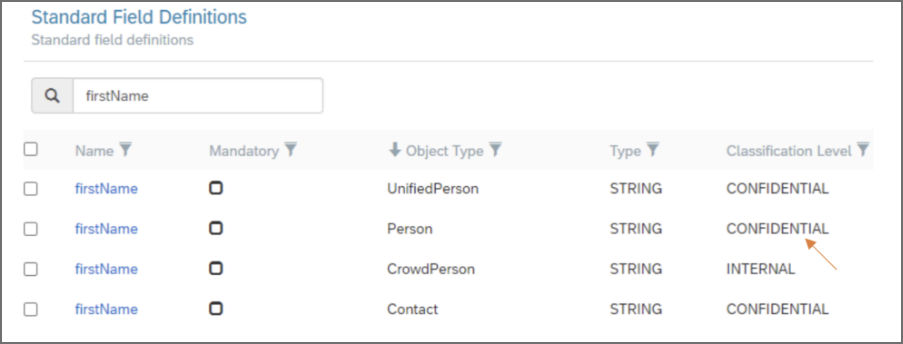
Protected Fields/Username
The extension will use the FSM API to retrieve information on the Activity, ServiceCall and associated Person.
Note: Depending on your security configuration, some fields may not be available.
The extension will try to determine the user’s name by the firstName and lastName fields. If these are not available, it will try to use the userName field. If this field is also unavailable, the emailAddress will be used. As a fallback, FSM User will be used to name the user.
It is possible to check the field accessibility via Company > Custom Objects > Standard Field Definitions and adjust the client access level accordingly if needed.
Here is an example of firstName configuration: