この記事はすべてのTeamViewer Meetingをご利用のユーザーに該当する内容です。

TeamViewer Meetingは、様々な用途やご使用条件に合わせてカスタマイズできる豊富なオプションをご用意しています。この記事ではオプションの内容をすべて説明いたします。

🚨注意: 記事の中でご案内するオプションの一部はMicrosoft® Windowsのみ可能なものもございますのでご注意くださいませ。特定の機能は他のプラットフォームでは利用できません。

TeamViewer Meetingオプションをダイアログボックスへ切り替える方法

ナビゲーションバーの設定をクリックし、オプションを選択します。

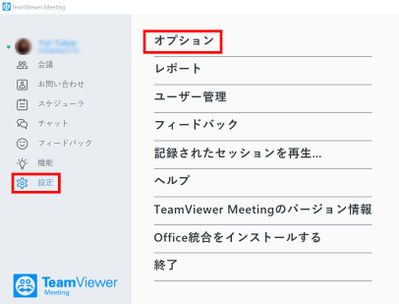
💡ヒント: ログインしている場合は、ユーザープロフィールタブの右上にある鉛筆アイコンをクリックして、オプションに切り替えることもできます。

プロファイル

プロファイルタブでは、一般的なアカウント設定を変更できます。

名前

会議中にログインしている間、参加者があなたを認識できるようにする名前です。たとえば、この名前はチャットで表示されます。

メールアドレス

あなたのメールアドレス

新しいパスワード

TeamViewer Meetingアカウントのパスワード 

サブスクリプションモデル

TeamViewer Meetingアカウントにリンクされている現在のサブスクリプションを表示します。

受信メッセージを通知する

チェックボックスにチェックを入れると、チャットメッセージを受信した際にショートメッセージでお知らせします。メッセージは画面右下にポップアップで表示されます。

リスト内のパートナーのみ...

有効化されると、あなたのオンラインステータスは、連絡先リストに登録されているパートナーにのみ表示されます。同様に、あなたにチャットメッセージを送信できるのは、連絡先リストに登録されている相手のみです。

新しいユーザーインターフェースの使用

有効にすると、新しいインターフェイスが使用されます。オプションが無効になっている場合は、TeamViewer Meeting を終了して再度開くと、変更が有効になります。

会議

会議タブでは、一般的なミーティングの設定を変更できます。

ディスプレイ .

品質

Select which display quality level should be used during connection setup from the drop-down list. You can choose between

  • Automatic quality selection,
  • Optimize quality,
  • Optimize speed,
  • Custom settings.

If you select the Custom Settings option, you can adjust the individual display parameters via the Custom Settings button.

デフォルトモニター

You can pre-select which monitor you want to share in a meeting per default.

Meeting defaults

Participant Interaction

Select the extent to which other participants can use the meeting functions from the drop-down list: 

  • Full Interaction: All meeting participants can take part in the meeting and all of the functions are available. 
  • Minimal Interaction (Presentation Mode): Only you as the presenter have the ability to use the meeting functions. All other participants can only watch. However, you can enable meeting functions for participants during a meeting as well. If you select the
  • Custom Settings option, you can adjust the individual interaction parameters via the Details button.

Auto-Start Screen Sharing

When activated, your screen will be transmitted as soon as the first participant connects with your meeting.

Share Computer Sounds and Music

When activated, the sounds from the presenter's computer will be transmitted to the participants.

Auto-Record Meetings

When activated, all meetings are recorded automatically. On the Advanced tab, you can specify a directory where the records will be saved.

Record Participant's Video and VoIP

When activated, participants can decide whether to record their video and audio data when a meeting is recorded. When deactivated, only your own video and audio data will be recorded except for the screen.

Enable notification

Decide whether you want to see notifications

🚨注意: 通信リンクの記録に関する法律上の規定を必ず守るようにしてください。

音声会議

音声会議タブでは、音声接続の設定を変更できます。
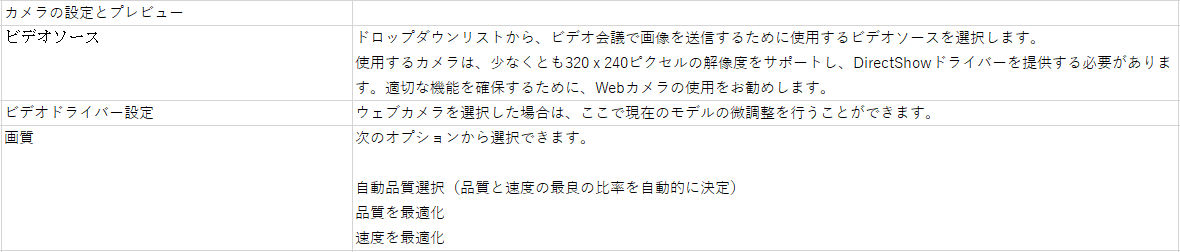
Voice Playback

Speakers

From the drop-down list, select the playback device or speakers that should be used to playback the sound from a VoIP connection.

Volume

Controls the desired audio output volume. If you click on the Play button, you will hear a beep to check the volume level.

Mute

When activated, the speakers will be muted.

Voice Input

Microphone

From the drop-down list, select the recording device or microphone that should be used for a VoIP connection.

Signal

Displays the speech input signal level as a graphic.

動画

動画タブでは、ビデオ接続の設定を変更できます。

Camera settings and preview

Video Source

From the drop-down list, select the video source that should be used to transmit an image in a video conference.

The camera used must support a resolution of at least 320 x 240 pixels and provide a DirectShow driver. To ensure proper functionality, the use of a webcam is recommended.

Video Driver Settings

If you have selected a webcam, you can make the fine adjustments for the current model here.

Quality

You can choose between the following options: 

  • Automatic quality selection (automatically determines the best ratio between quality and speed),
  • Optimize quality,
  • Optimize speed

カスタム招待

カスタム招待タブから、ミーティング招待のためのテンプレートをデザインできます。

Subject

Text that is used as the subject line for your invitation email. Feel free to be creative.

Invitation Message

Template text for your invitation email. You can customize the text. To do this, you can use normal text and placeholders. The placeholders available are accessible via a button underneath the invitation message box.

E-Mail placeholder

Opens a list of available placeholders. The selected placeholder is inserted at the cursor position.

Test invitation

Opens a dialog box that displays the final form of the text with the placeholders filled in with the mock text.

Reset

Restores the default template text. Be careful as it will override your customizations.

Phone number

Select the country-specific dial-in number for your meetings.

統合

統合タブで、Microsoft Officeの統合の使用について管理することができます。

Manage integrations

Microsoft Office presence Integration

The corresponding buttons allow you to installre-install (only if the integration is already installed) or uninstall the functions for Office integration.

Status

The drop-down list allows you to activate or deactivate the installed functions for Office integration. (Only available in case the integration is installed)

 連絡先の管理

連絡先の管理タブでは、Outlookデータにアクセスするための設定を変更することができます。

Outlook profile

Outlook profile

Allow Access to Outlook

When activated, you can use TeamViewer Meeting to access contacts that are saved in Outlook.

Use Profile

If you want TeamViewer Meeting to access your local Outlook profile, select this option. Use the drop-down list to specify whether TeamViewer Meeting is allowed to access all of your Outlook accounts or just one of them.

Use Username and Password

If you want TeamViewer Meeting to use a username and password to access Outlook, select this option. TeamViewer Meeting can use this setting to access Outlook data from different devices.

Imported address book

Delete

Removes all of the contacts from the contact list that have been imported from Outlook.

詳細

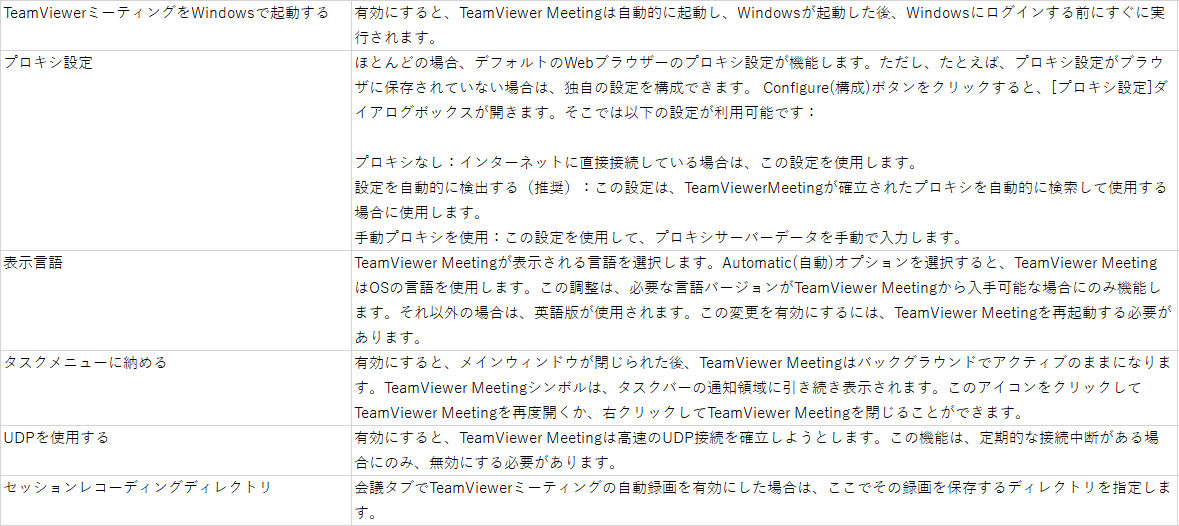
詳細タブで、TeamViewer Meetingの動作の追加設定を変更することができます。

注意: 高度な設定を変更すると、TeamViewer Meetingが正常に動作しなくなる可能性があります。変更してしまう前に、変更した場合の影響について理解するようにしてください。

Start TeamViewer Meeting with Windows

When activated, TeamViewer Meeting will start automatically and will run immediately after the Windows startup and before you log in to Windows.

Proxy Settings

In most cases, the default web browser proxy settings will work. You can, however, configure your own settings, for example, in the event that your proxy settings are not stored in your browser. Clicking on the Configure button opens the Proxy Settings dialog box. The following settings are available there:

  • No Proxy: Use this setting if you are connected directly to the internet. 
  • Automatically Detect Settings (Recommended): Use this setting when TeamViewer Meeting should automatically search for an established proxy and then use it. 
  • Use Manual Proxy: Use this setting to manually enter the proxy server data.

Display Language

Select the language that TeamViewer Meeting should be displayed in.

The Automatic option causes TeamViewer Meeting to use the operating system language.

This modulation only works when the required language version is available from the TeamViewer Meeting. Otherwise, the English version will be used.

Keep in mind: Restarting the TeamViewer Meeting is required for this change to take effect.

Close to Tray Menu

When activated, TeamViewer Meeting will remain active in the background after the main window is closed. The TeamViewer Meeting Symbol will continue to appear in the notification area of the taskbar. You can reopen TeamViewer Meeting by clicking on this icon or close it by right-clicking on it.

Use UDP

When activated, TeamViewer Meeting will attempt to build up fast UDP connections. This function is recommended and should only be deactivated if there are regular connection interruptions.

Session Recording Directory

If you enabled the automatic recording of TeamViewer Meeting meetings on the Meeting options tab, specify the directory where you want to store those recordings here.