Model Context Protocol (MCP) enables AI systems to connect to TeamViewer ONE and interact with your IT environment. It provides a standardized way to access data, trigger actions, and automate workflows using natural language. This allows you to reduce manual steps and work more efficiently across systems.
MCP acts as a shared interface between AI tools and enterprise platforms. Instead of creating multiple integrations, it provides a single, consistent connection layer.
This article applies to all TeamViewer paid license holders with access to TeamViewer WebAPI.
Prerequisites
- Access to an AI system (E.g., Claude or Copilot)
- Access to a TeamViewer account
Available resources
-
Self-hosted version: GitHub repository
Note: For additional details, see the ReadMe section in the GitHub repository.
-
Hosted version (link to live): https://tvone-mcp.azurewebsites.net
-
Available MCP Tools for the hosted version:
-
Model Context Protocol overview
Model Context Protocol (MCP) is an open standard that connects AI models with enterprise tools and APIs.
It enables:
-
Access to real-time data
-
Execution of actions across systems
-
Reusable workflows using structured prompts
MCP provides a consistent interface that allows AI systems to interact with tools without requiring individual integrations.
What the connector can do
After connecting your TeamViewer account, AI systems can help with:
-
Devices: View, add, edit, or remove managed devices and device groups
-
Remote sessions: Start and manage remote control sessions
-
Users and access: View and manage users, roles, and permissions in your TeamViewer company
-
Contacts: View, add, edit, or remove contacts
-
Policies: View and manage TeamViewer, monitoring, and patch management policies
-
Monitoring: View monitoring information for devices
-
Reports and logs: Access connection reports, device reports, and event logs
-
Account and company information: View and update account and company details
-
API tokens: Manage TeamViewer API tokens
The AI systems only perform these actions when you request them. Connecting the app does not allow them to act independently.
How your data is protected
TeamViewer uses OAuth authentication to protect your account information.
-
Your TeamViewer password is never shared with or stored by any of the AI systems
-
You always sign in directly through TeamViewer
-
Claude does not receive your TeamViewer credentials
-
Claude uses a separate authorization token with limited permissions
-
Access tokens are stored securely and only used to complete requested actions
- Use TeamViewer with Claude via MCP
- Use TeamViewer with Copilot via MCP
You can connect your TeamViewer account to Claude using the TeamViewer connector. Once connected, Claude can access TeamViewer information and perform actions on your behalf based on the permissions you grant.
The connection uses TeamViewer authentication, and you can review or revoke access at any time. Claude only performs actions when you explicitly ask it to.
How to connect TeamViewer with Claude
-
Go to Claude and open a new chat.
-
Click Customize.
-
Click Connect your apps.
4. Open Connectors and select Add custom connector.
5. Enter the connector details:
- Connector name
- MCP server URL
https://tvone-mcp.azurewebsites.net/mcp
6. Save the connector.
7. The TeamViewer tools are now available under the custom connector. Select Always allow to enable access to the tools.
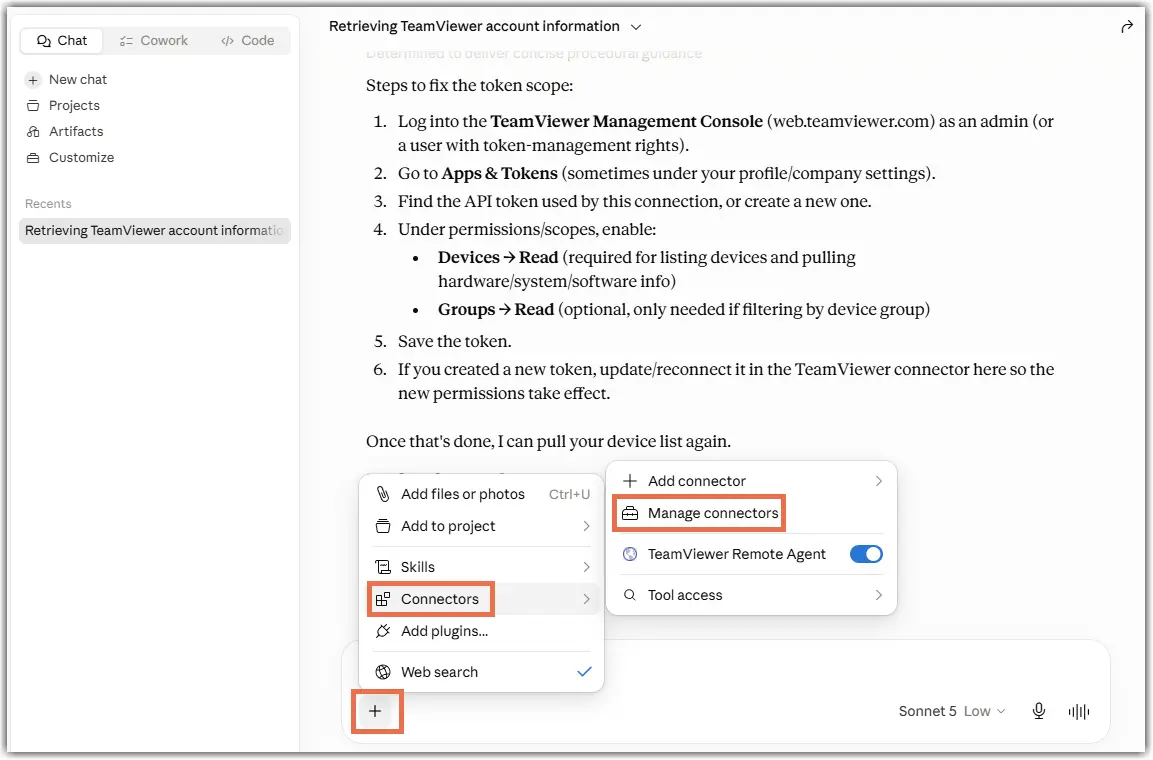
8. Return to the chat window. Click +, then open Connectors. Here you would find the TeamViewer Remote Agent custom connector. You can enable or disable the agent here.
9. In the chat, enter:
Help me get the TeamViewer account info
The request is processed. When prompted, click Connect and authenticate in the new window.
10. Allow the required permissions.
11. The connection is established, and Claude can answer your queries now.
In Claude
-
Open Connectors.
-
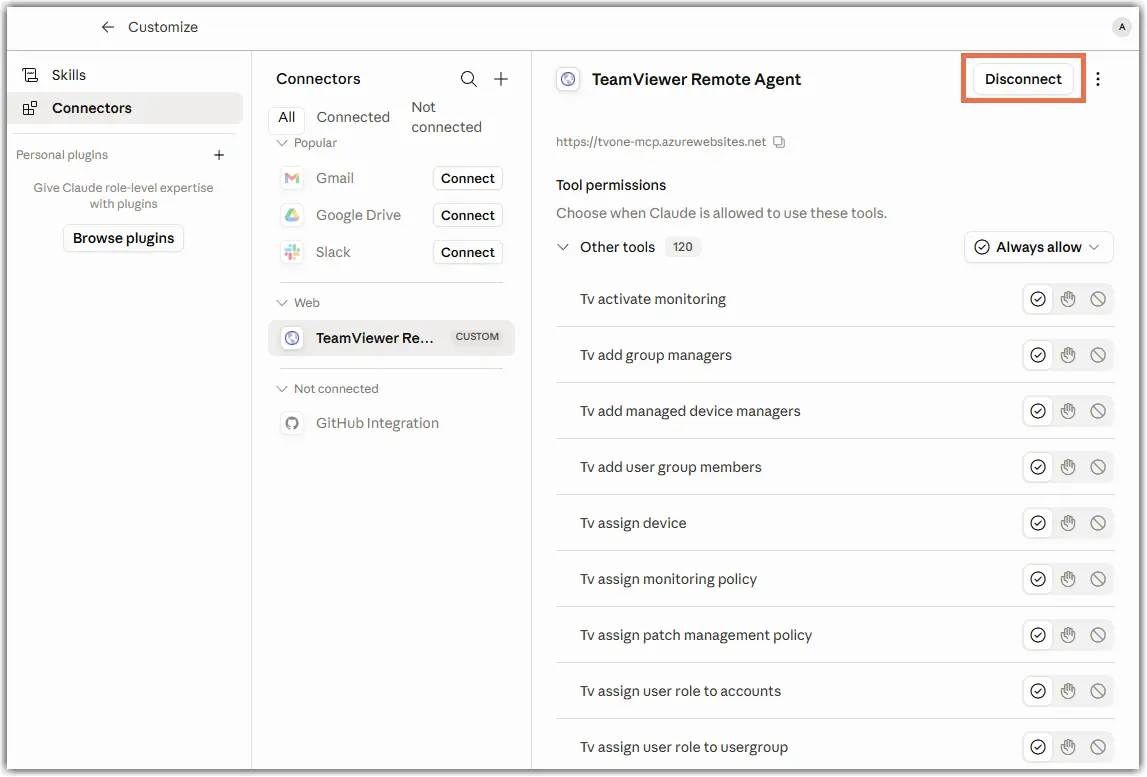
Select Manage connectors.
3. Choose the TeamViewer connector and click Disconnect.
4. Confirm the disconnection in the pop-up window.
In TeamViewer
-
Sign in to TeamViewer Management Console.
-
Go to Account settings.
-
Select Apps.
-
Revoke access for the TeamViewer connector.
-
Go to Customize > Connectors.
-
Under Not connected, select TeamViewer Remote Agent.
-
Click Connect.
4. Log in with your TeamViewer account.
You can connect your TeamViewer account to Microsoft Copilot Studio and allow agents to access TeamViewer data and perform actions on your behalf, based on the permissions you grant.
Copilot Studio performs actions only when triggered by an agent or workflow you configure.
How to connect TeamViewer with Copilot
-
Open Microsoft Copilot Studio and click Tools in the left navigation.
2. Click New tool and select Model Context Protocol.
3. Enter a name in Server name, add a description in Server description, paste your MCP server URL into Server URL, and select OAuth 2.0 under Authentication.
- MCP server URL:
https://tvone-mcp.azurewebsites.net/mcp
4. Provide Client ID, Client Secret, Authorization URL, Token URL Template, and Refresh URL in the popped-up window. Then click Create.
AuthorizationURL: https://tvone-mcp-nodcr.azurewebsites.net/authorize Token URL: https://tvone-mcp-nodcr.azurewebsites.net/token Refresh URL: https://tvone-mcp-nodcr.azurewebsites.net/token
Scope:UserInfo.View Computers.View Computers.Edit Computers.DeleteGroups.View Groups.Create Groups.Edit Groups.DeleteContacts.View Contacts.Create Contacts.Edit Contacts.DeletePartners.View Sessions.ManualCreation
5. Find the newly created tool in the Tools list, click the three-dot menu next to the tool, and select Add to agent.
6. Select the agent you want to use and confirm the selection.
7. In the tool selection window, choose your custom connector and click Connect.
8. Click Create new connection, confirm the connection, and then click Add to attach the tool to your agent.
9. Enter your TeamViewer credentials and allow the required permissions.
10. Open your agent, navigate to the Tools section, and confirm that the MCP tool is listed and enabled.
In Copilot
-
Open Copilot.
-
Go to Connections.
-
Locate the TeamViewer connection.
-
Select the connection and remove it.
In TeamViewer
-
Sign in to TeamViewer Management Console.
-
Go to Account settings.
-
Select Apps.
-
Revoke access for the TeamViewer connector.
Additional information for prompts
After connecting TeamViewer to an AI system through MCP, you can interact with your TeamViewer environment using natural language. The AI systems can help you retrieve information, manage users, update devices, review sessions, and perform administrative tasks.
The following example prompts show some of the actions available through the integration.
Account management
-
Show me the details of my current TeamViewer account
-
Update my TeamViewer account name to "[New Name]" and email to "[[email protected]]"
Company information
-
Show me the details of my TeamViewer company
-
What licenses does our company currently have?
Users
-
Create a new user named "[Jane Doe]" with email "[[email protected]]"
-
Show me the details for user "[user_name]"
-
Update user "[user_name]" and change their name to "[New Name]"
-
Delete the user with ID "[user_id]"
-
List all users in our company
Roles and permissions
-
List all user roles in our company
-
Create a new role called "[Support Agent]" with permissions to view sessions and manage devices
-
Assign the role "[role_id]" to user "[user_id]"
-
Remove the role "[role_id]" from user "[user_id]"
-
What permissions does user "[user_id]" have?
Devices
-
Show me the details for device "[device_id]"
-
Delete device "[device_id]"
-
List all devices I directly manage
-
Update managed device "[device_id]" and rename it to "[New Name]" and assign policy "[policy_id]"
-
Which managed groups does device "[device_id]" belong to?
Sessions
-
Show me the details of session "[session_id]"
-
List all sessions from the last 7 days
-
List the connection reports for the last 5 connections
-
Get session insights for connections with microphone issues
-
Show me the last connection made to device ID "[device_id]"
Connection reports
-
List connection reports for device "[device_id]"
-
Give me the AI-generated summary of connection "[connection_id]"
-
Get the chat transcript for connection "[connection_id]"
-
List all screenshots available for connection "[connection_id]"
Device groups
-
Create a new device group called "[Sales Devices]"
-
List all device groups
-
Share device group "[group_id]" with user "[user_id]"
-
Delete device group "[group_id]"